Resetting Your Password

Current Password Policy –

  • Passwords must be at least 12 characters long ✅

  • Passwords must contain at least one uppercase alpha character (A-Z) ✅

  • Passwords must contain at least one lowercase alpha character (a-z) ✅

  • Passwords must contain at least one number.  ✅

  • Passwords may not contain part of the username, first name, last name ✅

  • Passwords must be changed at least every 180 days ✅

  • Users may not reuse passwords ✅

  • Accounts are locked after 5 failed login attempts ✅


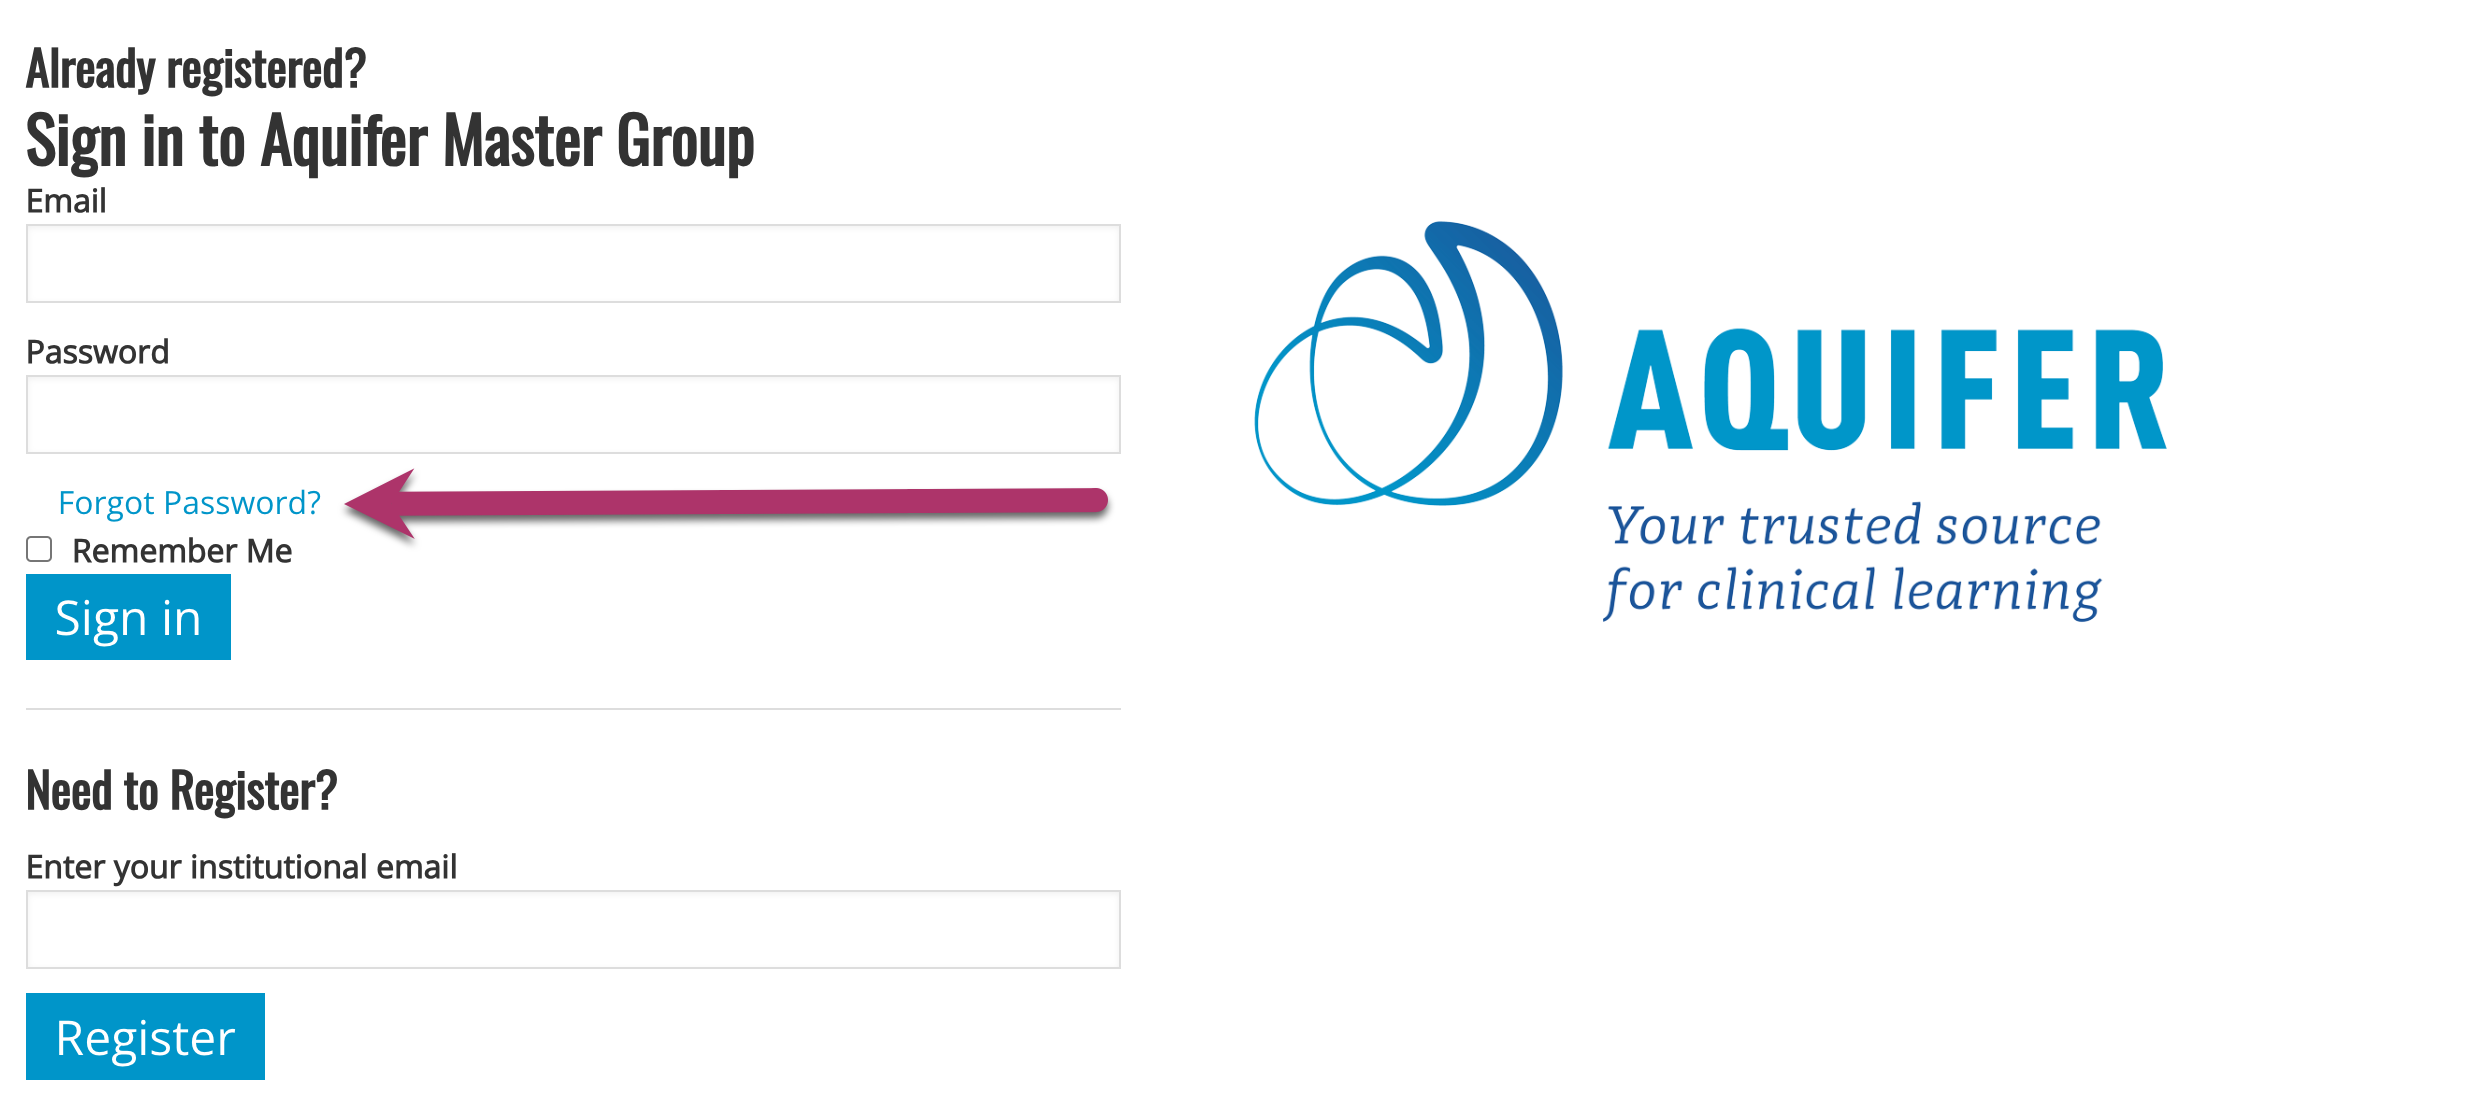
1. If you forget your password, Aquifer can help you regain access to your courses and information right away. From the Sign In page, click the Forgot Password link.


2. You will be brought to a page where you can enter your Account email address. After entering your email address, click “Send me instructions to set my password“.


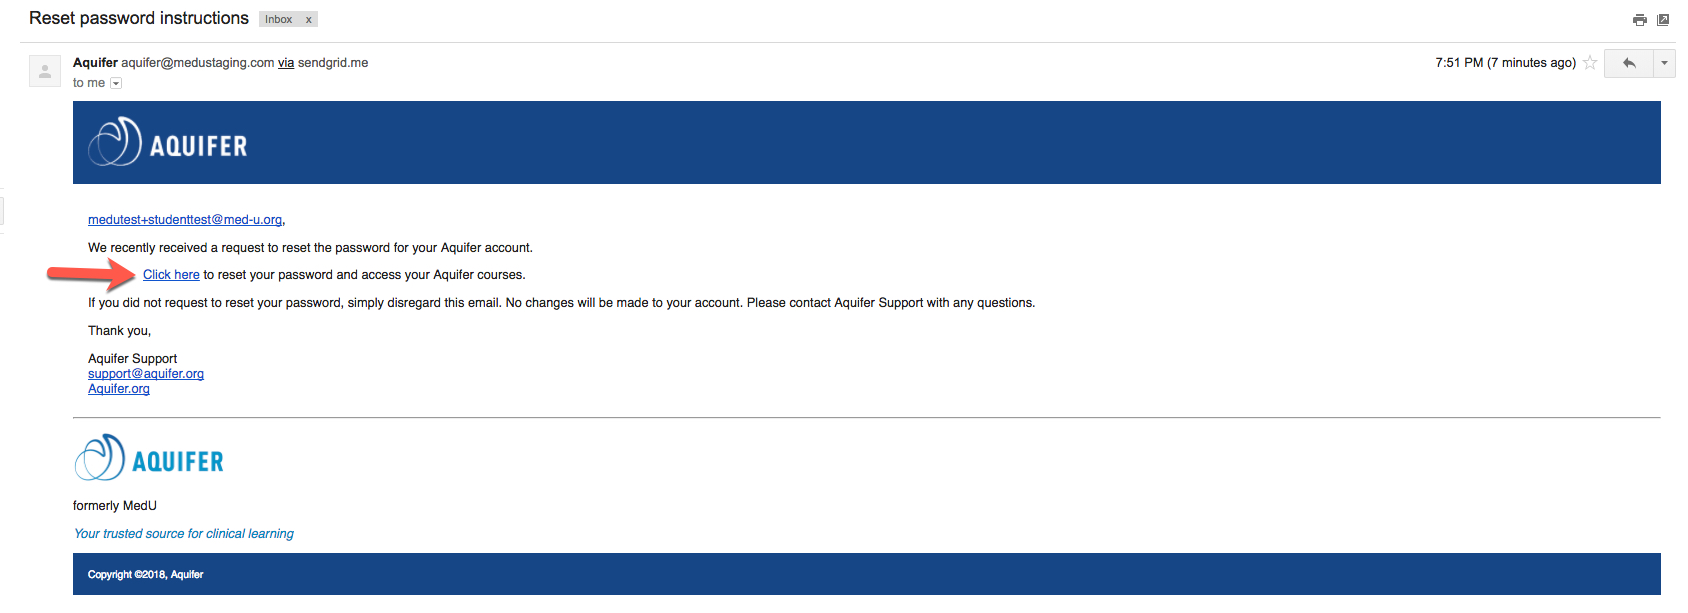
3. You will receive an email with instructions to reset your password. If you do not see this email, check your spam mailbox. Follow the instructions in the email to reset your password. Click the link to reset your password.


4. You will then be brought to a page where you can reset your password. Please put in your new password twice to confirm and click on “Change my password”. You will then be logged in with your new password.

Enter New Password

Student Progress Reporting

Tracking Student Usage and Performance

Aqueduct provides easy access to a range of interactive report dashboards. Program Service Administrators, Curriculum Administrators, Lead Course Administrators, and Custom Course Managers can all access reports on student progress through Aquifer courses, cases, and Integrated Illness Scripts. (Note: users in a Teacher role do not have access to view student reports, and Custom Course Managers may only view reports from their own custom courses)


The Aqueduct Reporting Experience

It’s quick and easy to find data by student, case/integrated illness script, or course. Our reports are simple to generate and easily understood. 

All reports can be viewed online in the interactive dashboard, or downloaded and exported to a CSV file. Please note that times will appear local time on screen, but all exports display in Eastern Time.


Reporting by Course Type

  • Aquifer Signature Course Reporting: Reports for Aquifer Signature courses that come standard with your subscription include student progress for:
    • Every case or Integrated Illness Script in the Signature Course
    • Every student that is registered in the system.

Note: Course reports can get large if your program has registered a lot of students and may include students who have not been assigned to work in the course. We recommend creating custom courses to access tailored reporting.

  • Custom Course Reporting: Creating a custom course is a recommended step for programs that wish to access reports tailored to a specific set of students and/or cases. Custom course reports include student progress for:
    • Just the specific cases and/or Integrated Illness Scripts that you have assigned to the students
    • Just the specific students you have assigned to the course

Optimizing your reports is just one of the many reasons to create a custom course—learn more.


The Course Report

The Course Report provides a quick view of students’ progress through each case or Integrated Illness Script in a Signature or Custom course.

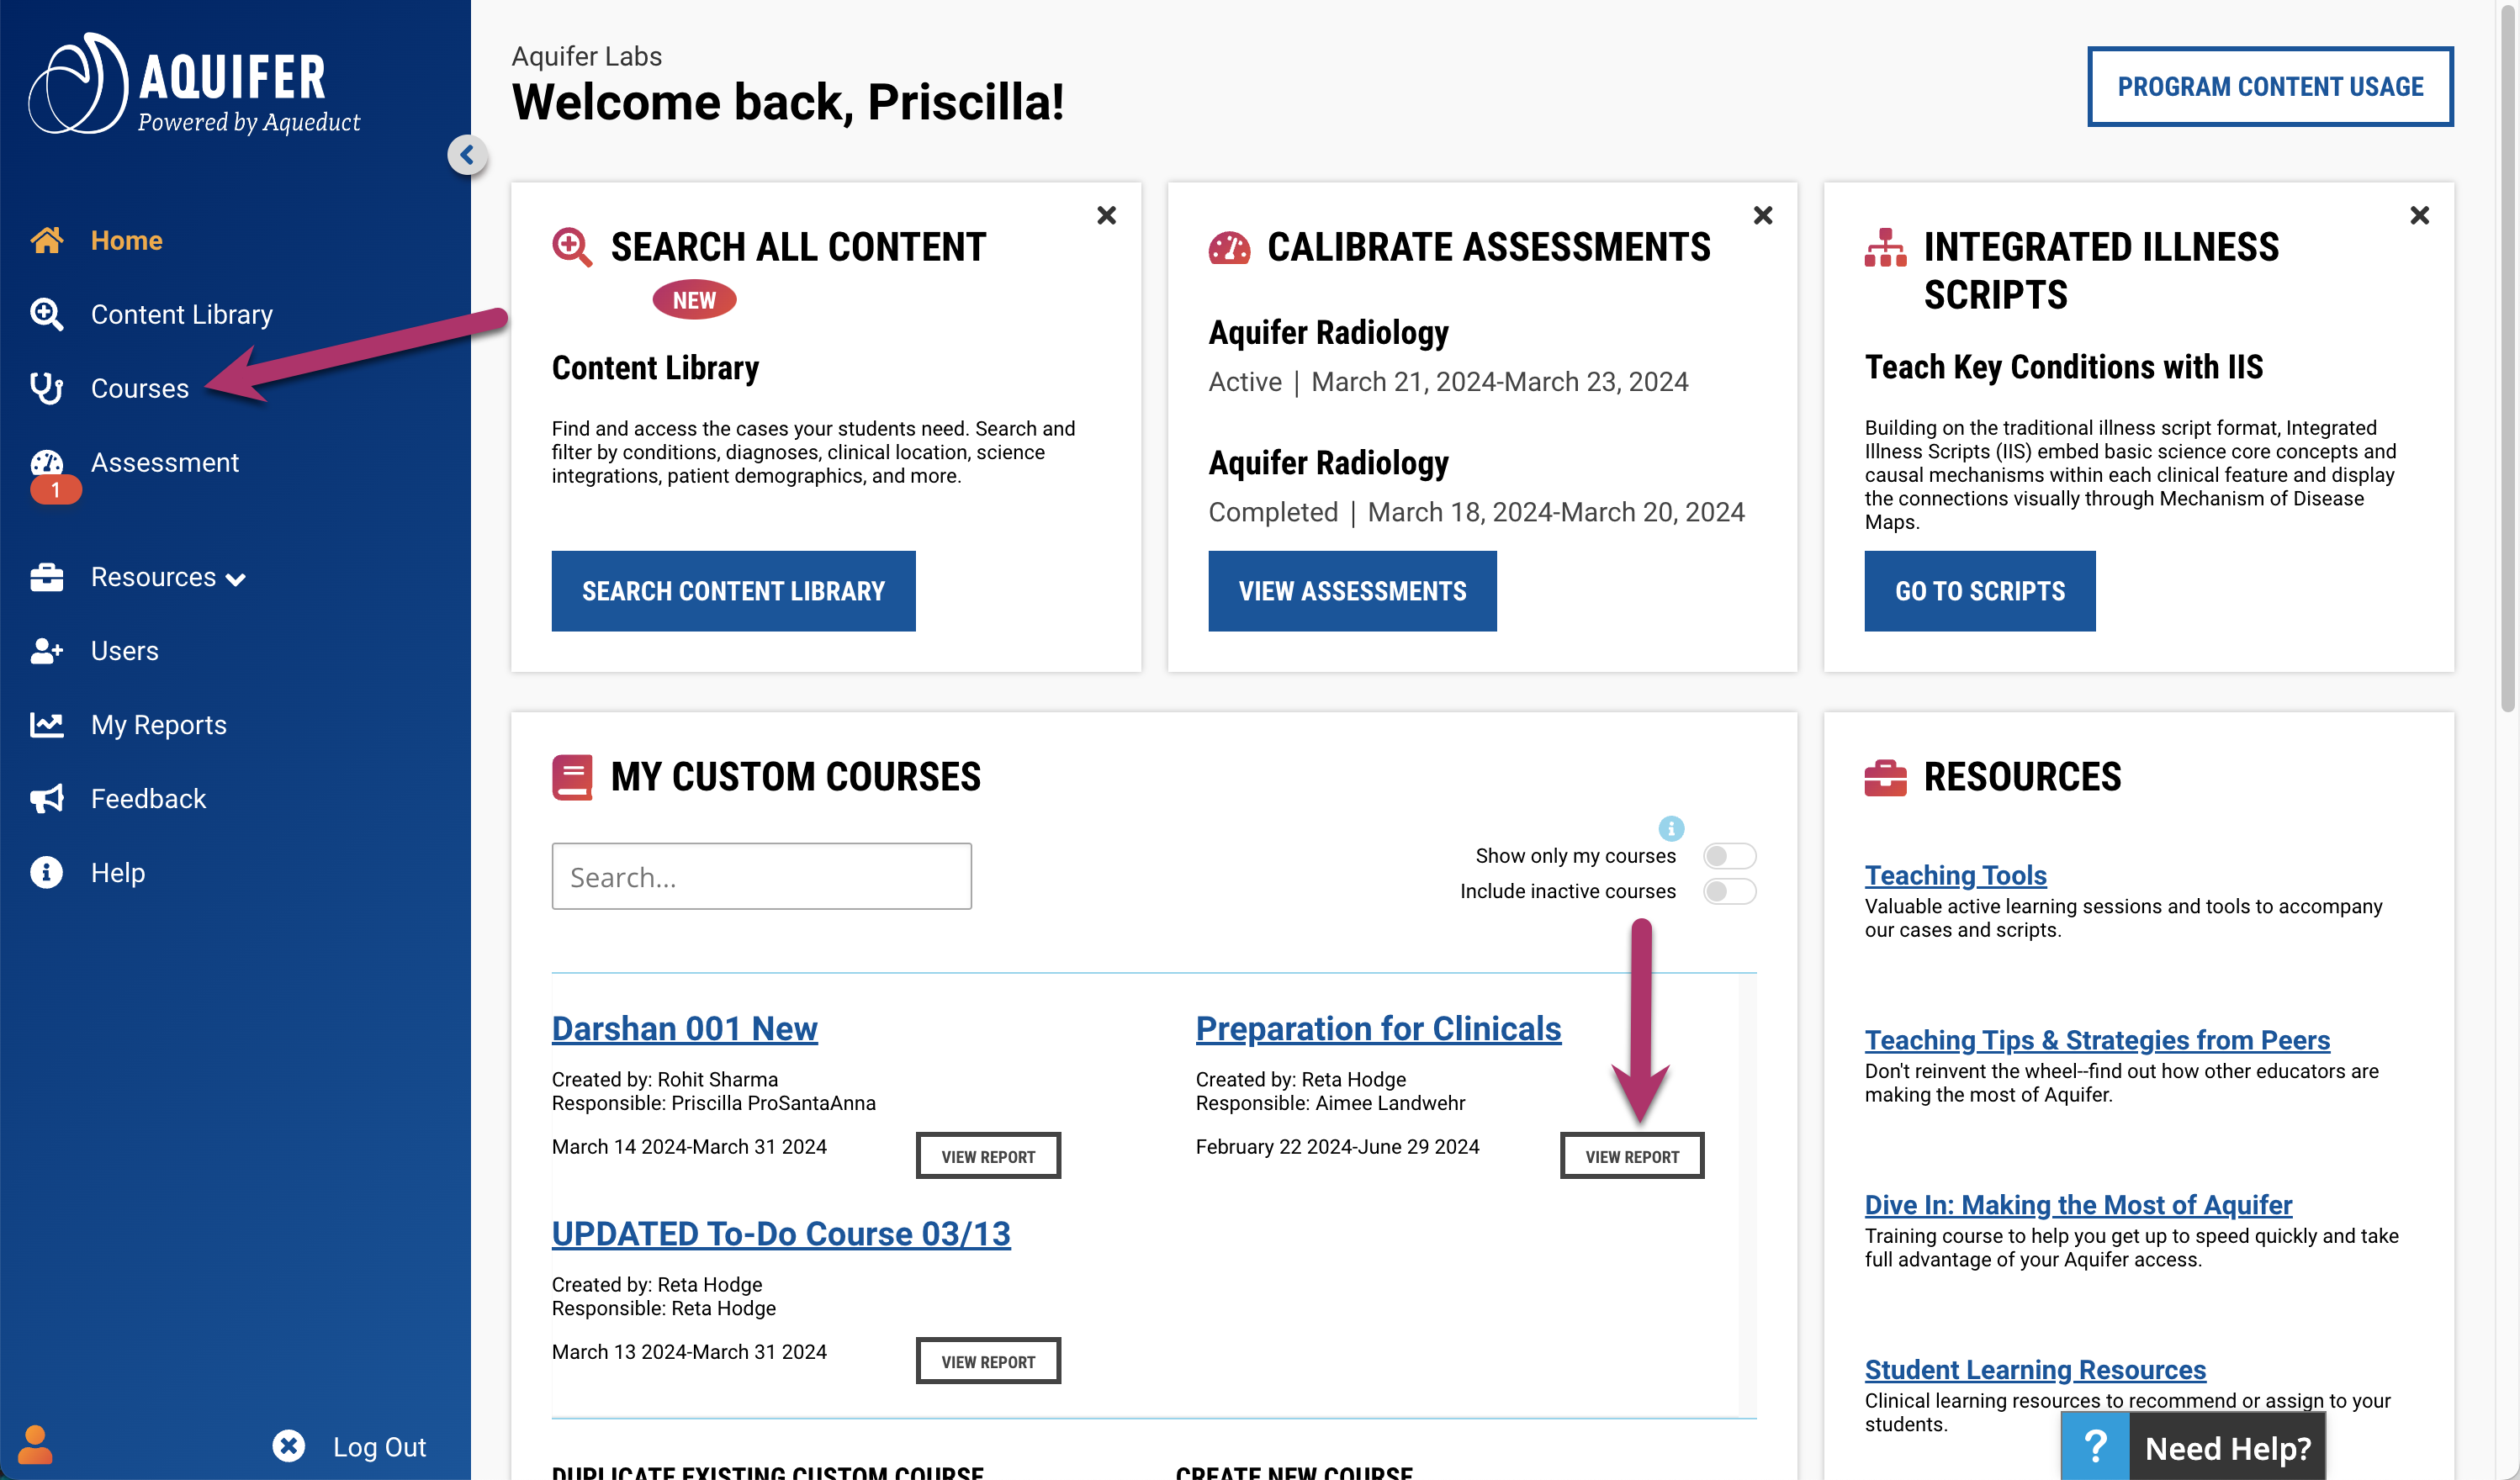
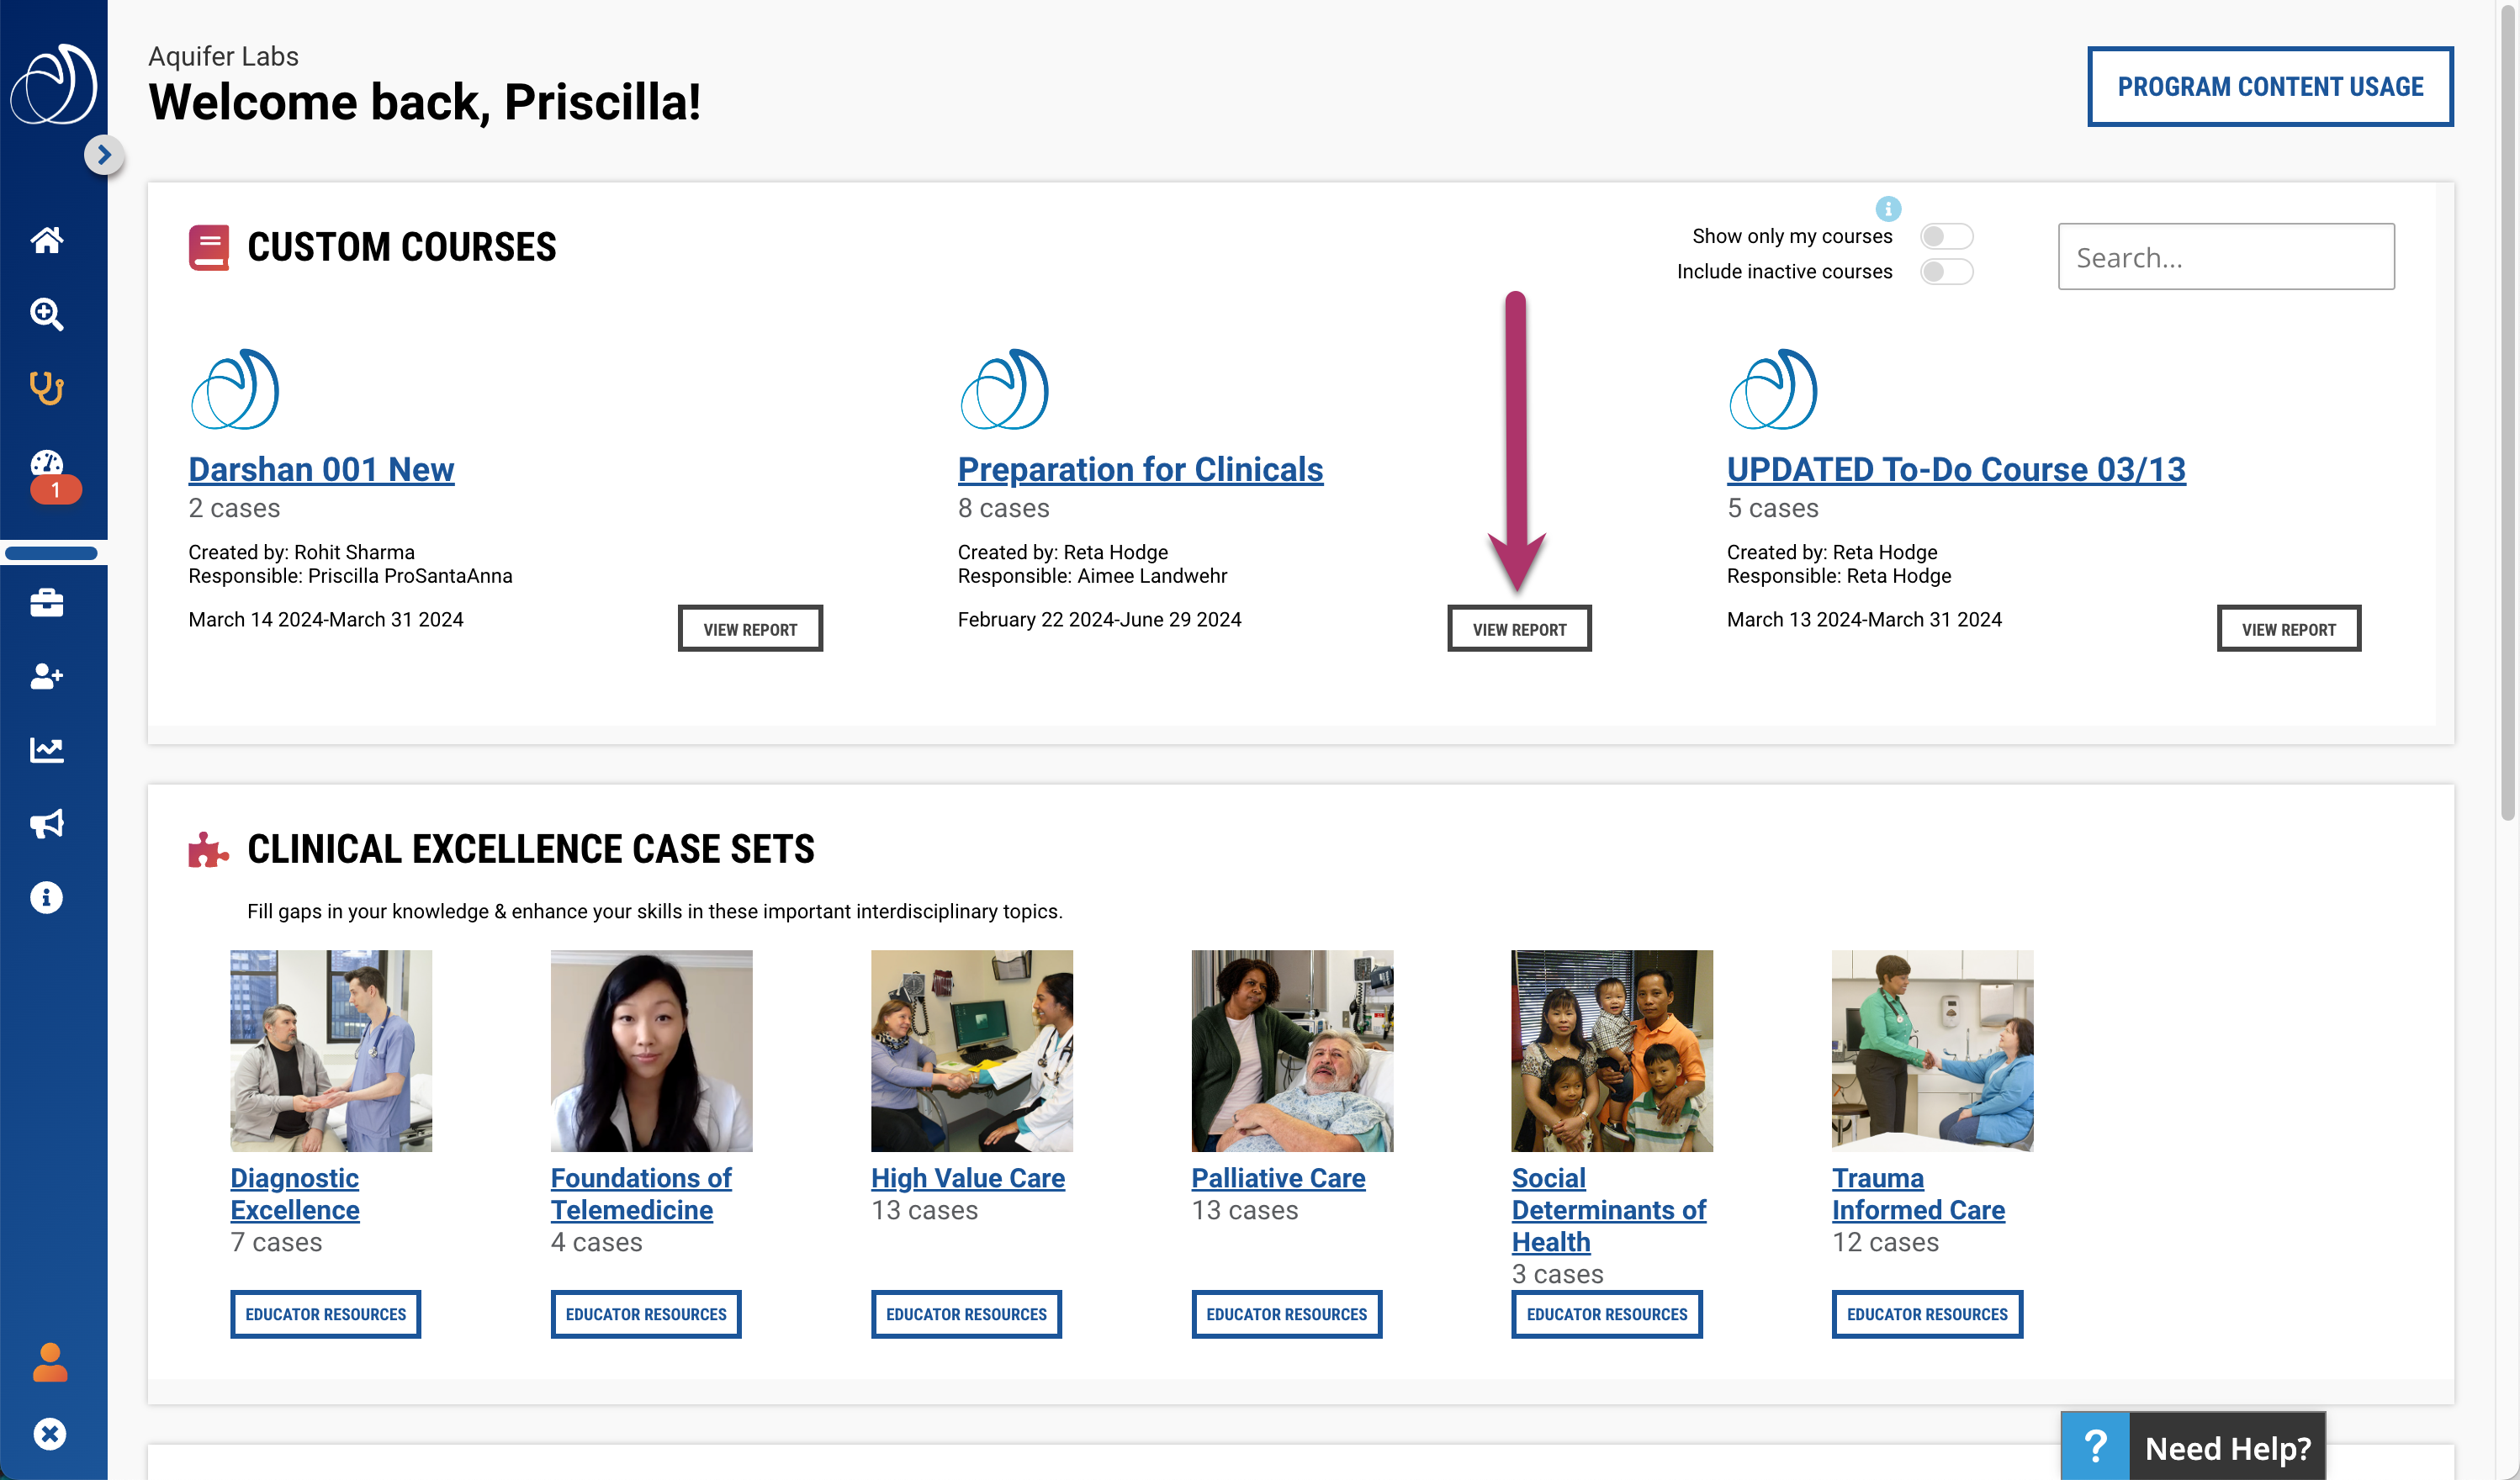
There are two different ways to access course reports. You can now get directly to your course reports by clicking the “View Report” button on the “My Custom Courses” card. Alternatively, you can click “Courses” on the left-hand navigation to take you to your courses page. From there, select the report that you wish to view.

Landing Page:

Click Course Report from Landing Page

Courses Page:


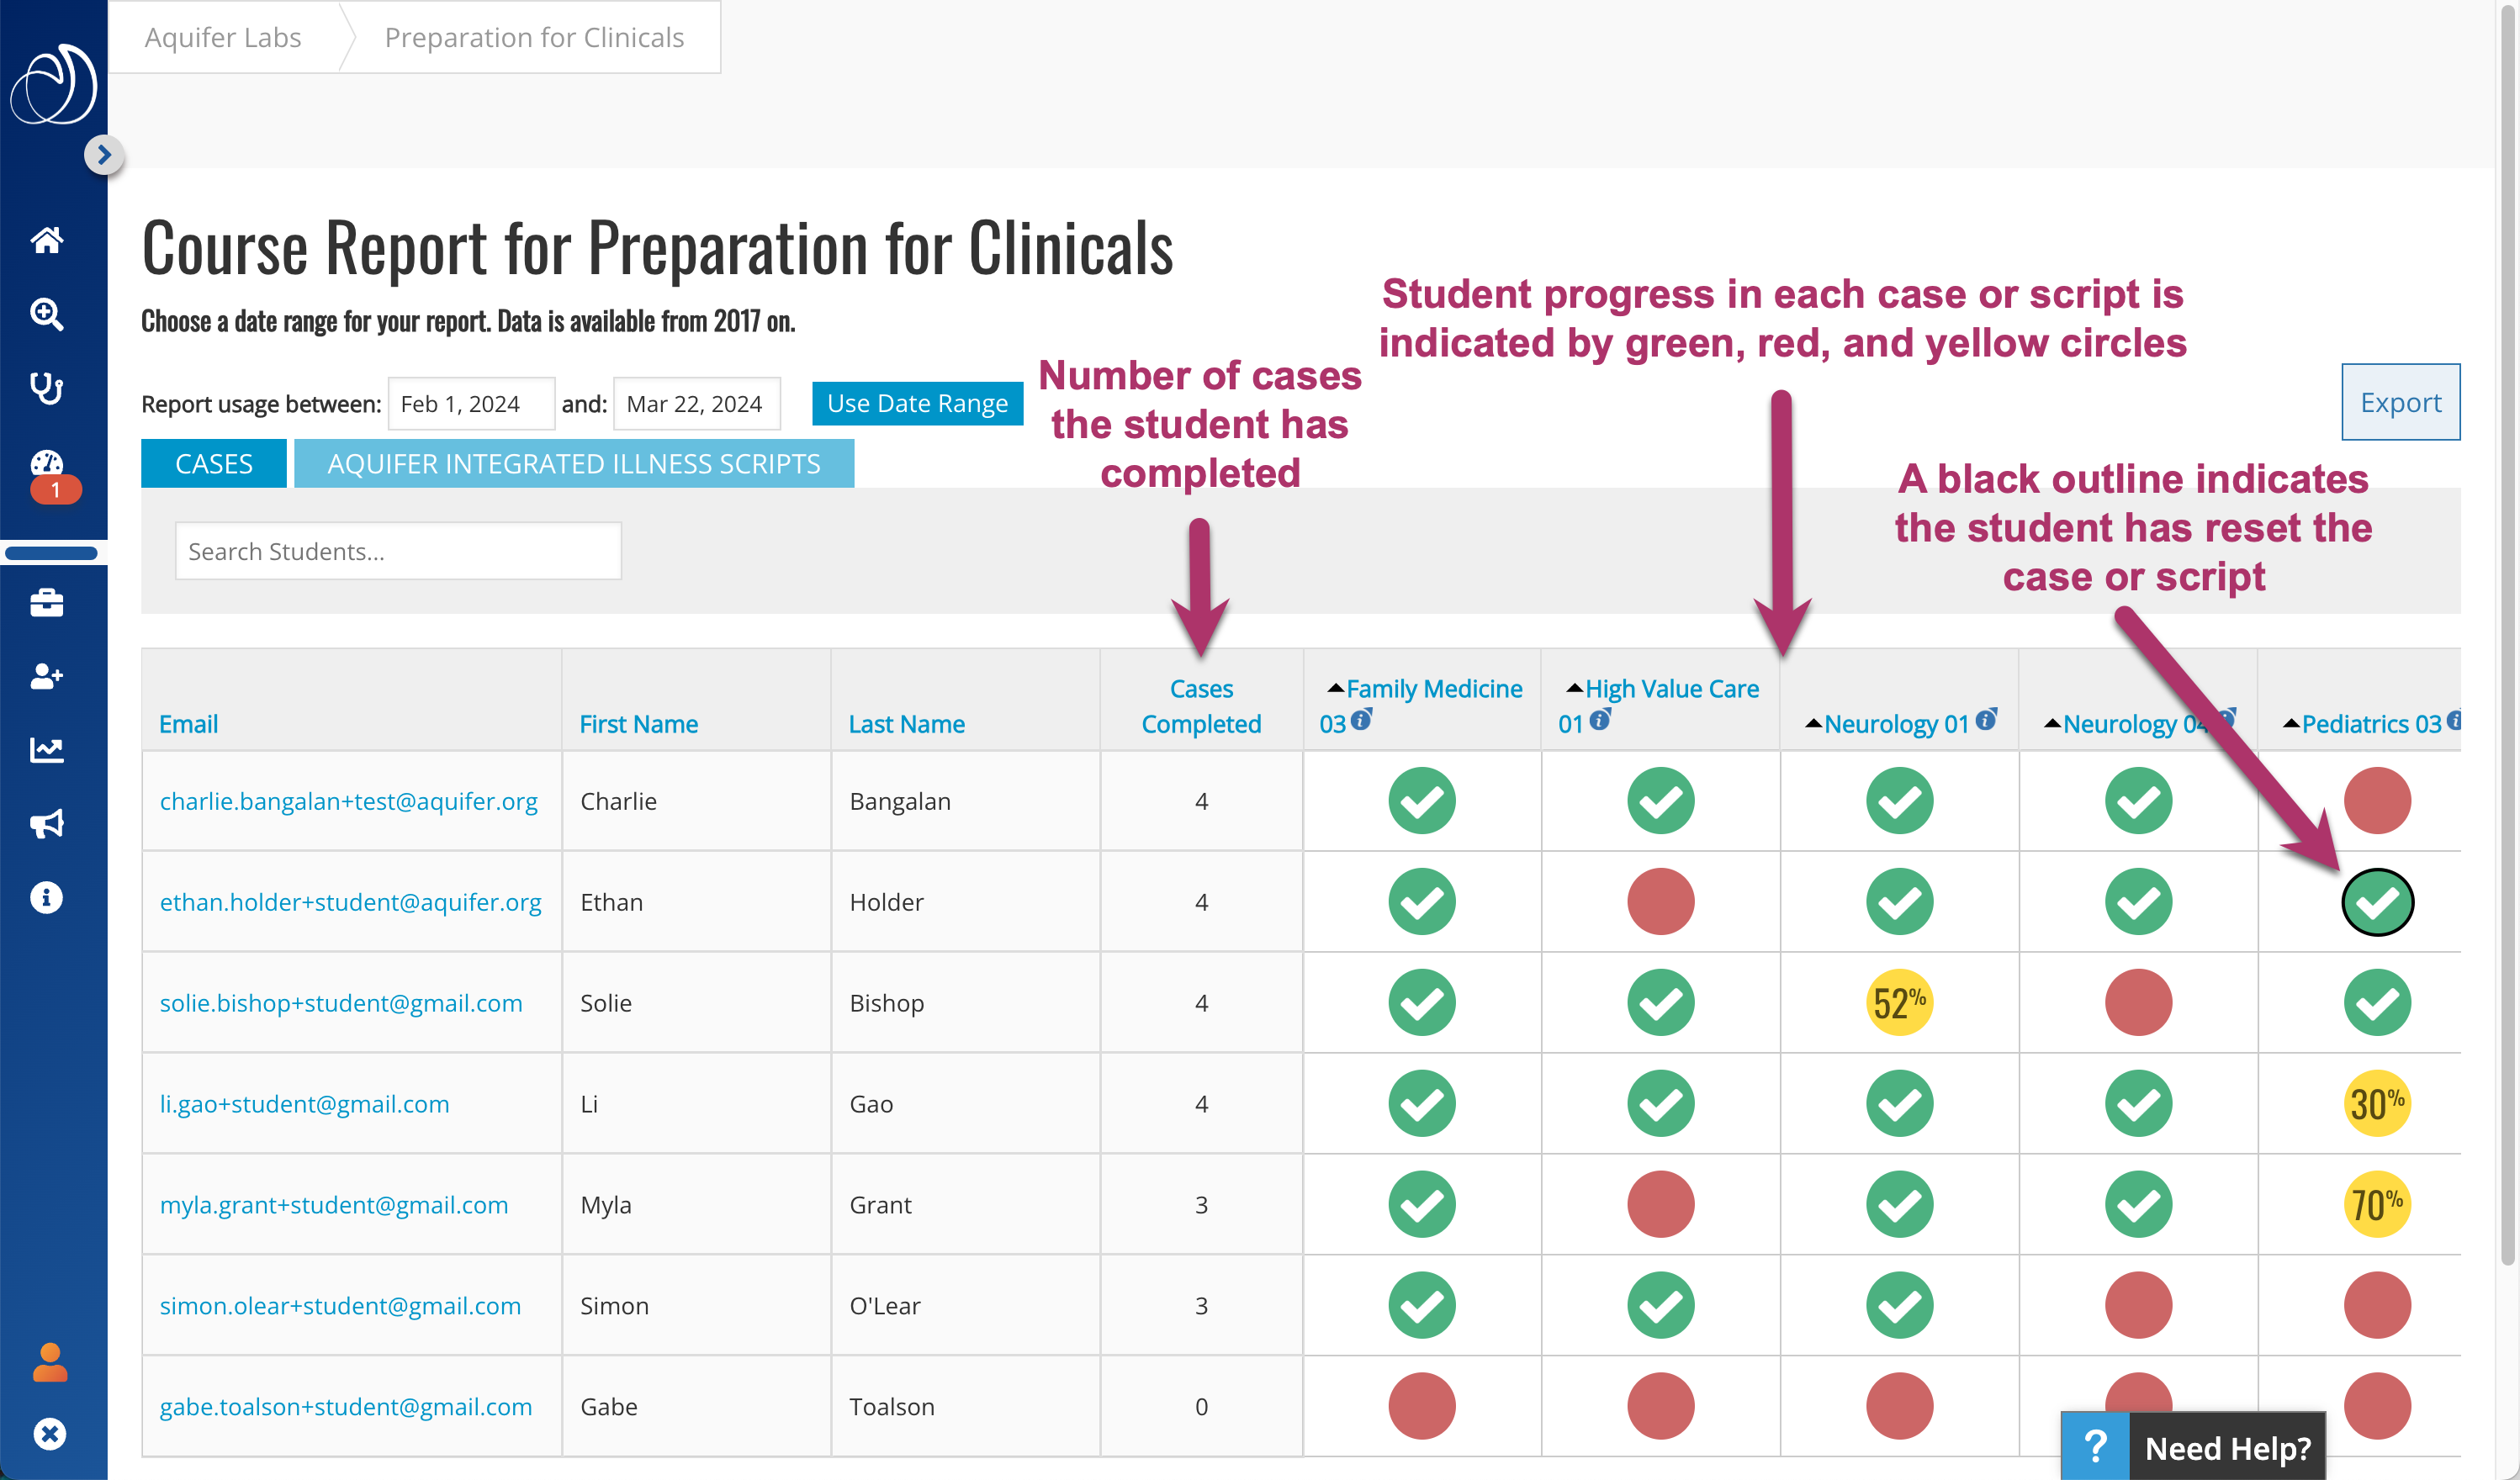
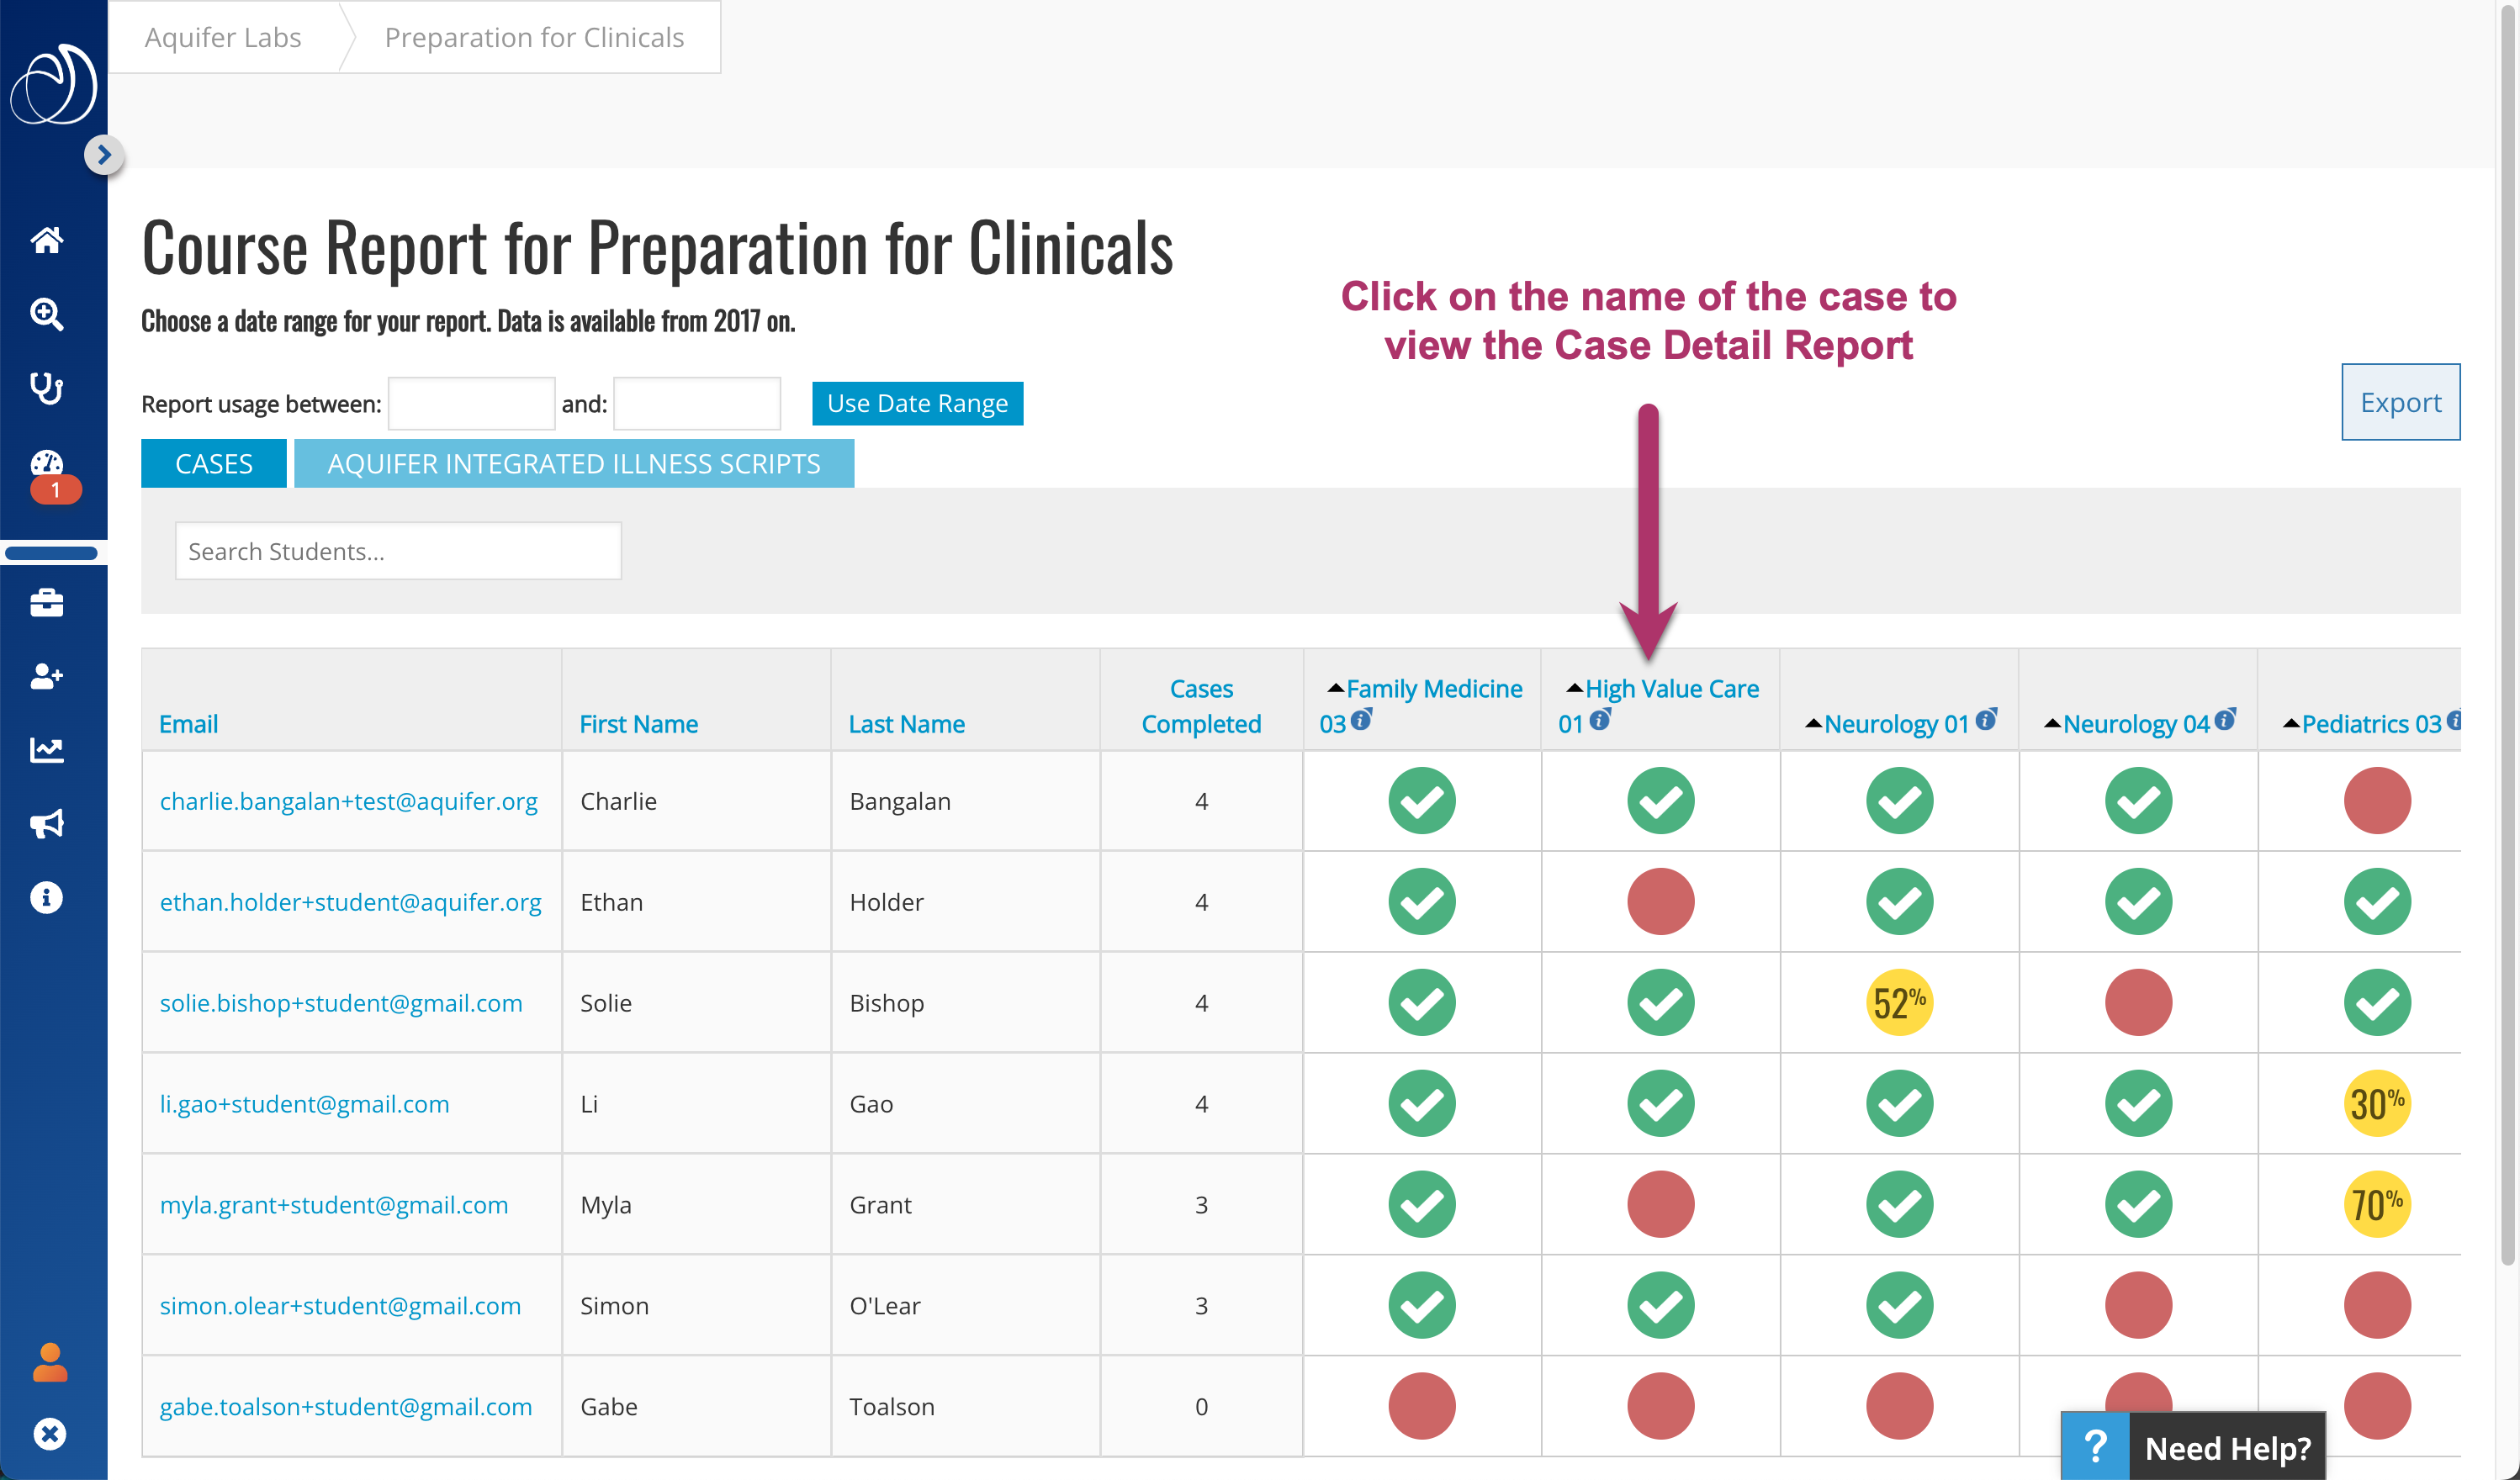
The Course Report will appear with student progress through all content in that specific course.

Select the date range for the report. Your report will include progress in all cases and scripts started during that time period

Select Date Range and Choose Cases or Scripts

If you are viewing a report for a custom course that includes both cases and Integrated Illness Scripts, student progress for the cases and scripts will be listed in separate tabs.

Under the Cases or Integrated Illness Scripts tab you will see:

  • List of Students Including Email Address, First Name, Last Name
    • Every student registered in the system will appear on reports for Aquifer Signature courses
    • For custom courses, only students that have been assigned to that course will appear, regardless of whether they have registered in Aqueduct. Students who have not yet registered in Aqueduct will appear as ‘Unknown Unknown’
  • All Cases or Scripts included in the Course
  • Total number of cases or scripts completed by each student
  • Progress through each case or script in the course that has been started in the given time period shown in individual columns
    • Complete = green check mark
    • Complete partially completed = yellow circle showing the percentage of the case that is complete. Note, the percentage does NOT represent a grade or score!
    • Not started = red circle
    • Any color circle with a black outline = indicates that the student reset the case
  • Search For a Specific Student: You can use the Search function to search for a specific student by entering the student’s name into the search box
Course Report Descriptions

The Export button for all reports is located in the upper right hand corner of the screen.

Case Completion Notes

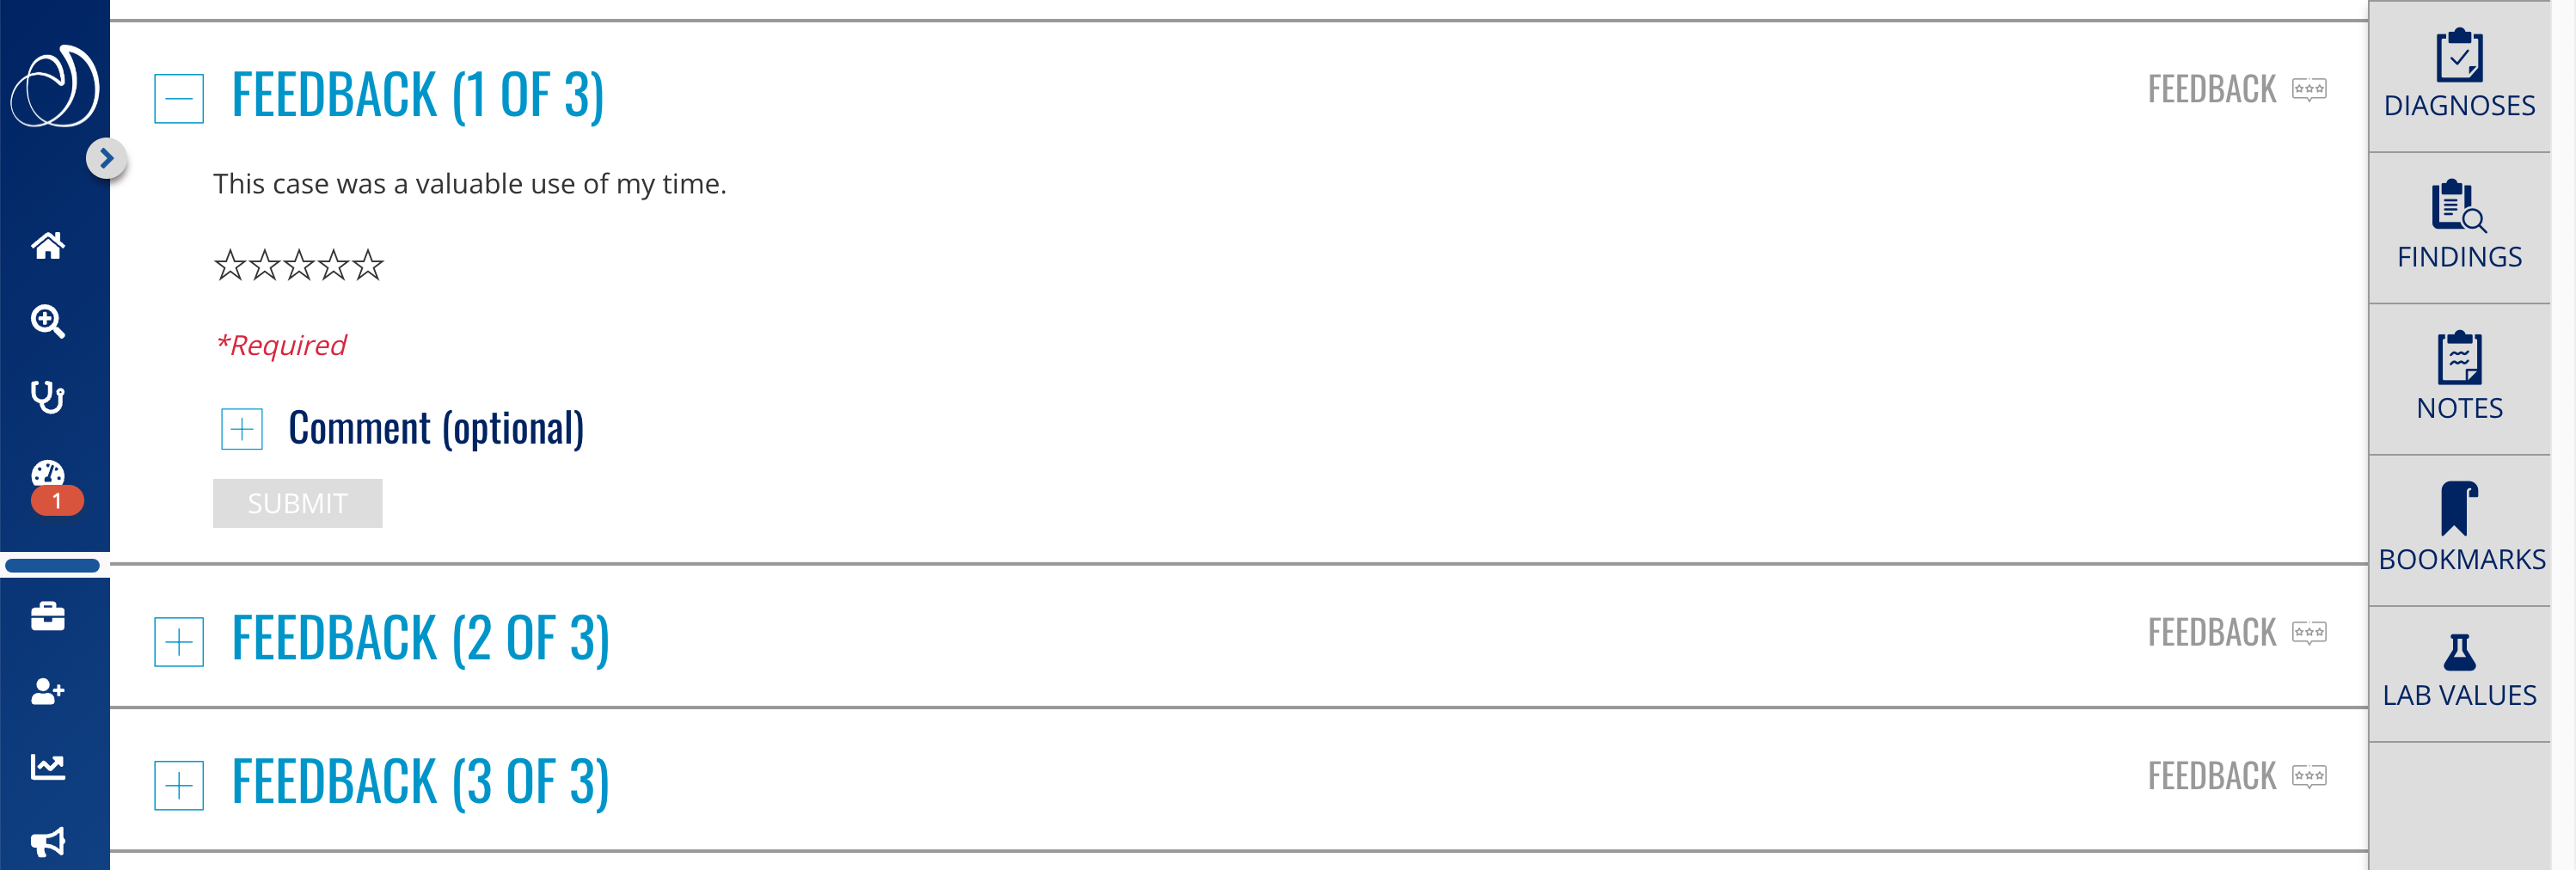
Students must answer all three required feedback questions at the end of each case—and click the Finish Case button in the Case Summary Download section—in order for the case to appear as complete on reporting. If students have worked through the case content but haven’t completed the feedback questions or clicked Finish Case, their work will show as partially completed—a yellow circle showing the percentage complete—on all Aquifer reports.

Student Feedback in case

The Case Detail Report

The Case Detail Report is a drill-down report that shows the progress that all relevant students have made within a specific case within a course.

From within your Course Report, you can access case-specific reporting in just one easy step:

  • From the Course Report: In the header row, click on the case number you need to access.
Access Case Detail Report

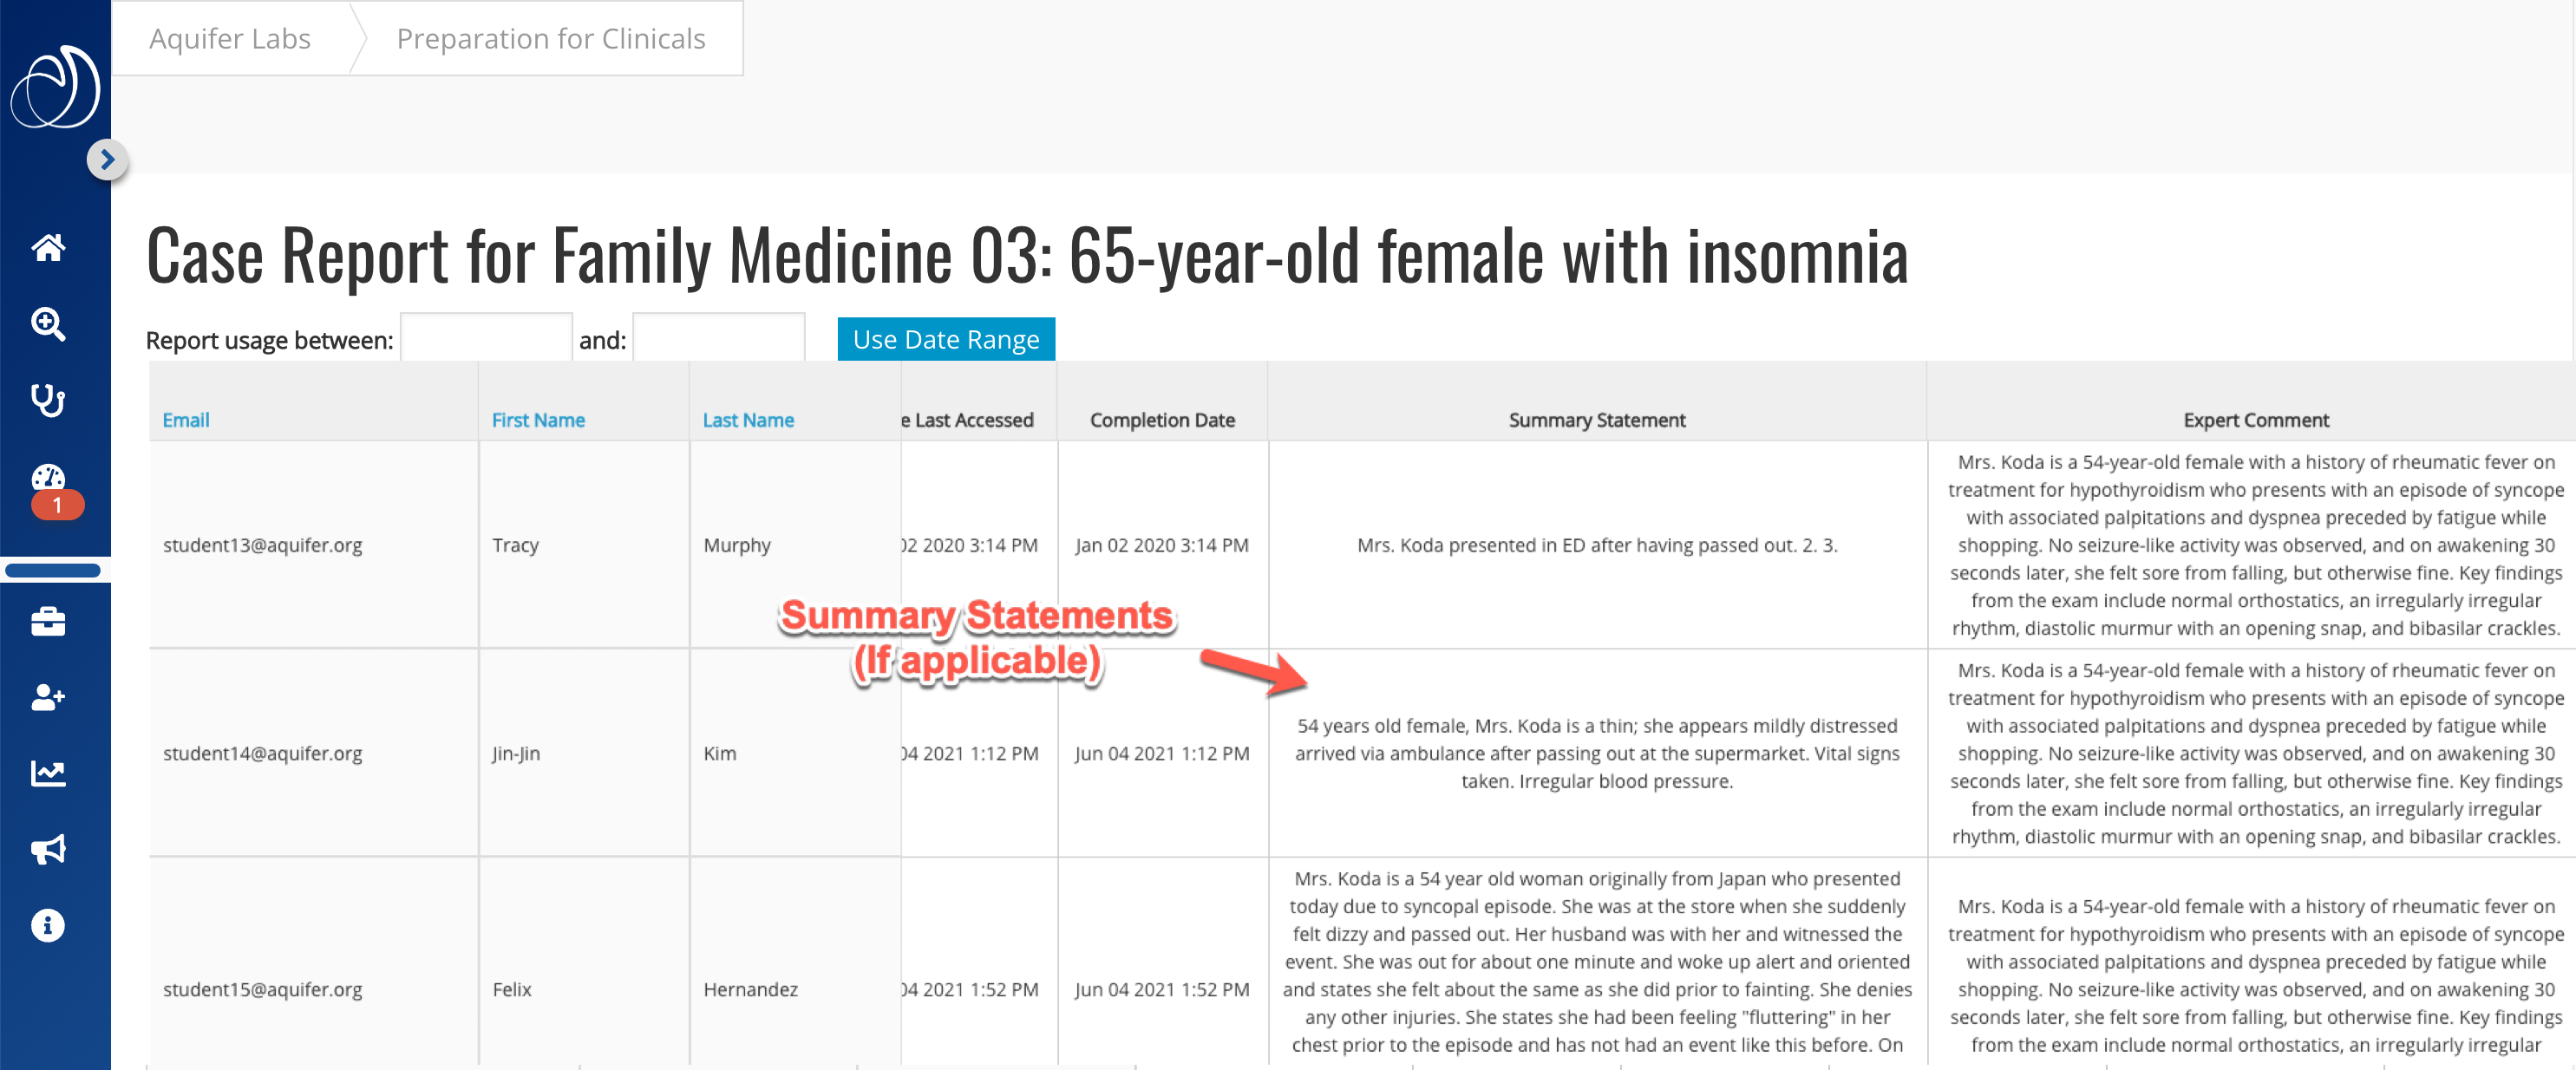
The Case Report includes each students’ progress through a specific case with the following information:

  • Time from Case Start to Complete
  • Percent of the Case Completed
  • Case Reset Status (indicated by a black outline around the case completion circle)
  • Pages Completed
  • Case Start Date (local time shown on-screen)
  • Date Case Last Accessed (local time shown on-screen)
  • Case Completion Date (local time shown on-screen)
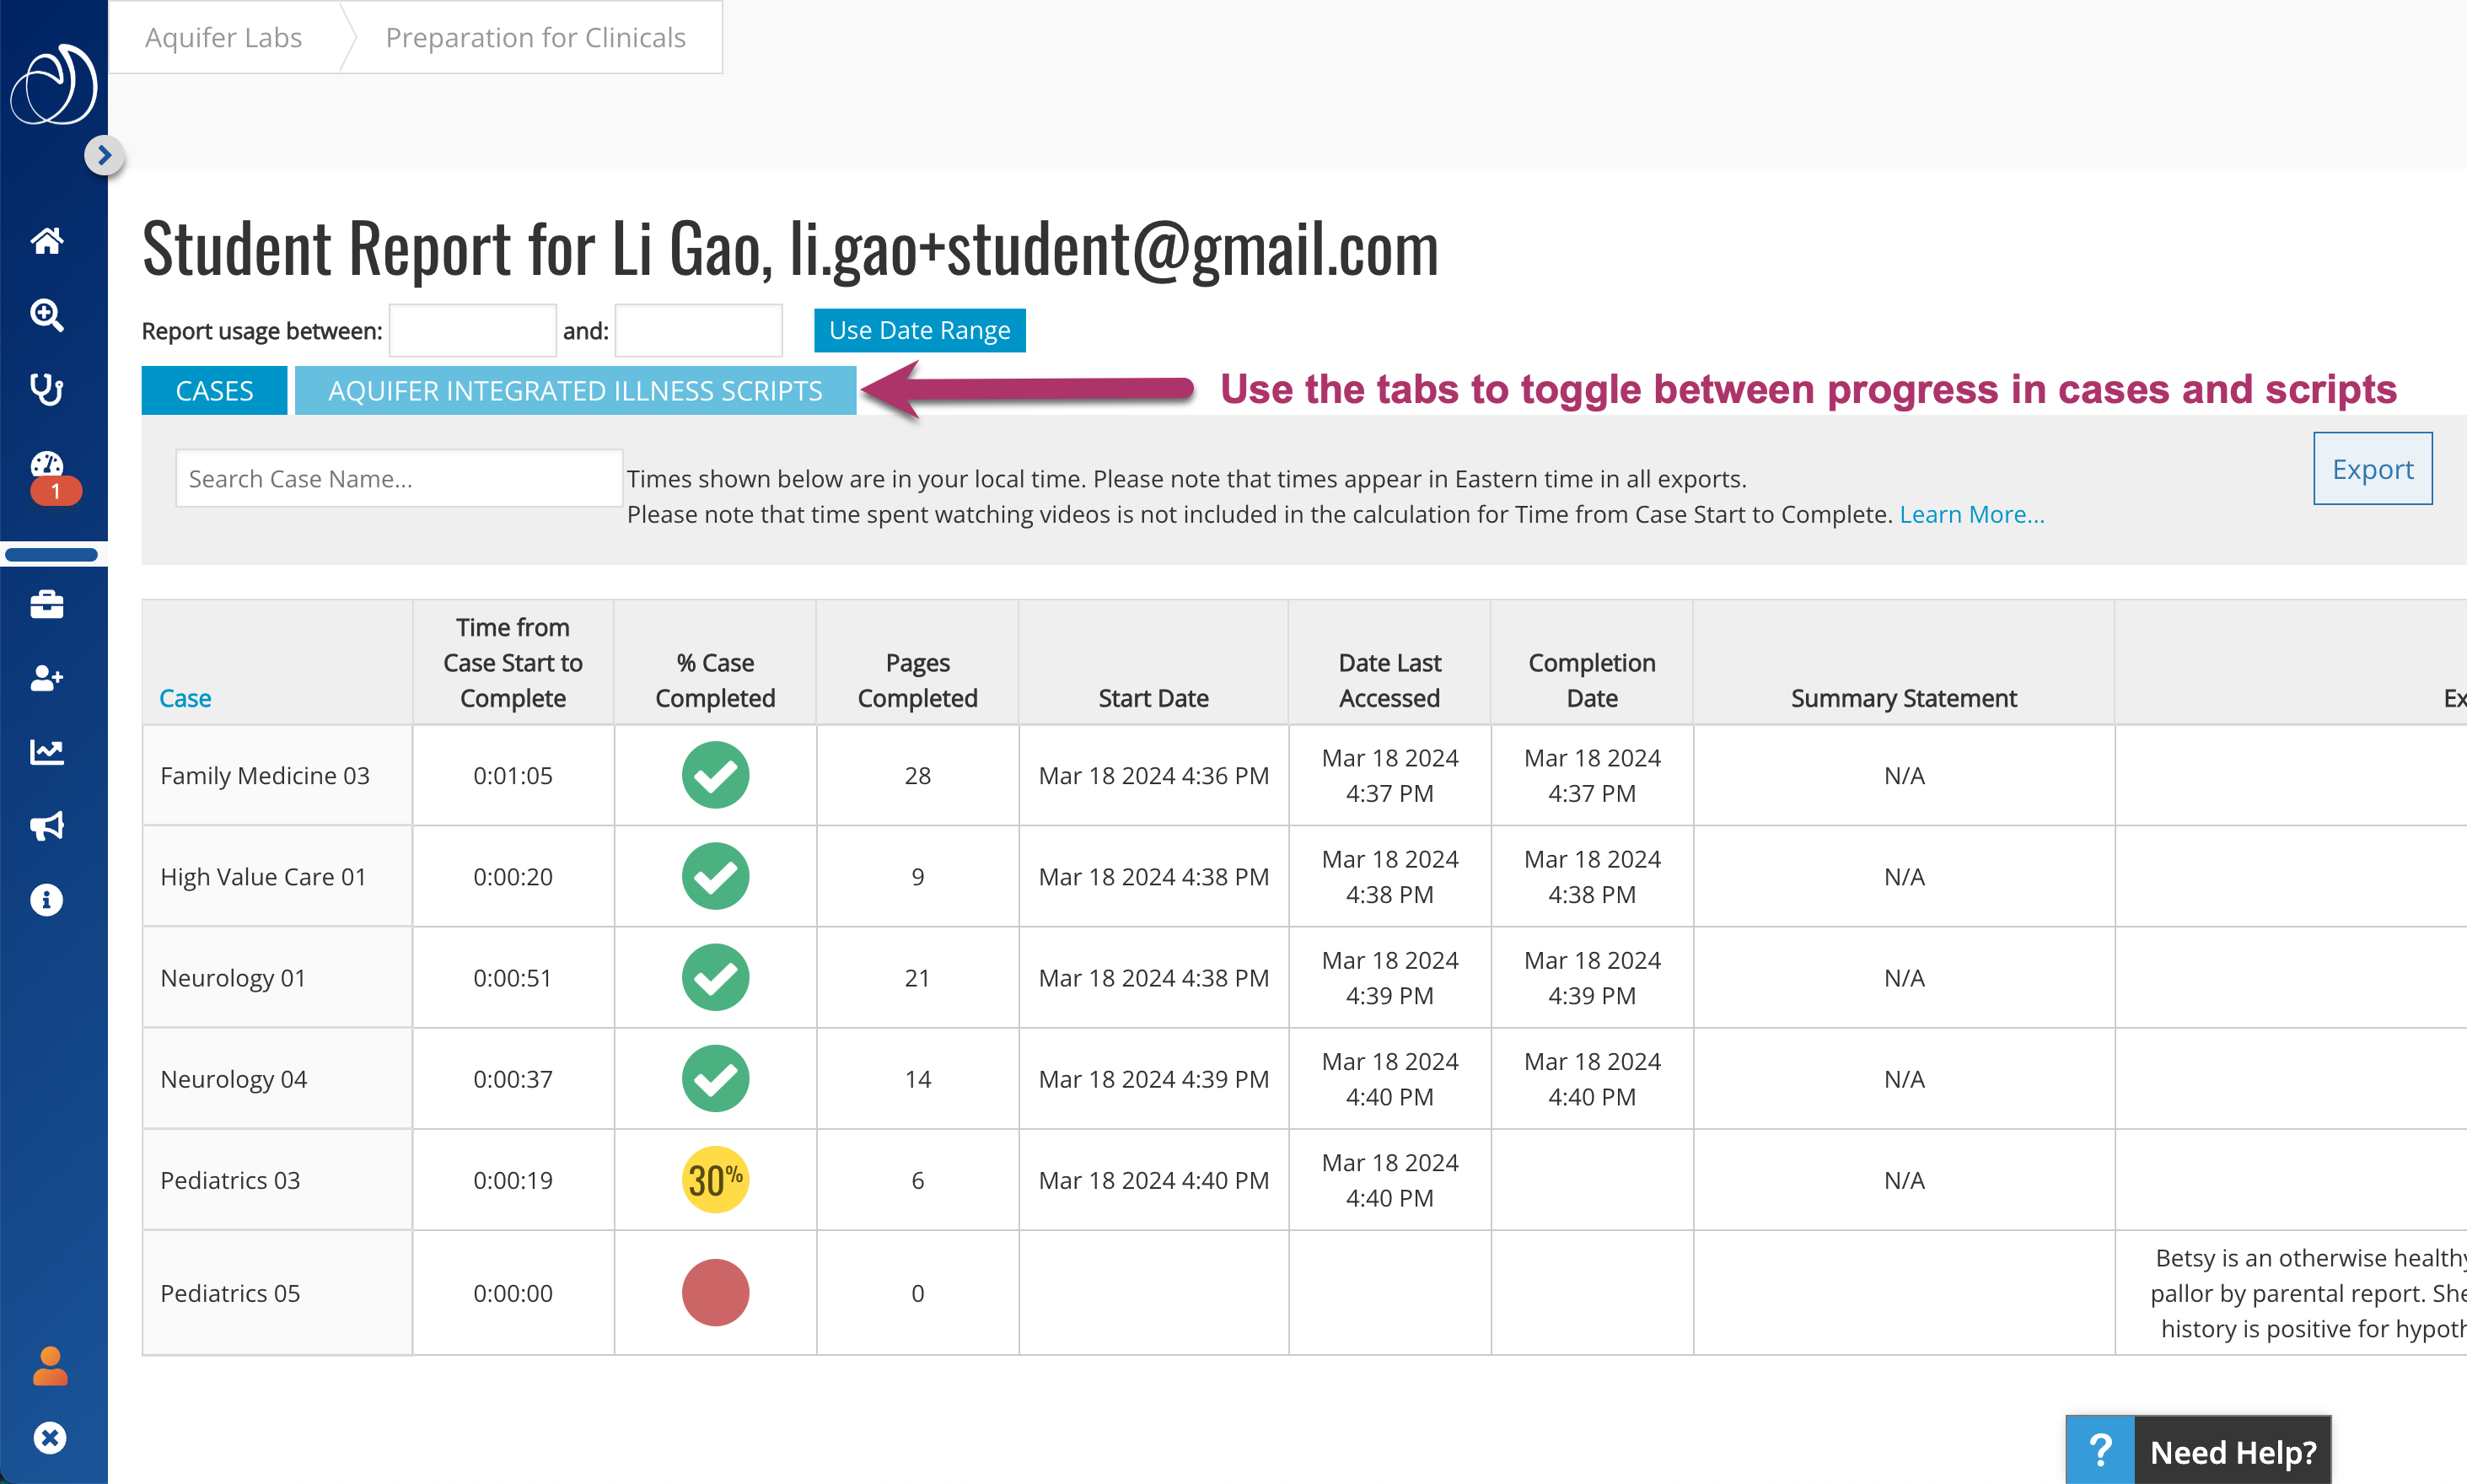
  • Case Summary statement (if applicable). If the student is asked to write a summary statement as part of the case you will be able to view his/her submission here. The Summary Statement column will be blank if the student has not written a summary statement and will show N/A if there is no summary statement question within the case.
  • Expert Comment summary statement (if applicable) for easy evaluation of your students’ work. Note: Scroll to the right to view this column.
  • Note: The number of times the case was reset by each student will show in the Case and Student Report exports only.
Case Detail Report with summary statements

The Integrated Illness Script Detail Report

If your course includes Integrated Illness Scripts you can drill down to view details on student progress through each script.

To access the Integrated Illness Script Detail Report from the Course Report:

  1. If you are viewing a report for a course that includes cases and scripts, first click on the Integrated Illness Script Tab at the top of the report.  If your course includes only scripts you can skip this step.
  2. In the header row, click on the name of the script you need to access.

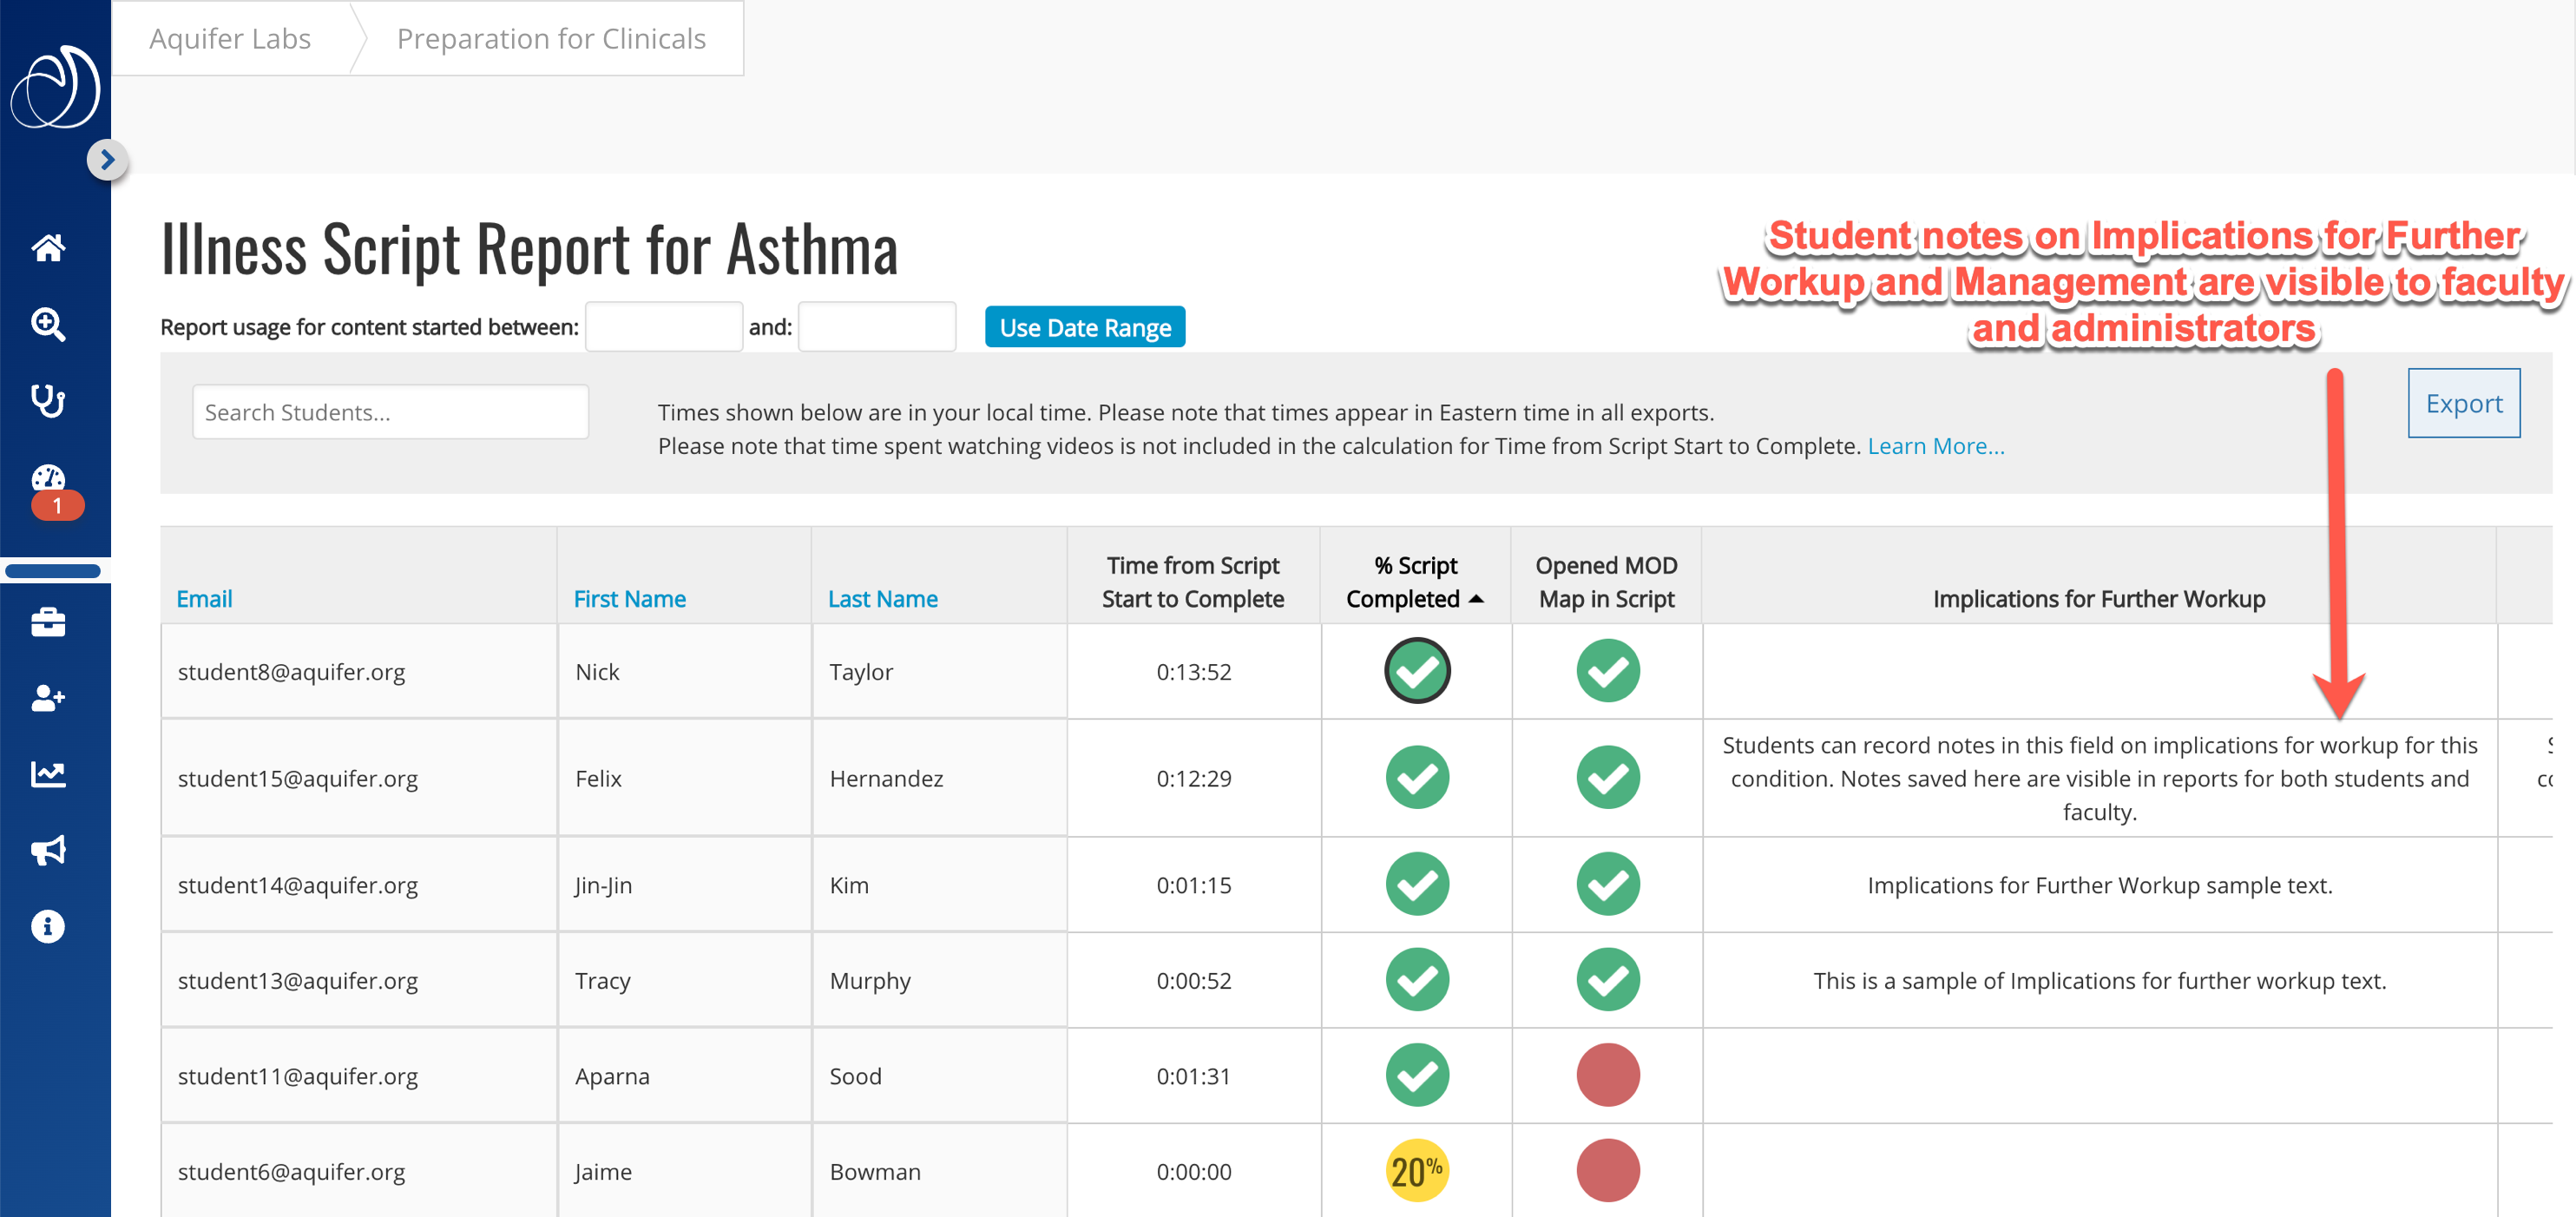
For each student, the Integrated Illness Script Detail report includes:

  • Time from Script from start to completion.
  • Percent of the Script Completed (measured as percentage of sections opened)
  • Case Reset Status (indicated by a black outline around the case completion circle)
  • A check box to indicate whether the Mechanism of Disease Map has been opened
  • Implications for Further Workup: If students record notes in this section within the script, their work appears on this report.
  • Implications for Further Management:  If students record notes in this section within the script, their work appears on this report.
IIS Case Detail Report

The Student Detail Report

You can also view detailed reports on a single student, which reflect the same information found in the Case and Integrated Illness Script Detail reports, but organized with all the content completion progress in the course for a single student.

To access a Student Detail Report for a specific student:

  • From the Course Report: In the header row, click on the email address for the student you need to access
  • Use the tabs at the top of the report to toggle between the student’s progress in cases and Integrated Illness Scripts
Student Report Admin View

Creating Custom Courses

Why Create a Custom Course?

Organize rotations, blocks, or academic years: Custom courses make it easy to assign specific cases and Integrated Illness Scripts to students, track class or cohort progress at a glance, and include course specific information or directions for students

Align Courses to Your Curriculum: Pick and choose content to create courses that fit your curriculum. You can create courses that align to longitudinal integrated clerkships, bootcamps, electives, or specific student’s remediation needs. You can integrate cases from our free courses, like High Value Care, with a discipline-specific course that you subscribe to, enriching an existing course.  If you have access to Integrated Illness Scripts you can create a custom course with select scripts for students to compare and contrast using one of our ready-made Integrated Learning Sessions for instance, or combine them with our cases to enable a rich learning experience.

Track and monitor progress for a specific group of students: Reports for custom courses are tailored to include just the students and just the cases or scripts assigned to that course, making it easy to track and monitor student progress in the course at a glance.

Manage Exam Rosters: Creating a custom course is a required step for subscribers using Aquifer exams, and allows for quick and easy exam roster creation.


Create a New Custom Course

Tip! Do you want to copy a set of cases or users from an existing course to a new custom course? Save time by using our new Duplicate Course feature, which allows you to copy cases and/or users to a new custom course. If not, continue with the directions below to create a new custom course.

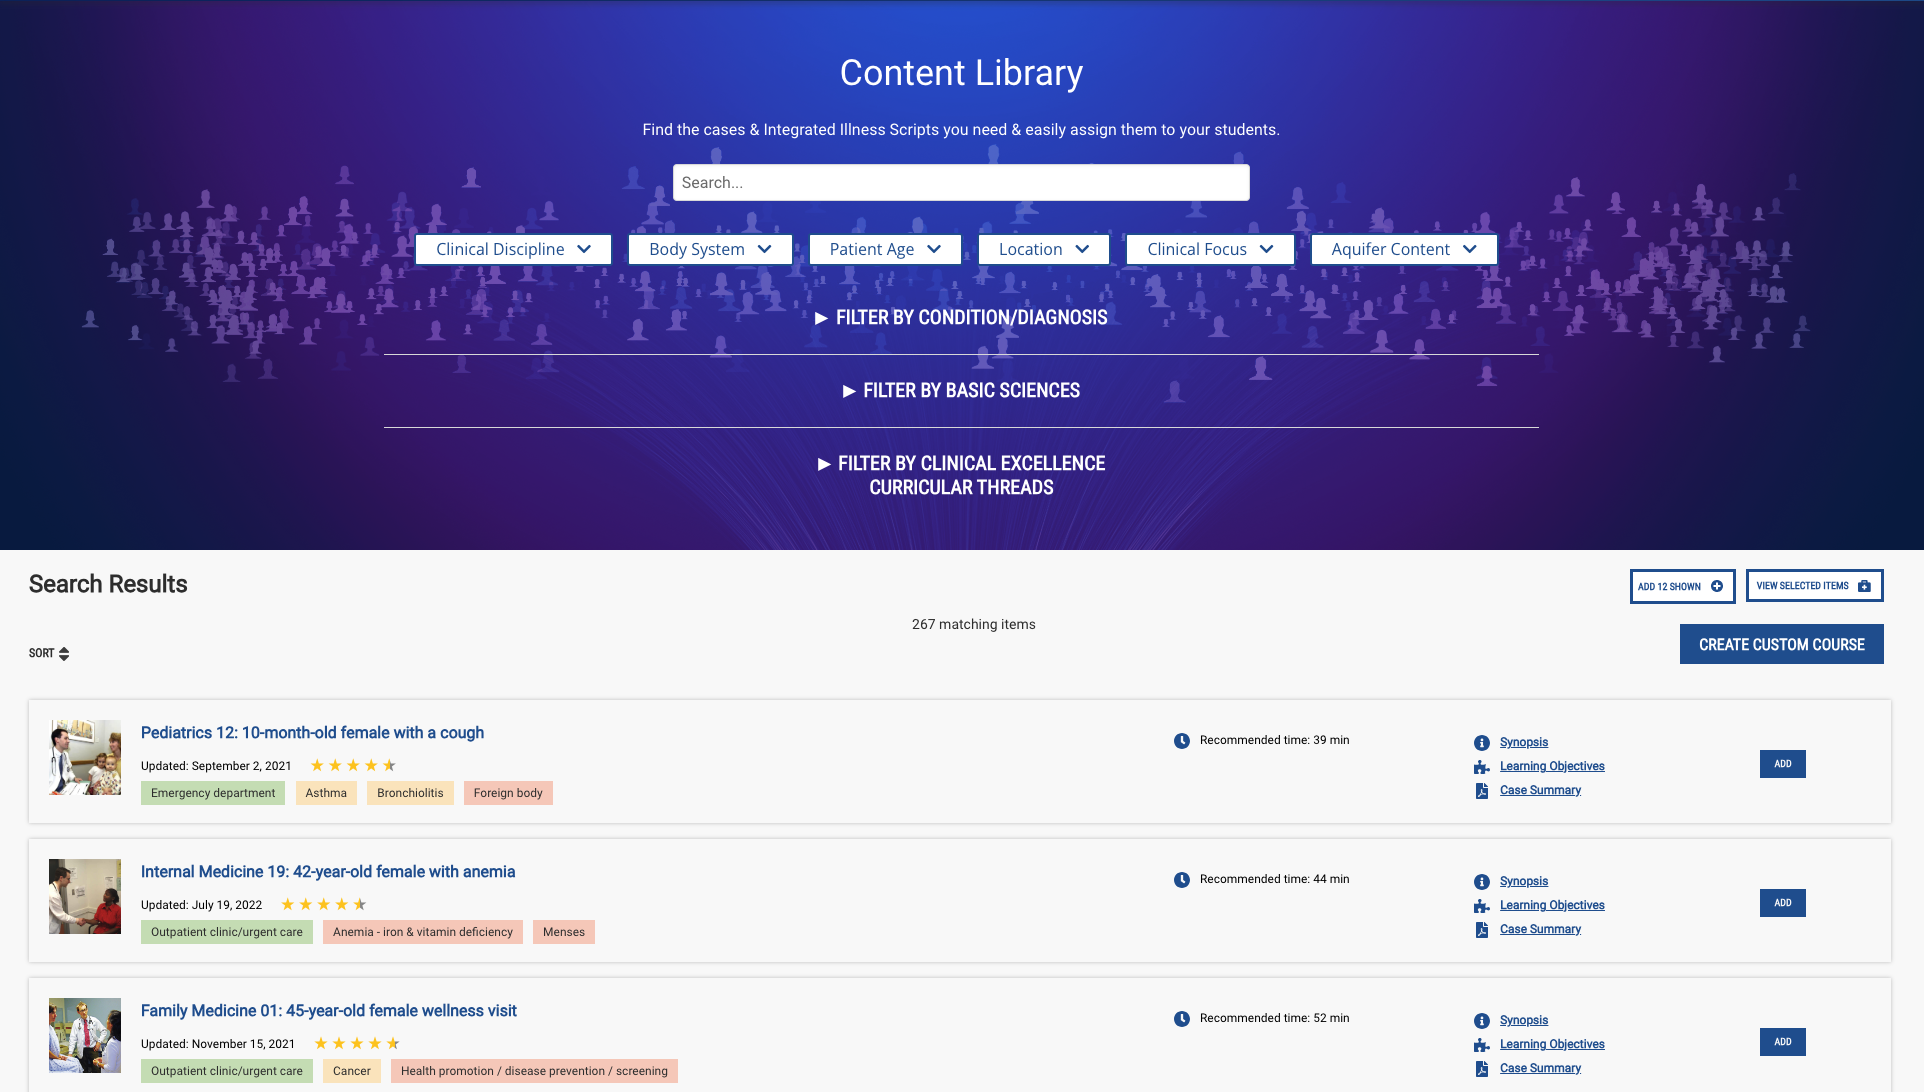
1. Click on Content Library in the side navigation.


2. Use the Searchable Content Library filters to select the cases and integrated illness scripts you want to add to your custom course. Note: Skip this step if you want to create the custom course shell first and add cases later or create an exam roster.

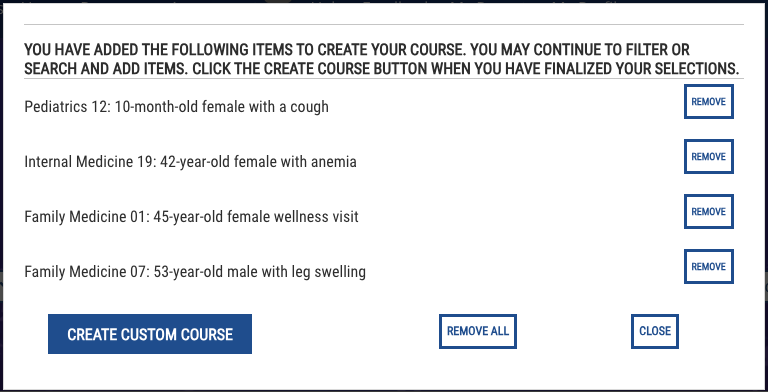
After you have added your content, you can click “View Selected Items” to verify you have selected the cases and scripts that suit your course.


3. A new window allows you to add or remove cases and scripts. If you are satisfied with the selection, click Create Course


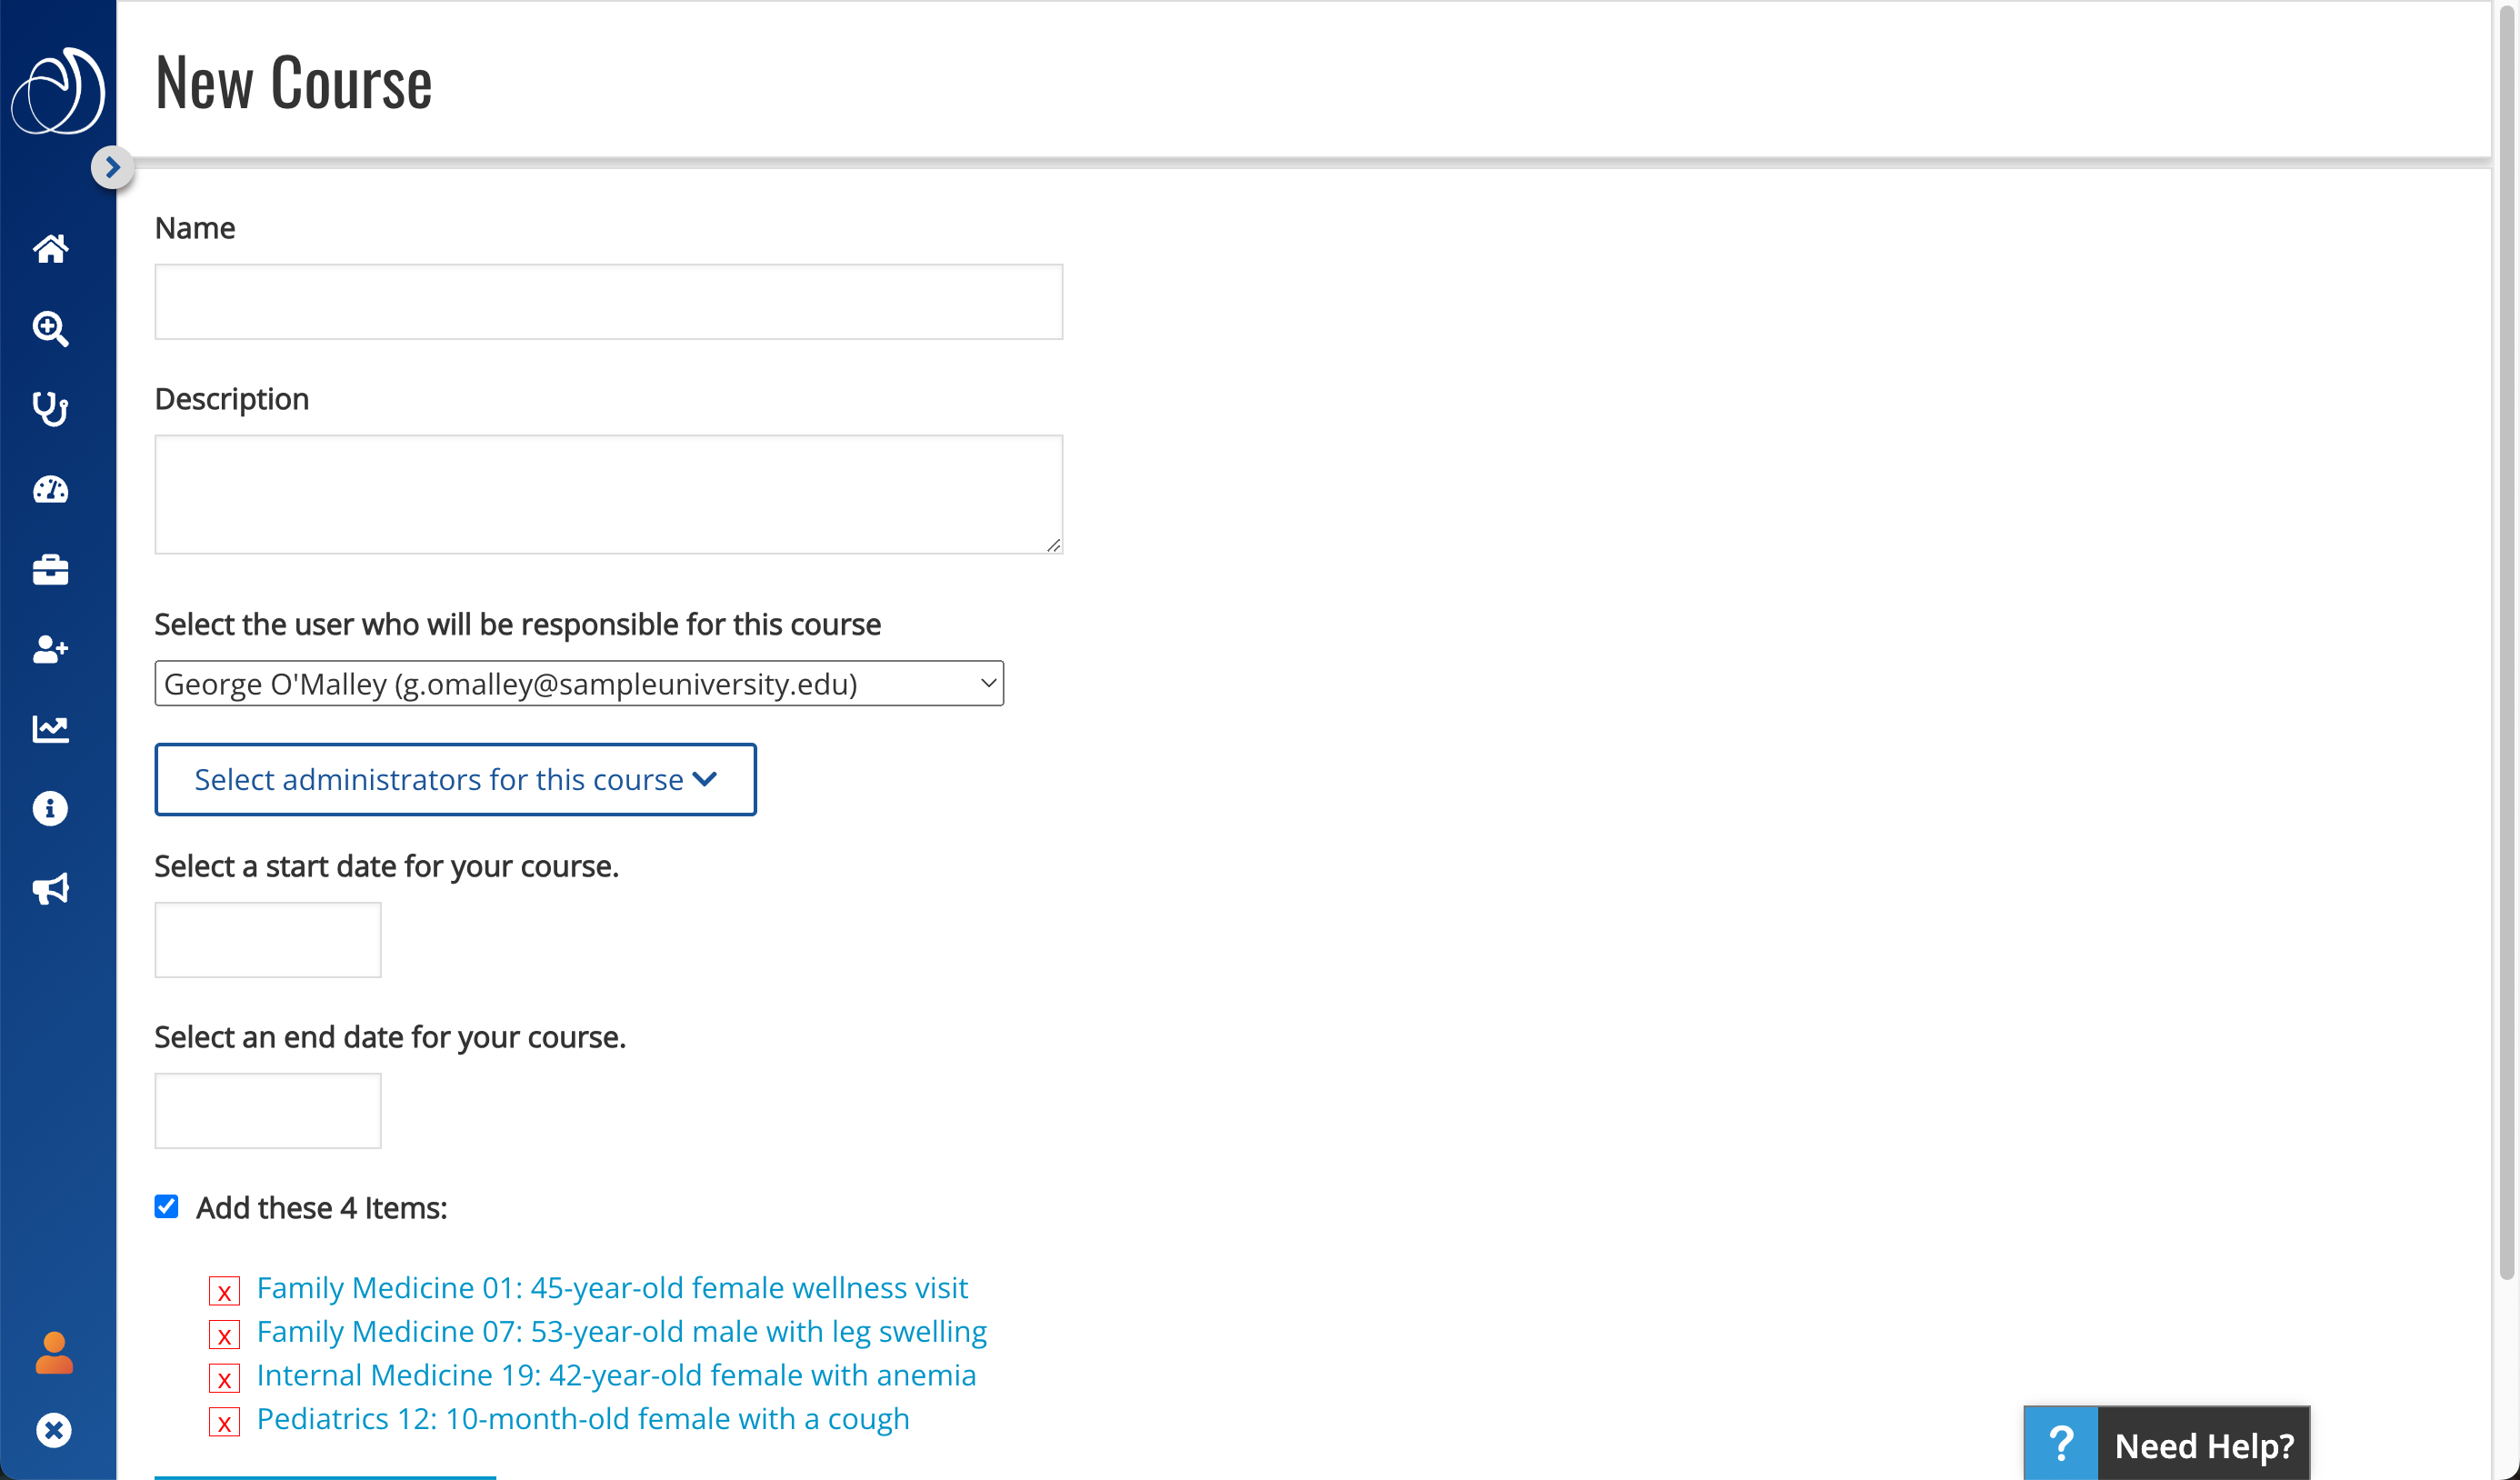
5. On the New Course page, enter:

Course Name: We suggest using a consistent naming convention that includes course and rotation name, such as “Family Medicine Clerkship: Block 4”.

Description: We suggest including instructor name, instructions for the course, which cases are assigned, due date, and anything else your students need to know.

Person Responsible: Select the user responsible for the course from your list of eligible administrators. The person responsible will be visible on the course page to all students and administrators associated with the course and will be notified when the course reaches its end date to either delete or extend the date of this course.

Start Date: Visible to all course users.

End Date: This date will show on the courses page for all associated users. When the end date is reached, the person responsible for the course will be notified and asked to delete or extend the date for this course.


6. Click Create Course.


7. You will then see a notification of successful course creation. On your new course page, you will see your course information at the top and the content you have selected showing below.


Add Users to the Course

Only the users that are added to custom courses will be able to view and access it, so it is important that you complete this step. All users assigned to a custom course will receive an automated email invitation. You can add or remove users at any time.

Remember: Users must be rostered in your program before you can assign them to a custom course.

  1. From the custom course page, choose Course Users button in top right-hand corner. This will take you to the Course Users page.

You have two options to add users:

Add by Email will allow you to batch add the students to the course, rather than adding them one by one from a list, and is recommended if you have a large group of students to add to a course.

1.Click Add By Email in the upper right-hand corner.


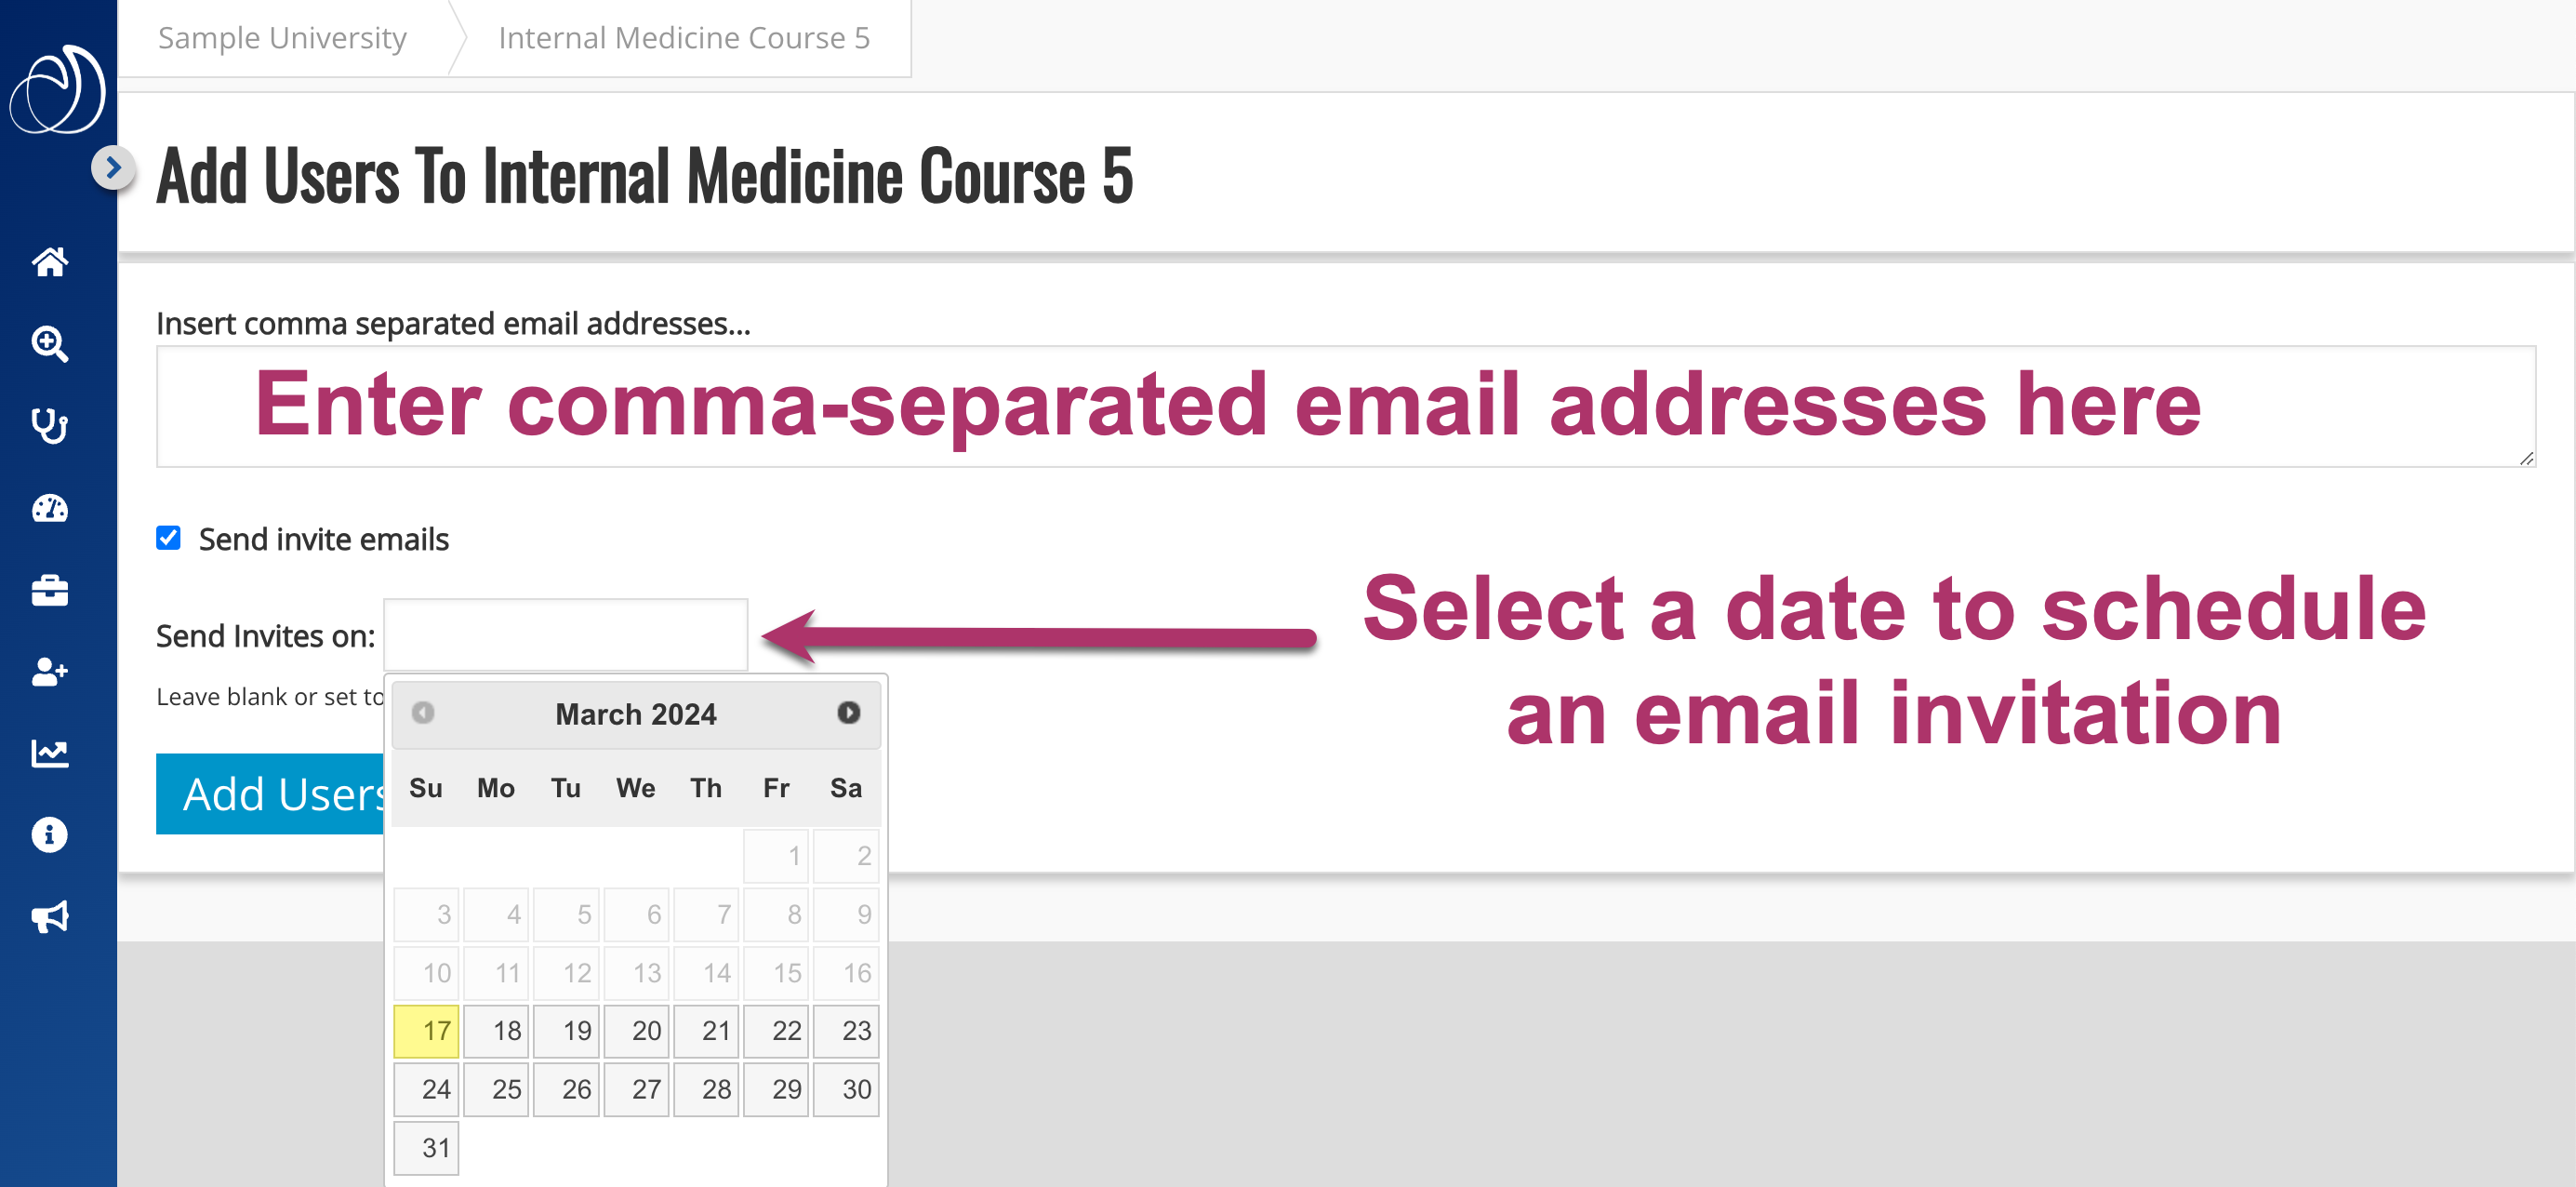
2. Insert comma separated email addresses into the open field. It is recommended that you have list of student emails in a column list (in Excel) which you can simply copy and paste into Aqueduct.


3. Select a date to schedule an email inviting users to access this course. If you do not choose a date, the email invitation will send immediately.


4. Click Add Users button directly under the field.

Add by List allows you to select users to add to your course by selecting them from the list of current users in the system. This option is recommended if you are adding individuals or small groups of students to a course.

1.Click Add By List in the upper right-hand corner.


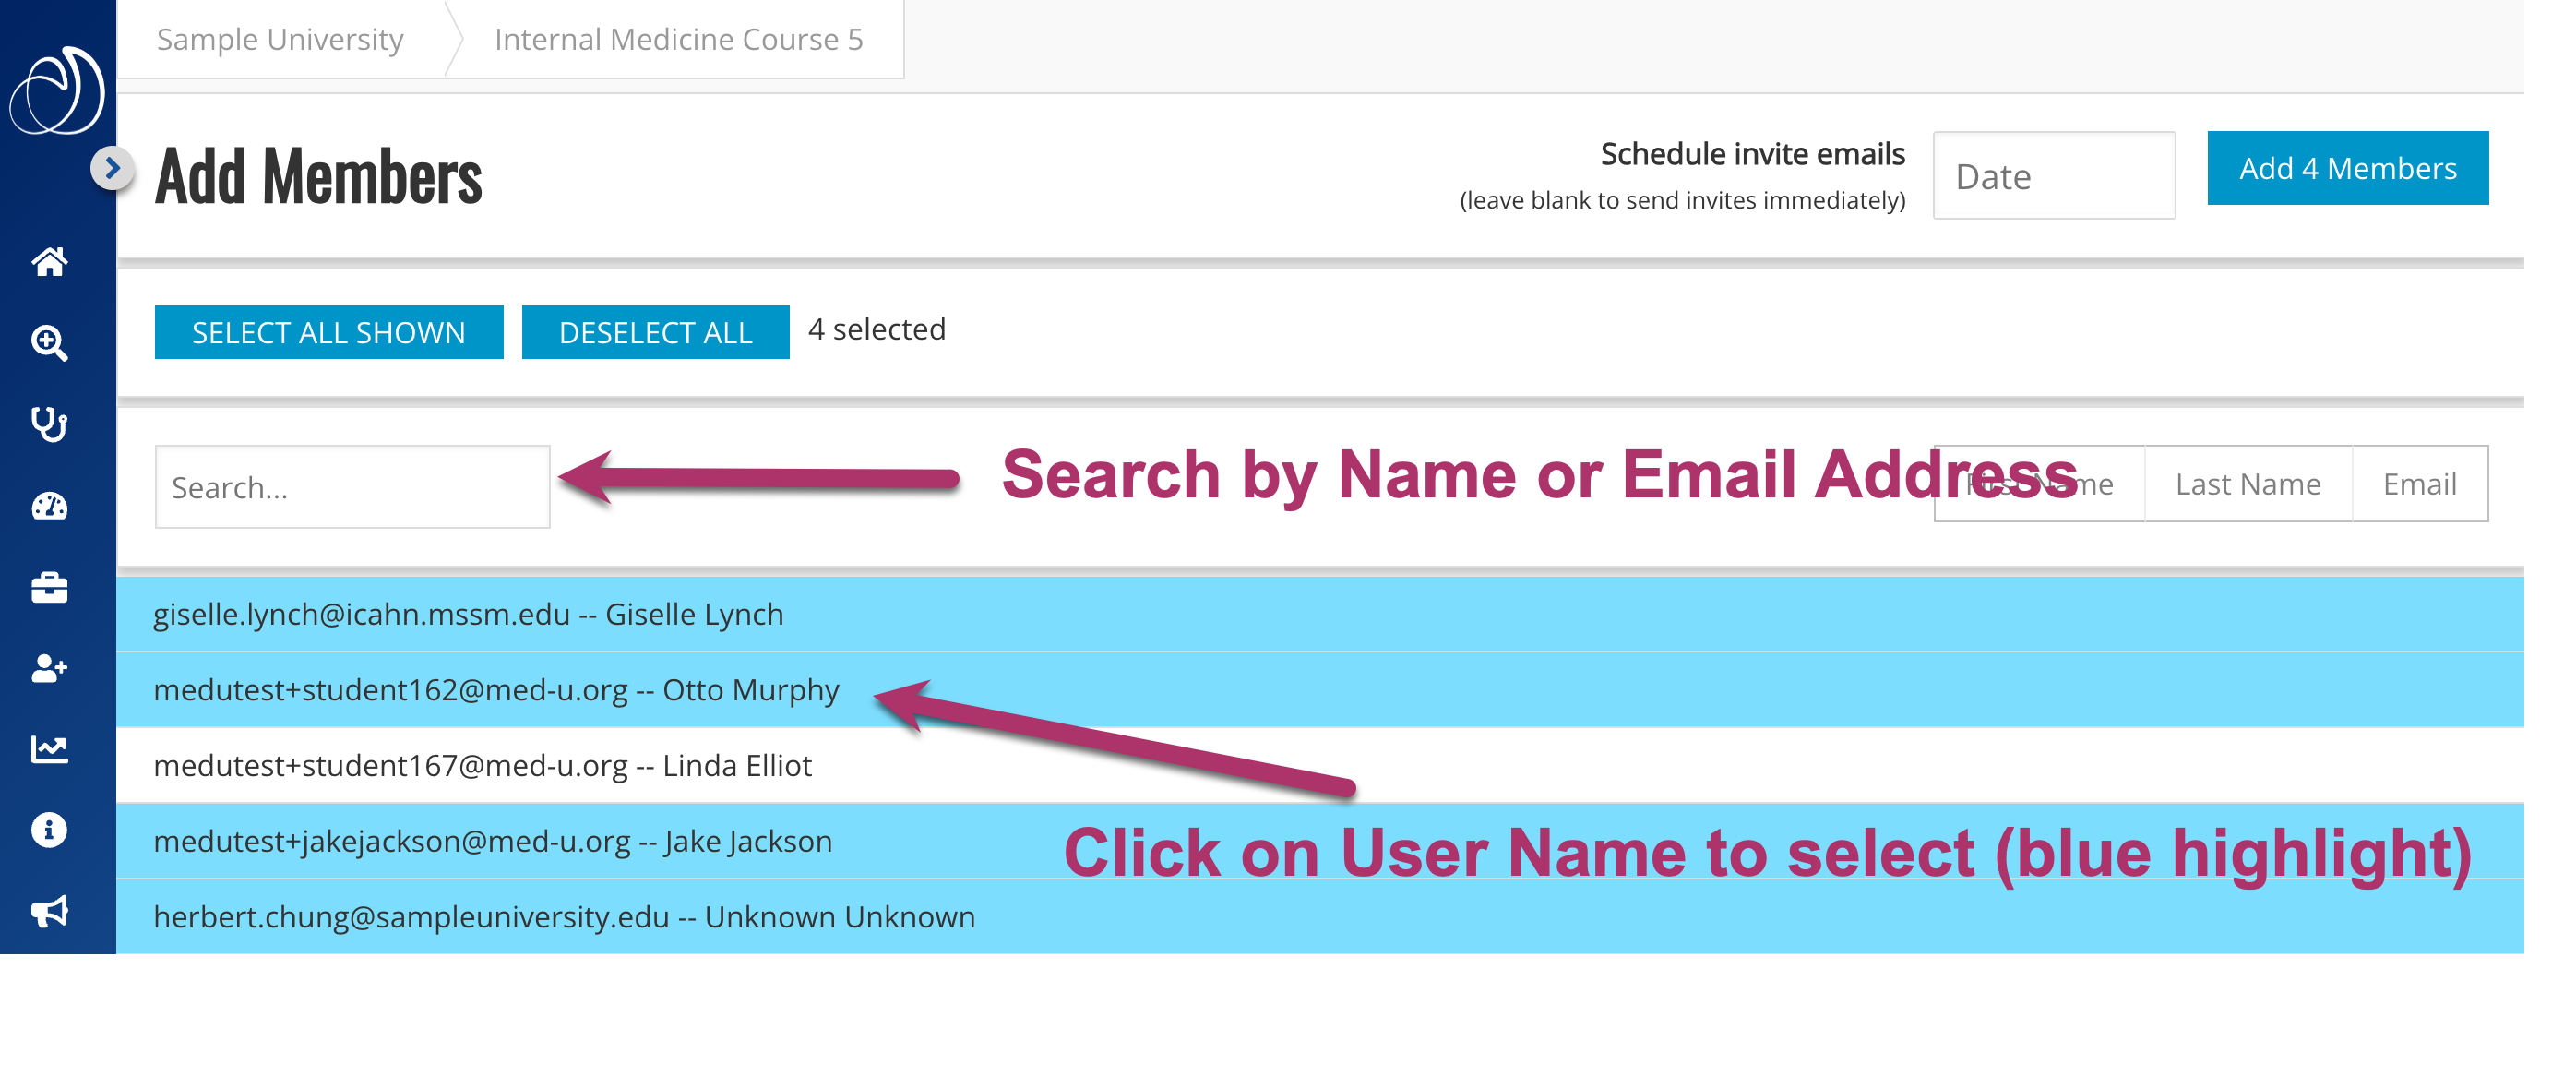
2. Scroll through list to find specific users or use the Search feature to search for a user by name or email. Please note that if “Unknown Unknown” appears to the right of the student email address, they have not yet completed registration or signed in.

3. Click on a user to select them.


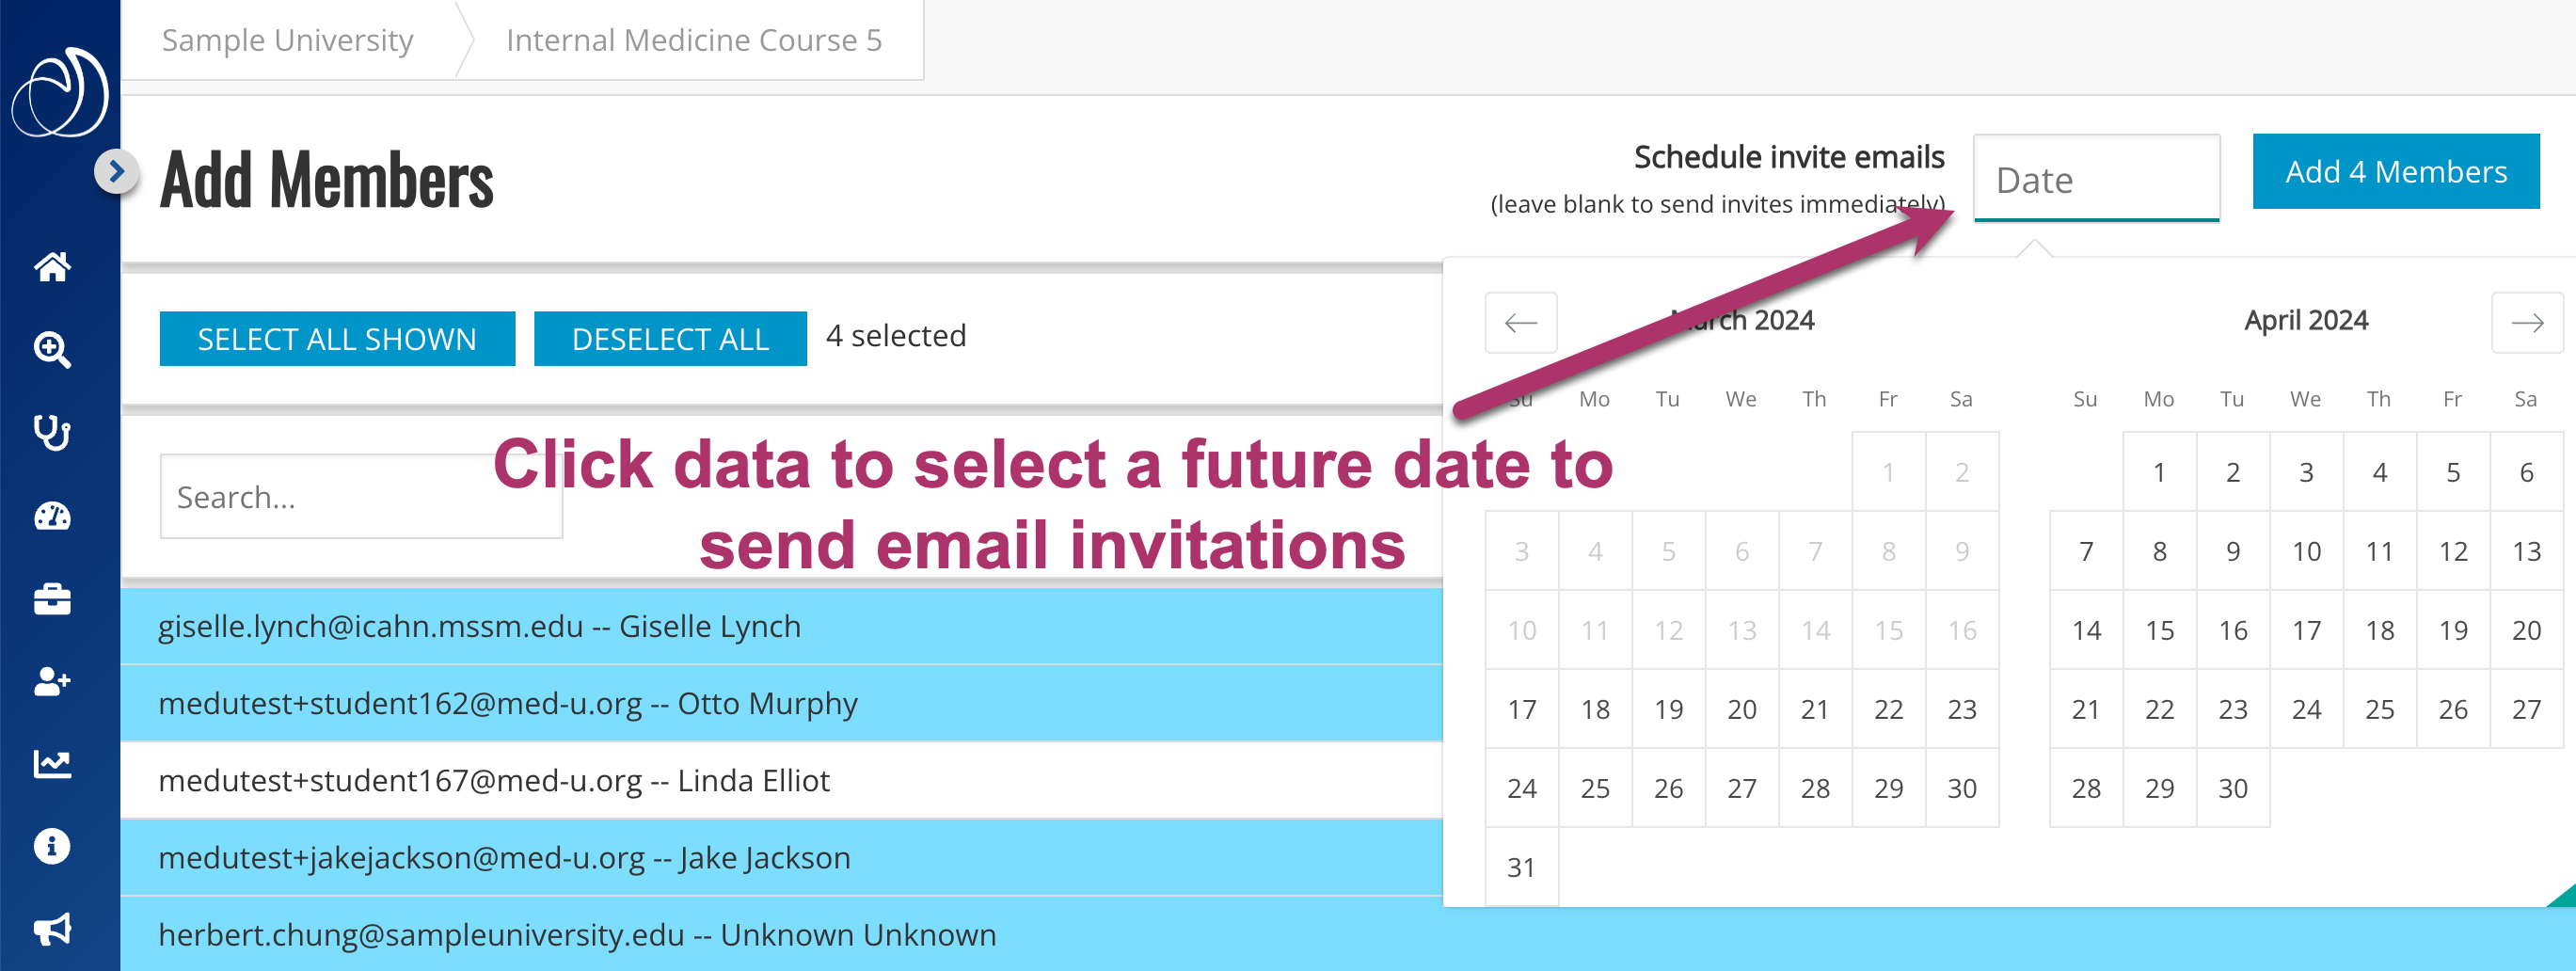
4. Select a date to schedule an email to your users inviting them to access the course. If no date is selected, the email will be sent immediately.

5. Once you have completed your selection(s), click Add Members button in top right-hand corner.

Confirm Your Users Were Added Successfully

1. A message will appear at the top of the course page indicates the users that were successfully added to the course.

2. If you receive a message saying “The following emails are not members of the group yet but were saved to be added to the course later ….” It means the system does not recognize those emails as having been previously rostered. Check to see that you entered the email addresses correctly. If so, contact your Program Service Administrator to ask to have the users rostered in Aqueduct. Once they have been rostered in Aqueduct they will be automatically be added to the course.

Fail to add members in content library

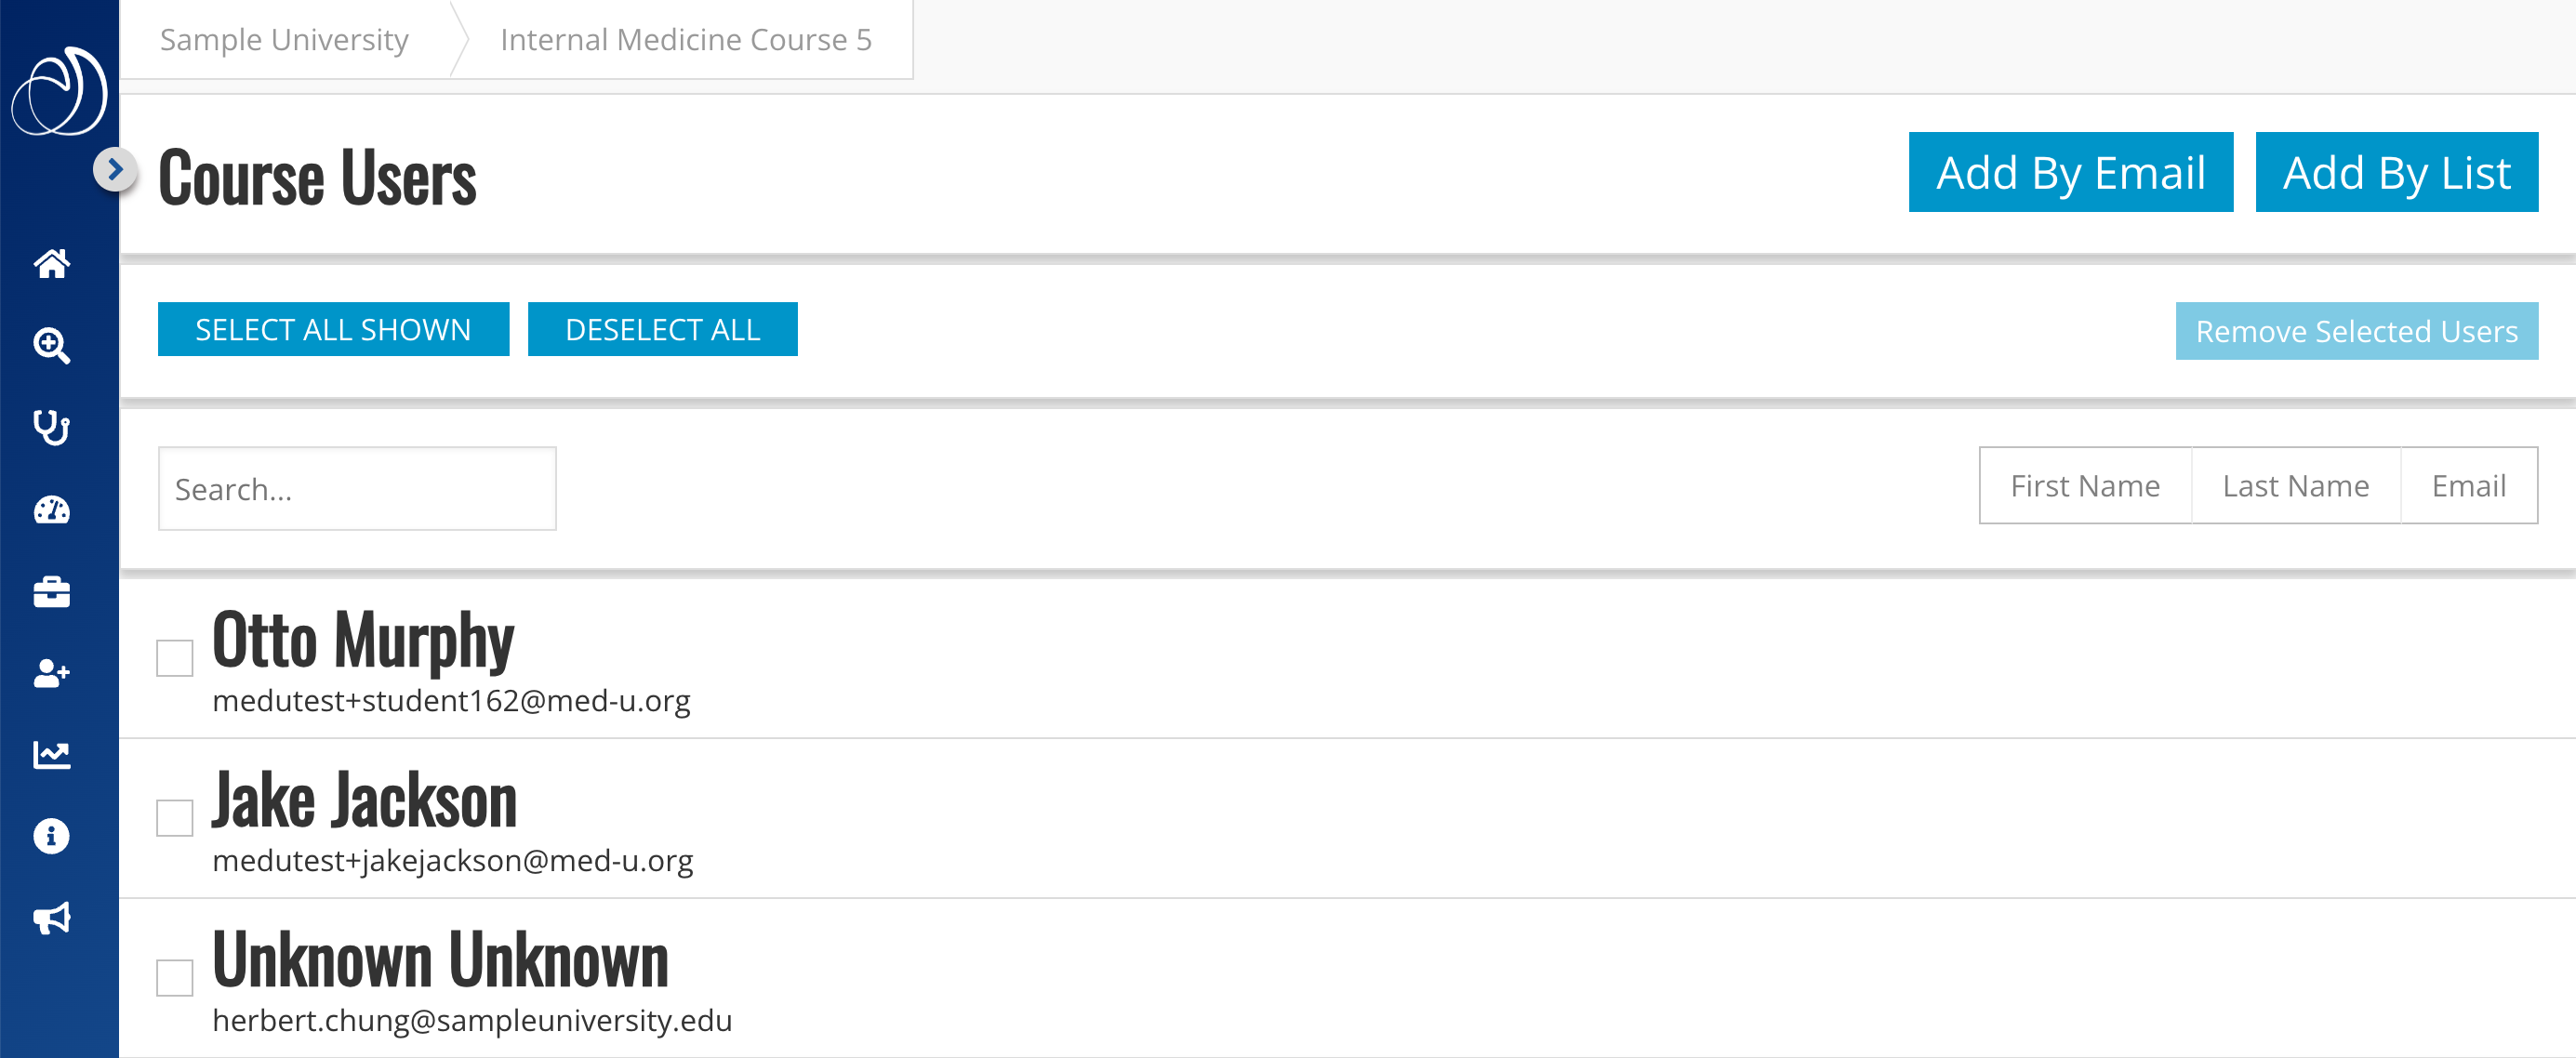
Click “Course Users” to view all users that have been added to the Course.

Click the “Course Users” button to view all users added to the Course. You can also duplicate your custom course to create new courses.

Rostering Students in Aqueduct

In Aqueduct, it’s easy for administrators to manage student access. The most important thing to know is that students need to be rostered in Aqueduct in order to have access to the Aquifer courses. Be sure to add new students to your program at the start of each academic year or semester.

Notes about Student Rosters:

  • Please inform students that you will be using their official institutional email address only. Using official institutional emails exclusively allows a consistent way for you and students to manage log-in, and for Aquifer support to assist students who need help.
  • The format for inputting a student roster is comma separated email addresses ONLY. You will want to download this list from your current system to a CSV file.

Access the Student User Panel

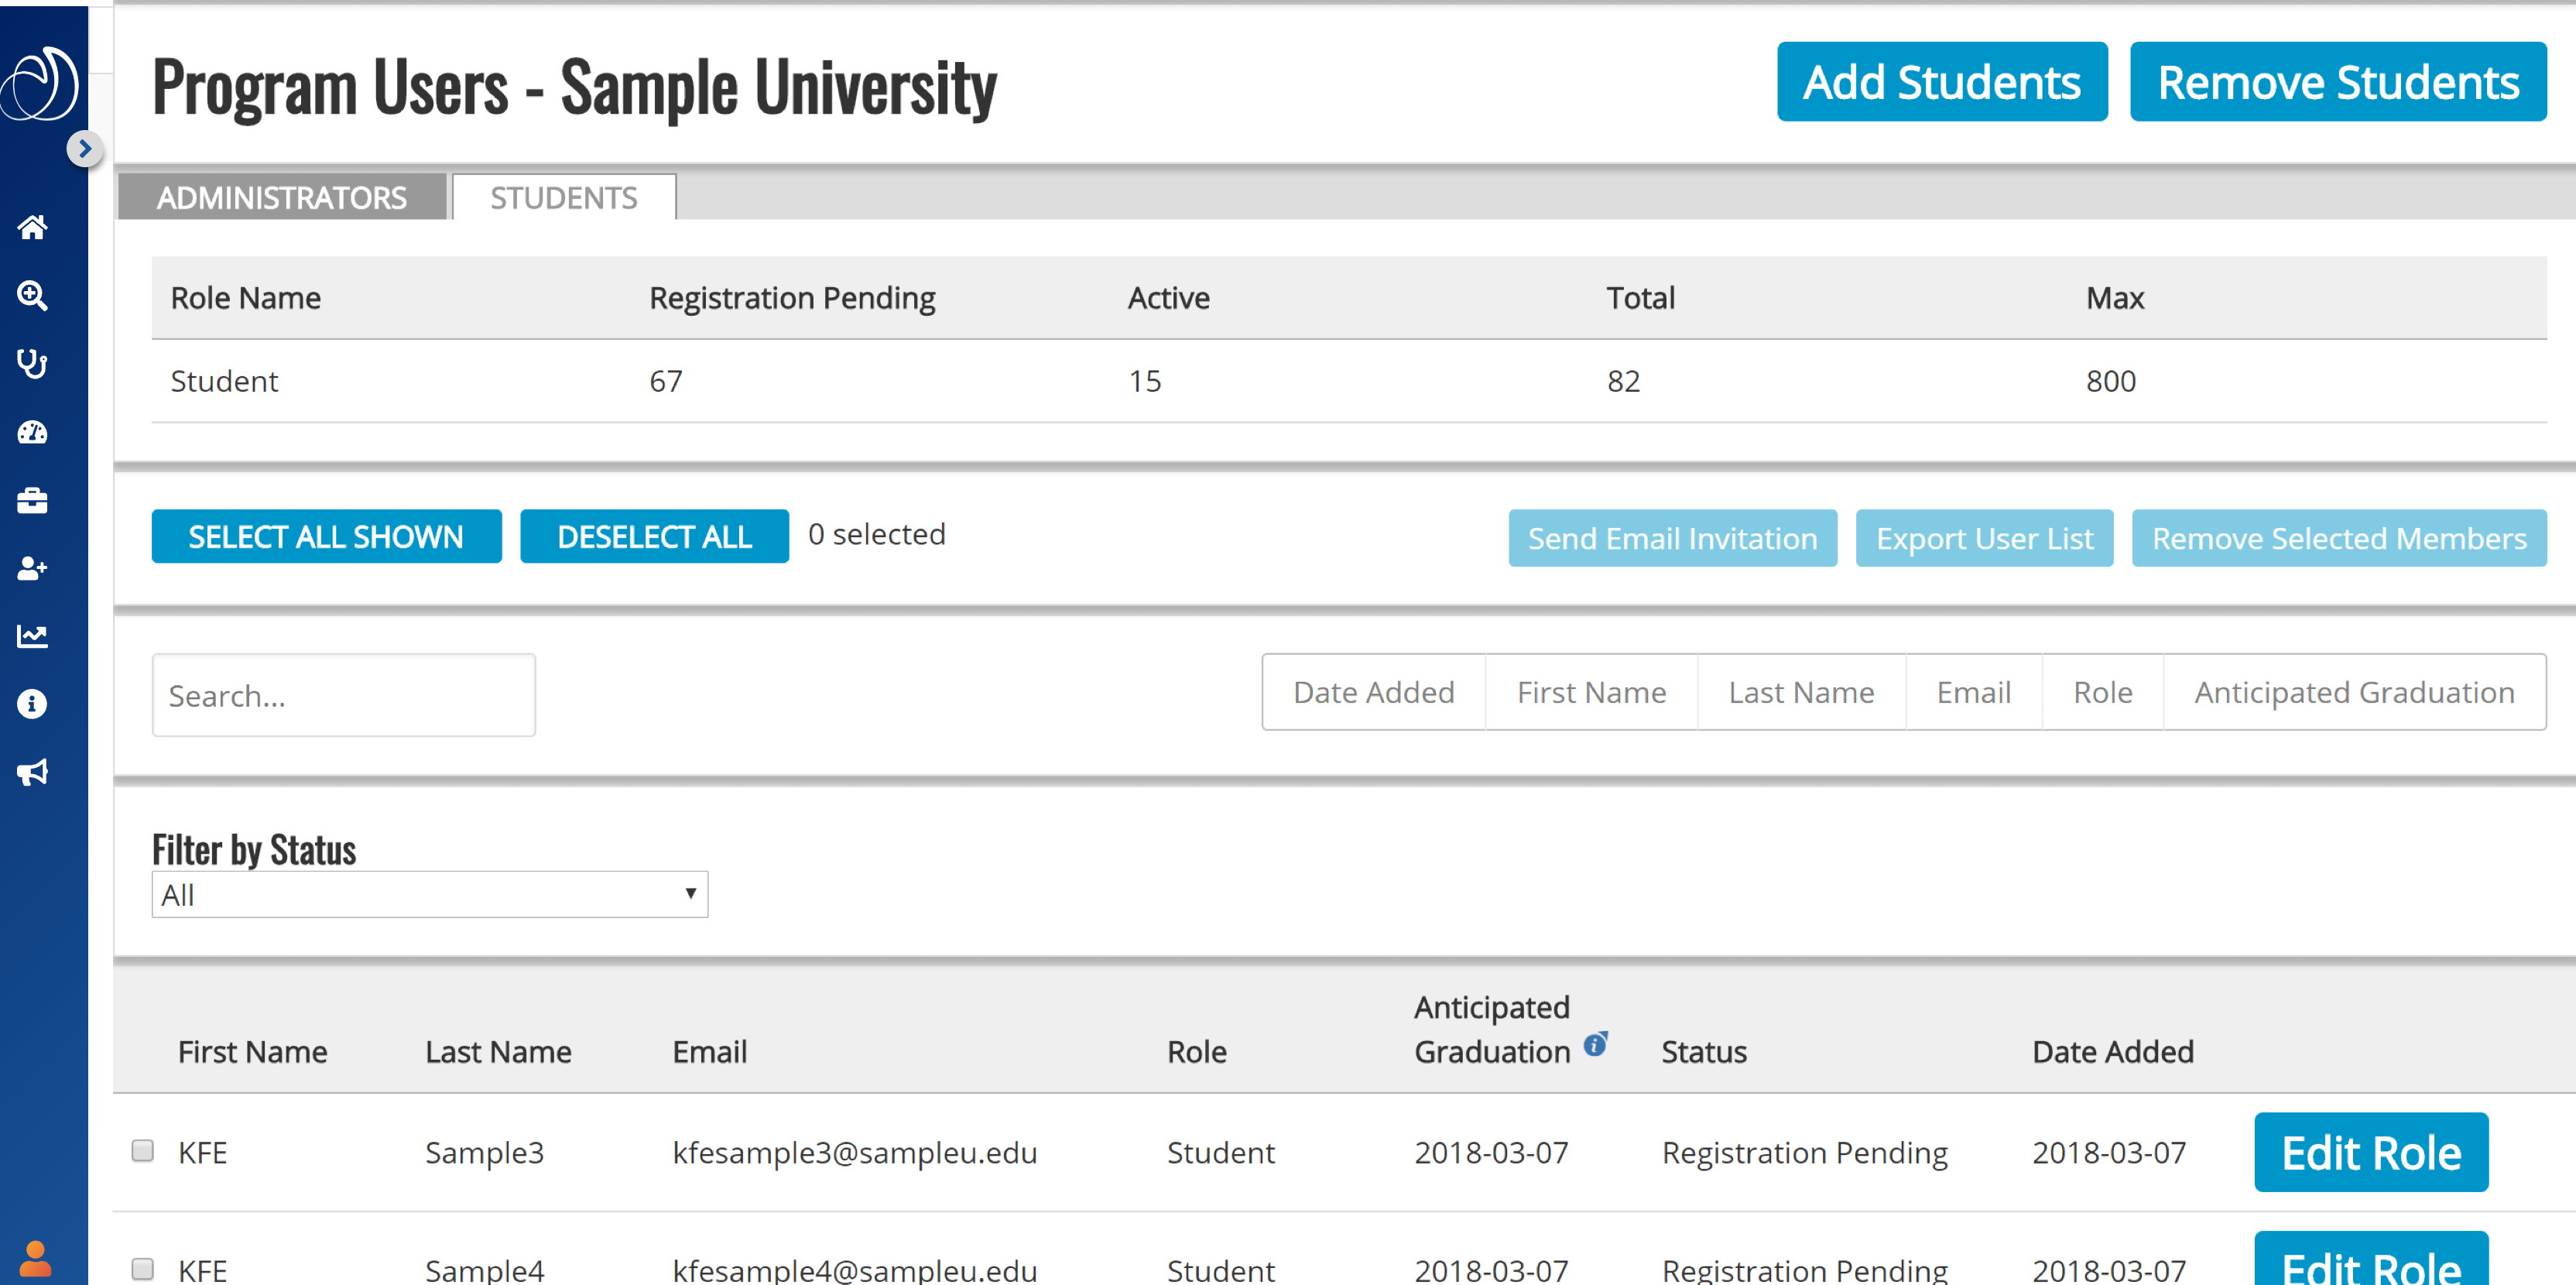
To access the student user panel, click on Users in the top navigation. From the program users page, click on the Students tab.

Select Students

Details on the student user panel can be found in our Managing and Removing Student Users post.


Adding Students to a Program

From the student user panel, click on the Add Students button at the top of the page.

Add Students Button

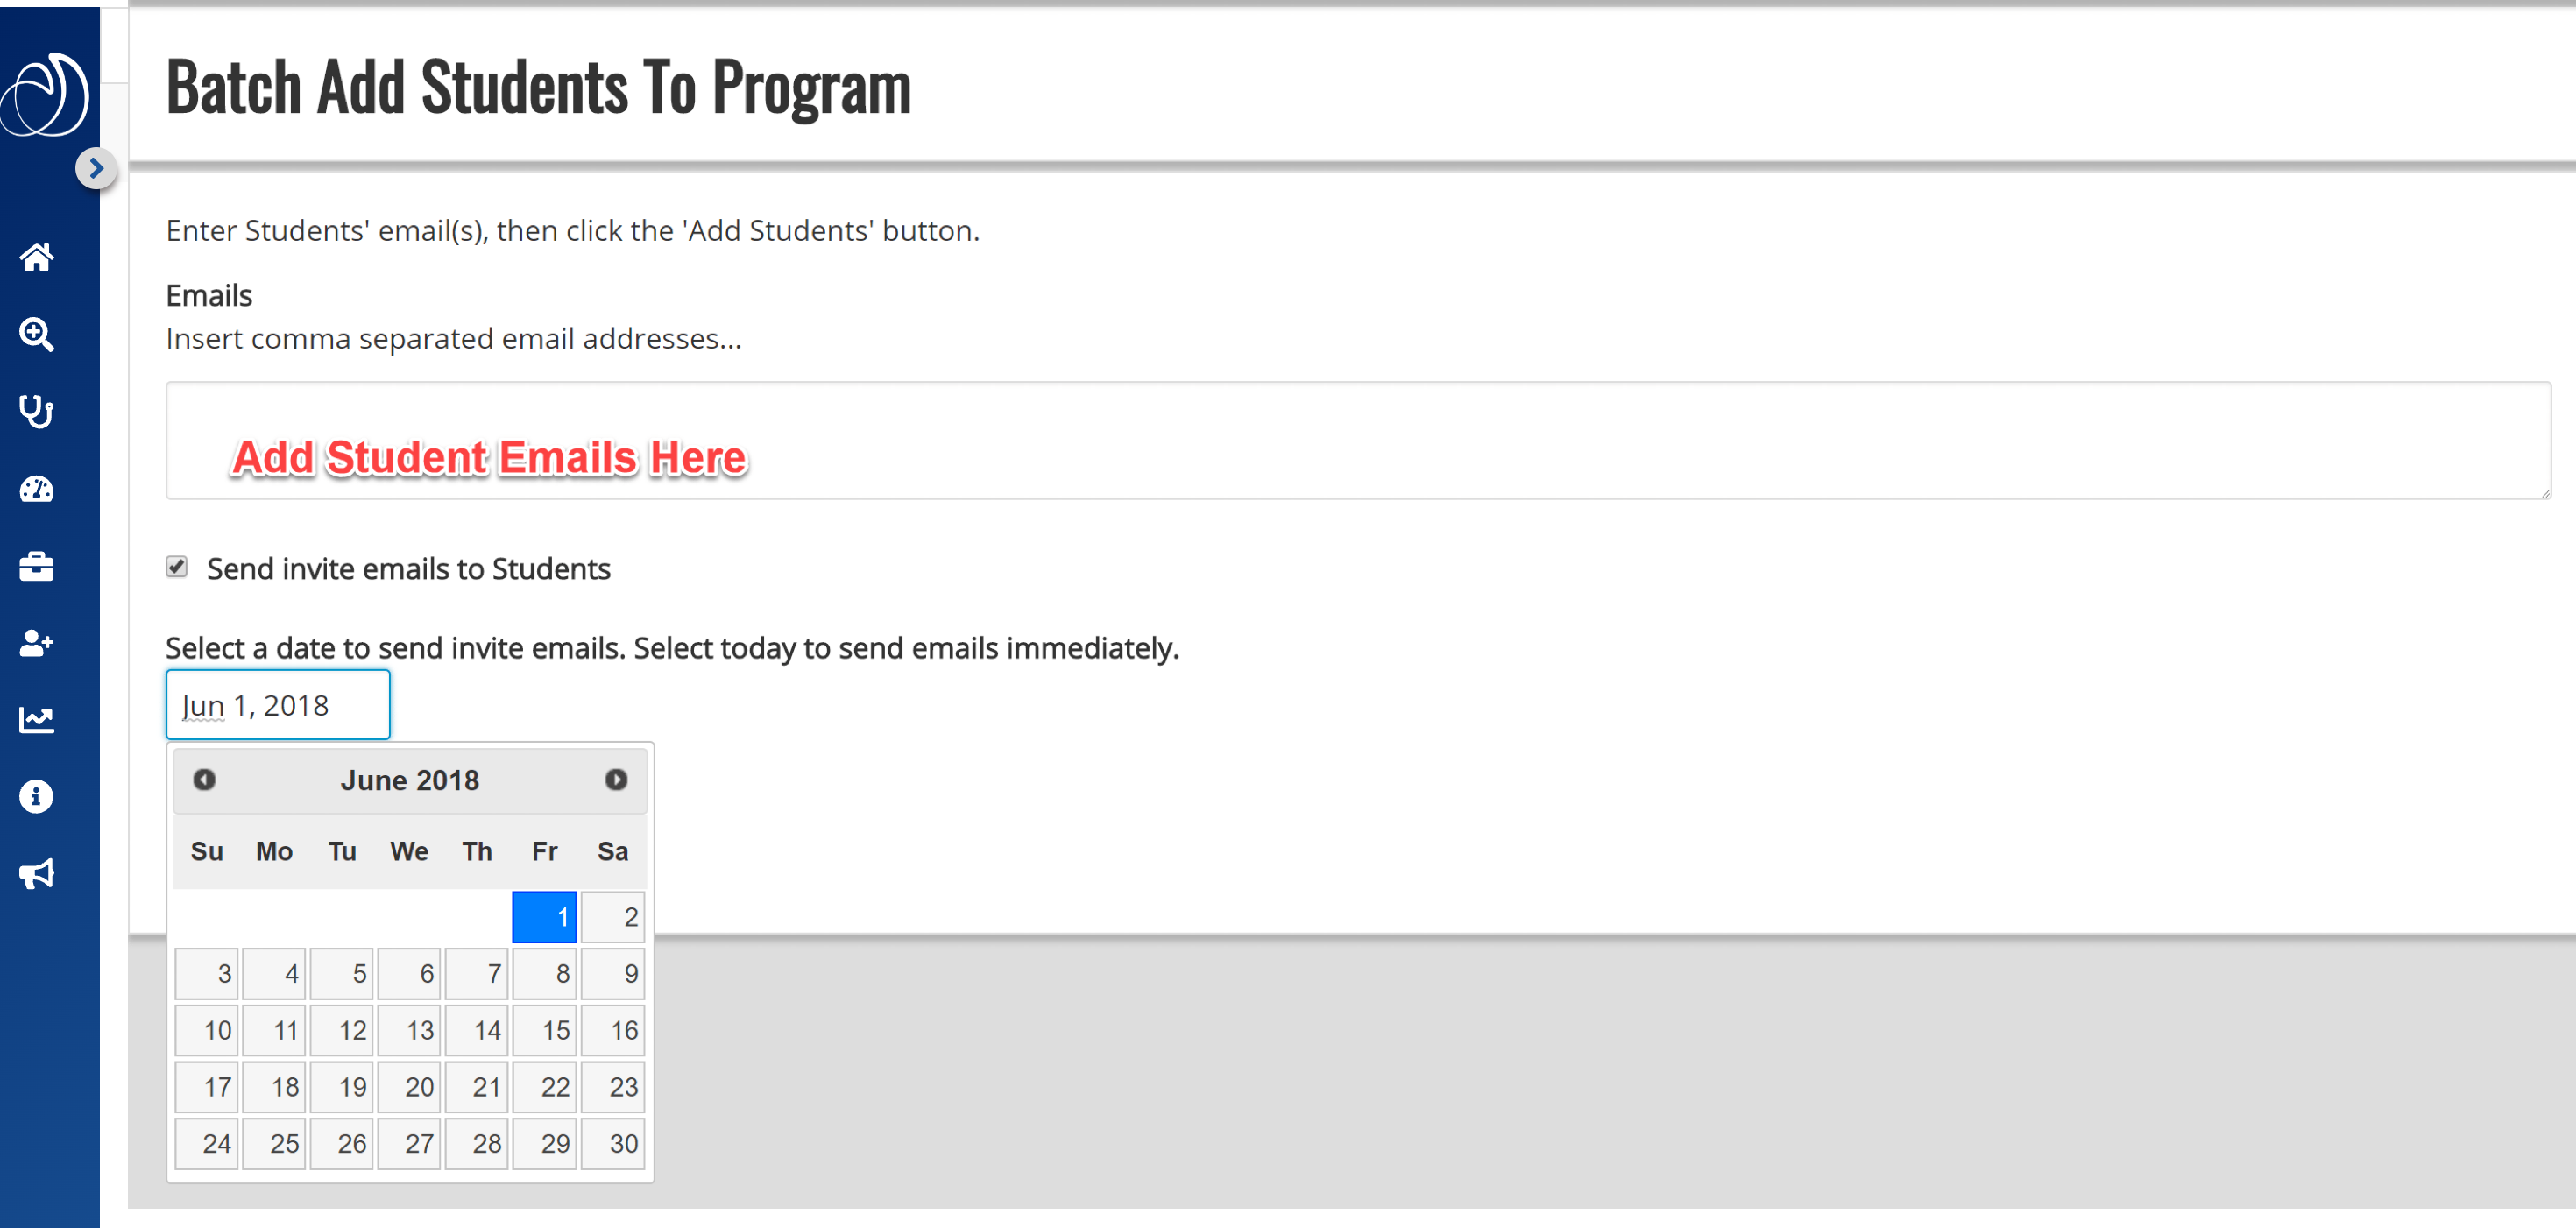
Copy/paste your student emails in comma separated format on the screen. You can also add new students one by one throughout the year as needed by simply typing their email address into the box.

Batch Add Students

If you would like to schedule an automated email inviting your students to access your program’s Aquifer subscription, click on the checkbox next to the “Send invite emails to students” text. If you do not want to send automated email invitations at this time, don’t check the box and click on Add Students. You will have the ability to send email invitations at any time once your students are added to your program.

Batch Add Students on Date

If you wish to send an automated email invitation, a date selection field will appear after you check the send invite box. Schedule your email invitation by selecting the date on which you would like it to send. If you select the current date, your invitation will send immediately.


You will see a confirmation at the top of your User page listing the user(s) that have been added. If you have included any student emails that are already part of the program, you will see a red notification bar with that message.

Email address added

The students you added will now appear in the student user list below as “Unknown Unknown”, showing their email addresses and a status of “Registration Pending”. When the students sign in and complete their registration, their status will change to “Active” and this screen will show the values that they enter for First Name, Last Name, and Anticipated Graduation Date.

Registration Pending

To learn more about student user management and tools, please view our Managing & Removing Student Users post.

Integrating Aquifer Cases into Your Curriculum

Effective, successful integration of Aquifer cases into the curriculum depends upon careful consideration and planning.

Proven Integration Strategies Include:

Creating clear learning objectives from the Aquifer cases that link to your course objectives
  • Articulate clearly to students how the case learning objectives fit into the overarching learning objectives for the course.
  • Discuss the use of Aquifer cases in student orientation materials.
  • Require student completion of the cases or a relevant subset of cases.
  • Fill gaps in clinical exposure with virtual patients – count completion of the case toward clinical case log entries, which assists in meeting LCME standards as well.
  • Include case content in formative or summative assessment.

Incorporating time into your curriculum for the Aquifer cases

Research has demonstrated that the most effective integration strategy is building in time for students to work on the cases.

  • Eliminate redundant teaching from didactic sessions, required reading, other course assignments or unrelated assessments.
  • Schedule time for students to work on the cases during the course.
  • Ensure sufficient access to computers and the internet, particularly during clinical assignments and away rotations.

Blending Aquifer content into clinical teaching
  • Ask clinical faculty to review case summaries for common presentations, building on the content before or after clinical encounters.
  • Compare and contrast the presentation of Aquifer cases to students’ own patients.
  • Encourage teaching residents to draw from the case resources – they likely completed the cases as students themselves!
  • Use the Aquifer clinical reasoning structure to frame and expand discussions of patient workup and management.

Building on Aquifer content in didactic sessions
  • Align required case completion to your course didactic sessions.
  • Use Aquifer cases to guide sessions on required competencies: communication skills, professionalism, cultural competency and systems-based practice.
  • Create active learning sessions––such as team-based learning or flipped classroom sessions––that require students to problem-solve and apply what they have learned.

Creating new learning experiences that elaborate on Aquifer content

Educators have reported a number of innovative methods for expanding on Aquifer content––taking clinical learning to a higher level:

  • Clinical reasoning assignments
  • Patient safety and quality improvement exercises
  • High fidelity simulation exercises
  • Standardized patient sessions
  • Reflection writing exercises

Sharing Innovations

Do you have integration strategies that have worked well for you? Do you have teaching innovations that you’d like to share? Contact us. We’d like to disseminate them!

Engaging Your Faculty with Aquifer

With Aquifer you can tell your busy teachers to relax–you’ve got the core content covered! Now they can do what they love best: teach about patients, observe students’ skills, provide useful feedback, and mentor students’ professional development.

Realizing the full value of Aquifer occurs when students blend their learning from our cases effectively into their foundational knowledge and clinical experiences. Your clinical faculty, community-based preceptors, didactic faculty, and teaching residents provide invaluable opportunities for this cognitive integration to occur.

Eight Great Tips for Teaching with Aquifer

We offer a variety of password-protected access options:

  • Student-level access: Includes card-by-card case navigation with a case summary provided upon case completion. All faculty, community preceptors, and residents who share your institutional email address may self-register for all of the courses to which your institution subscribes.
  • Teacher access: Includes open case navigation, access to the case summaries, and to the case search feature of the Aquifer website. Contact your institution’s Aquifer Program Service Administrator or Curriculum Administrator to authorize access.

Our case summaries provide an in-depth review of each case––the learning objectives, the differential and final diagnosis, and key teaching points. All of the summaries are available to registered instructors in the relevant Aquifer course. Encourage your faculty and residents to:

  • Familiarize themselves with the Aquifer cases that are common to their practice setting.
  • Incorporate relevant Aquifer case content into their didactic session.

Our site is optimized for mobile access, making teaching on-the-fly easy. Your teachers may quickly find relevant cases or case content through our powerful search feature found on the Courses page.

  • Website search (open to the public): Searches the Aquifer site for relevant content, including the virtual patient presenting problems. Preceptors and residents can encourage students to complete Aquifer cases just prior to or following clinical patient encounters.
  • Case search (available to registered instructors only): Searches the virtual patient cases themselves, identifying all relevant content and multimedia within the cases and case summaries. Preceptors and residents can dive into the cases at a moment’s notice, drawing immediately from the rich resources that the cases provide.

Encourage your clinical teachers to visit our Educators page and use our integration resources to:

  • Compare and contrast the presentation of Aquifer cases to students’ patients.
  • Draw from the wide array of available multimedia resources and Web links for use in their own teaching.
  • Employ the Aquifer clinical reasoning structure to frame and expand patient work-up and management discussions.
  • Use the case analysis tool to work through an Aquifer case together––or apply the tool to a challenging patient presentation.
  • Apply the Aquifer summary statement rubric to students’ real-time case presentations.

Residents can be unsure in their new teaching role. Remember––they probably completed the cases as students themselves! Now they have access to the instructor resources. Urge them to draw from the cases they found most useful, and to use Aquifer’s Educator Resources as a way to get started.

Clinics get busy. Admissions mount. Faculty and residents struggle to balance it all. Students worry about finishing this week’s cases. Problem solved! Increase your teacher and student satisfaction by letting them know it’s OK to give students some time to work on the cases when the day gets out of hand. How often is it that easy?!

Decrease lecture time and increase active learning in your course or clerkship when you integrate Aquifer content into faculty or resident teaching sessions.

  • Align required case completion with your course didactic sessions––and cut down the need for your faculty to lecture. Ask them to do a chalk talk instead: We guarantee the students will enjoy it a lot more.
  • Expand on Aquifer content about the competencies that are more effectively taught in face-to-face discussions, including communication skills, professionalism, cultural competency, and systems-based practice.
  • Create active learning sessions––such as team-based learning or flipped classroom sessions––that require students to problem-solve and apply lessons they have learned from working through the virtual cases.

Educators have reported a number of innovative methods for expanding on Aquifer content––taking student satisfaction and clinical learning to a higher level:

  • Clinical reasoning assignments: Create and solve new “what if” scenarios built off of our virtual patients.
  • Patient safety and quality improvement exercises: How would you measure the quality of the care received by an Aquifer patient?
  • High fidelity simulation exercises: Create scenarios that make our virtual patients take a turn for the worse.
  • Standardized patient sessions: What would happen if this Aquifer patient could talk?

Orienting Your Students to Aquifer

Help Maximize Student Learning

Orienting your students to Aquifer will make a big difference in their learning experience. You can help them maximize their learning by sharing some key information to help them get started and understand how Aquifer fits into your plans for your course or clerkship.

3 Steps to Successful Orientation

As always, we’re here to help! Aquifer has developed resources to make it easy for you to share key points with students in a quick, engaging way. We’ve also identified the key questions you’ll need to consider about how Aquifer is integrated into your course to be sure students clearly understand your expectations.

1

Start with Our Slides

We’ve created slides with the basics on Aquifer cases and useful tips for students, ready to drop into your course or clerkship orientation.

2

Watch Student Story Videos

Let your students hear from their peers to help them understand how Aquifer cases can help them advance their skills through complete, realistic clinical experiences. Show our two 1-minute videos in your orientation, or have your students watch them on their own by sharing this link: aquifer.org/students.

3

Share Goals & Expectations for Your Course or Clerkship

Orient students to your rationale for using the cases in your curriculum is important.

Recommended Article

We recommend reviewing the article below when planning your Aquifer use to understand key student insights.

Key Questions

Review the following questions during your course orientation or include the answers in your course materials.

Review the Aquifer educational goals with your students and articulate how you have chosen to incorporate them into your own course goals. Discuss how the cases will advance their understanding of the foundational concepts and clinical skills within your course.

Many educators require students to complete all of the cases within an Aquifer course. Other approaches include assigning specific cases to fill an important gap in clinical experience or in faculty teaching expertise or assigning a specified number of cases of the student’s choosing.

Students are encouraged to complete the remaining cases as needed. You may also wish to make your students aware of the additional courses that Aquifer offers with each subscription.

Regardless of your approach, ensure that your students clearly understand your expectations at the beginning of the course.

Most educators choose to use our student reports feature to monitor students’ case progress and engagement. Many document case completion to meet institutional case log or LCME requirements. Be clear with students at the beginning of your course that you will be monitoring their progress, and how and when they will be notified if they are falling behind, or devoting insufficient time and attention to the cases.

To assist students in pacing themselves through the cases, many educators assign a minimum number of cases to completed each week. Additionally, best practice suggests requiring students to complete a specific case prior to a didactic session or related clinical experience. Ensure students understand that case completion is a requirement and will be monitored through the student log report.

Our cases are very effective for self-directed learning and independent study. However, proactive students can further their understanding by intentionally integrating their learning from the cases with their clinical experiences. Consider suggesting these methods during your orientation.

  • Completing or reviewing Aquifer cases just before or after seeing a patient with a similar presenting problem.
  • Comparing and contrasting the presenting finding from an Aquifer case with their patients’ presentation.
  • Applying the Aquifer clinical reasoning approach to their patient presentations and write-ups.
  • Using the Aquifer summary statement rubric when writing summary statements in the patient record.
  • Reviewing their questions about the cases with their preceptors or teaching residents.
  • Applying practice guidelines identified in the cases to their own patients.

Our research has shown that intentionally building time into your course for students to work on the cases is a critical integration factor (Berman et al, Academic Medicine Academic Medicine 84(7):942-949, 2009). Identifying and listing time to work on the cases in your course calendar is a straightforward method to make this time clear to students.

Integrating assessment closes the curricular loop and demonstrates to students that you value the Aquifer content and their time spent working through the cases. In addition to our Calibrate Formative Assessment for progress testing, some programs assign the Aquifer Clinical Decision Making Exam for Internal Medicine as a summative assessment. Other ways programs use Aquifer in grading and assessment is to include case completion as part of course grade, review students’ Summary Statement responses compared to expert comments, assign students to complete Aquifer’s Case Analysis Tool (CAT), or ask them to present oral reports on Aquifer cases, considering them as standardized patients. An early understanding of how their Aquifer work will be assessed ensures student attention to the cases, and enhances their engagement.

Webinar: Engaging Your Students & Faculty with Aquifer

For more tips on engaging and orienting your students with Aquifer, catch our panel of educators and student contributors sharing their experiences.

Don’t Forget: Anytime, Anywhere Access

Be sure to let your students know that all cases are available via our mobile apps. Download “Aquifer Clinical Learning” for iOS and Android to complete work anytime, anywhere—including working offline.

Aquifer Pediatrics Active Learning Modules

Aquifer Pediatrics Active Learning Modules are application exercises designed for educators to use with their students in small or large group settings. These modules have been thoughtfully prepared with the aim of minimizing teacher preparation time and maximizing learner achievement.

What is an Active Learning Module?

An active learning module is a type of facilitated student-centered learning session that promotes students’ ability to apply core concepts and information learned from pre-session assignments to new and more complex scenarios. Active learning modules typically consist of between one and three case vignettes, or “application exercises,” each followed by one to four questions that stimulate the student to combine and apply the learned concepts in new ways. Each question requires the students to do one or more of the following:

  • React to a clinical scenario
  • Interpret laboratory or other diagnostic data, or
  • Respond to other previously unseen information

Students should then have to make a specific choice or create a specific answer to the question.

Answers to these questions should not be found in the pre-assigned Aquifer Pediatrics cases (or in any other resource assigned in the pre-lesson homework), and can only be answered by synthesizing and applying the information learned to reach a single best answer.

Students should be expected to make decisions and use their judgment.

Application exercises simulate authentic clinical scenarios—with appropriate ambiguity and uncertainty—and allow each student or student team to reasonably select a different “best answer” provided they are able to support their answer with reasonable arguments based on the concepts provided in the cases and other advance preparation assignments.

Active learning modules can be used for:

  • Flipped classrooms
  • Team-based learning
  • Small group sessions

Using the Modules

There are currently active learning modules for:

  • Pediatric immunizations
  • Fever
  • Prescription writing/Patient safety
  • Child development: Identifying and classifying speech delay
Each module contains:
  • A detailed facilitator’s guide: This guide is designed to allow the course director to map the learning objectives to the course curriculum and to understand the expected learning outcomes. In addition, it is designed to provide the granular teaching points and higher order structure needed to allow an instructor novice to use the information to teach a session successfully.
  • Pre-session homework assignments: One to three Aquifer Pediatrics cases will be assigned in preparation for the session. Additional reading requiring less than 30 minutes of preparation will also be assigned.
  • Individual and group readiness assessment questions: A series of questions to administer to the students at the beginning of the learning session in order to hold the student accountable for the assigned pre-reading. If using team-based learning, the questions will then be repeated as a group.
  • Core concepts: Core concepts are the building blocks of clinical decision-making. They are the concepts that allow students to tackle novel clinical scenarios. These are the concepts that we want students to take away from the session.
  • Specific learning objectives: The learning objectives are the measurable outcomes for how a student demonstrates mastery of the core concepts.
  • Application exercises (in both PowerpointTM and pdf formats): The application exercises are complex clinical scenarios that stimulate students to apply the core concepts that they have learned through their pre-reading. They should require students to work together to come to a solution.

Where to Find the Active Learning Modules

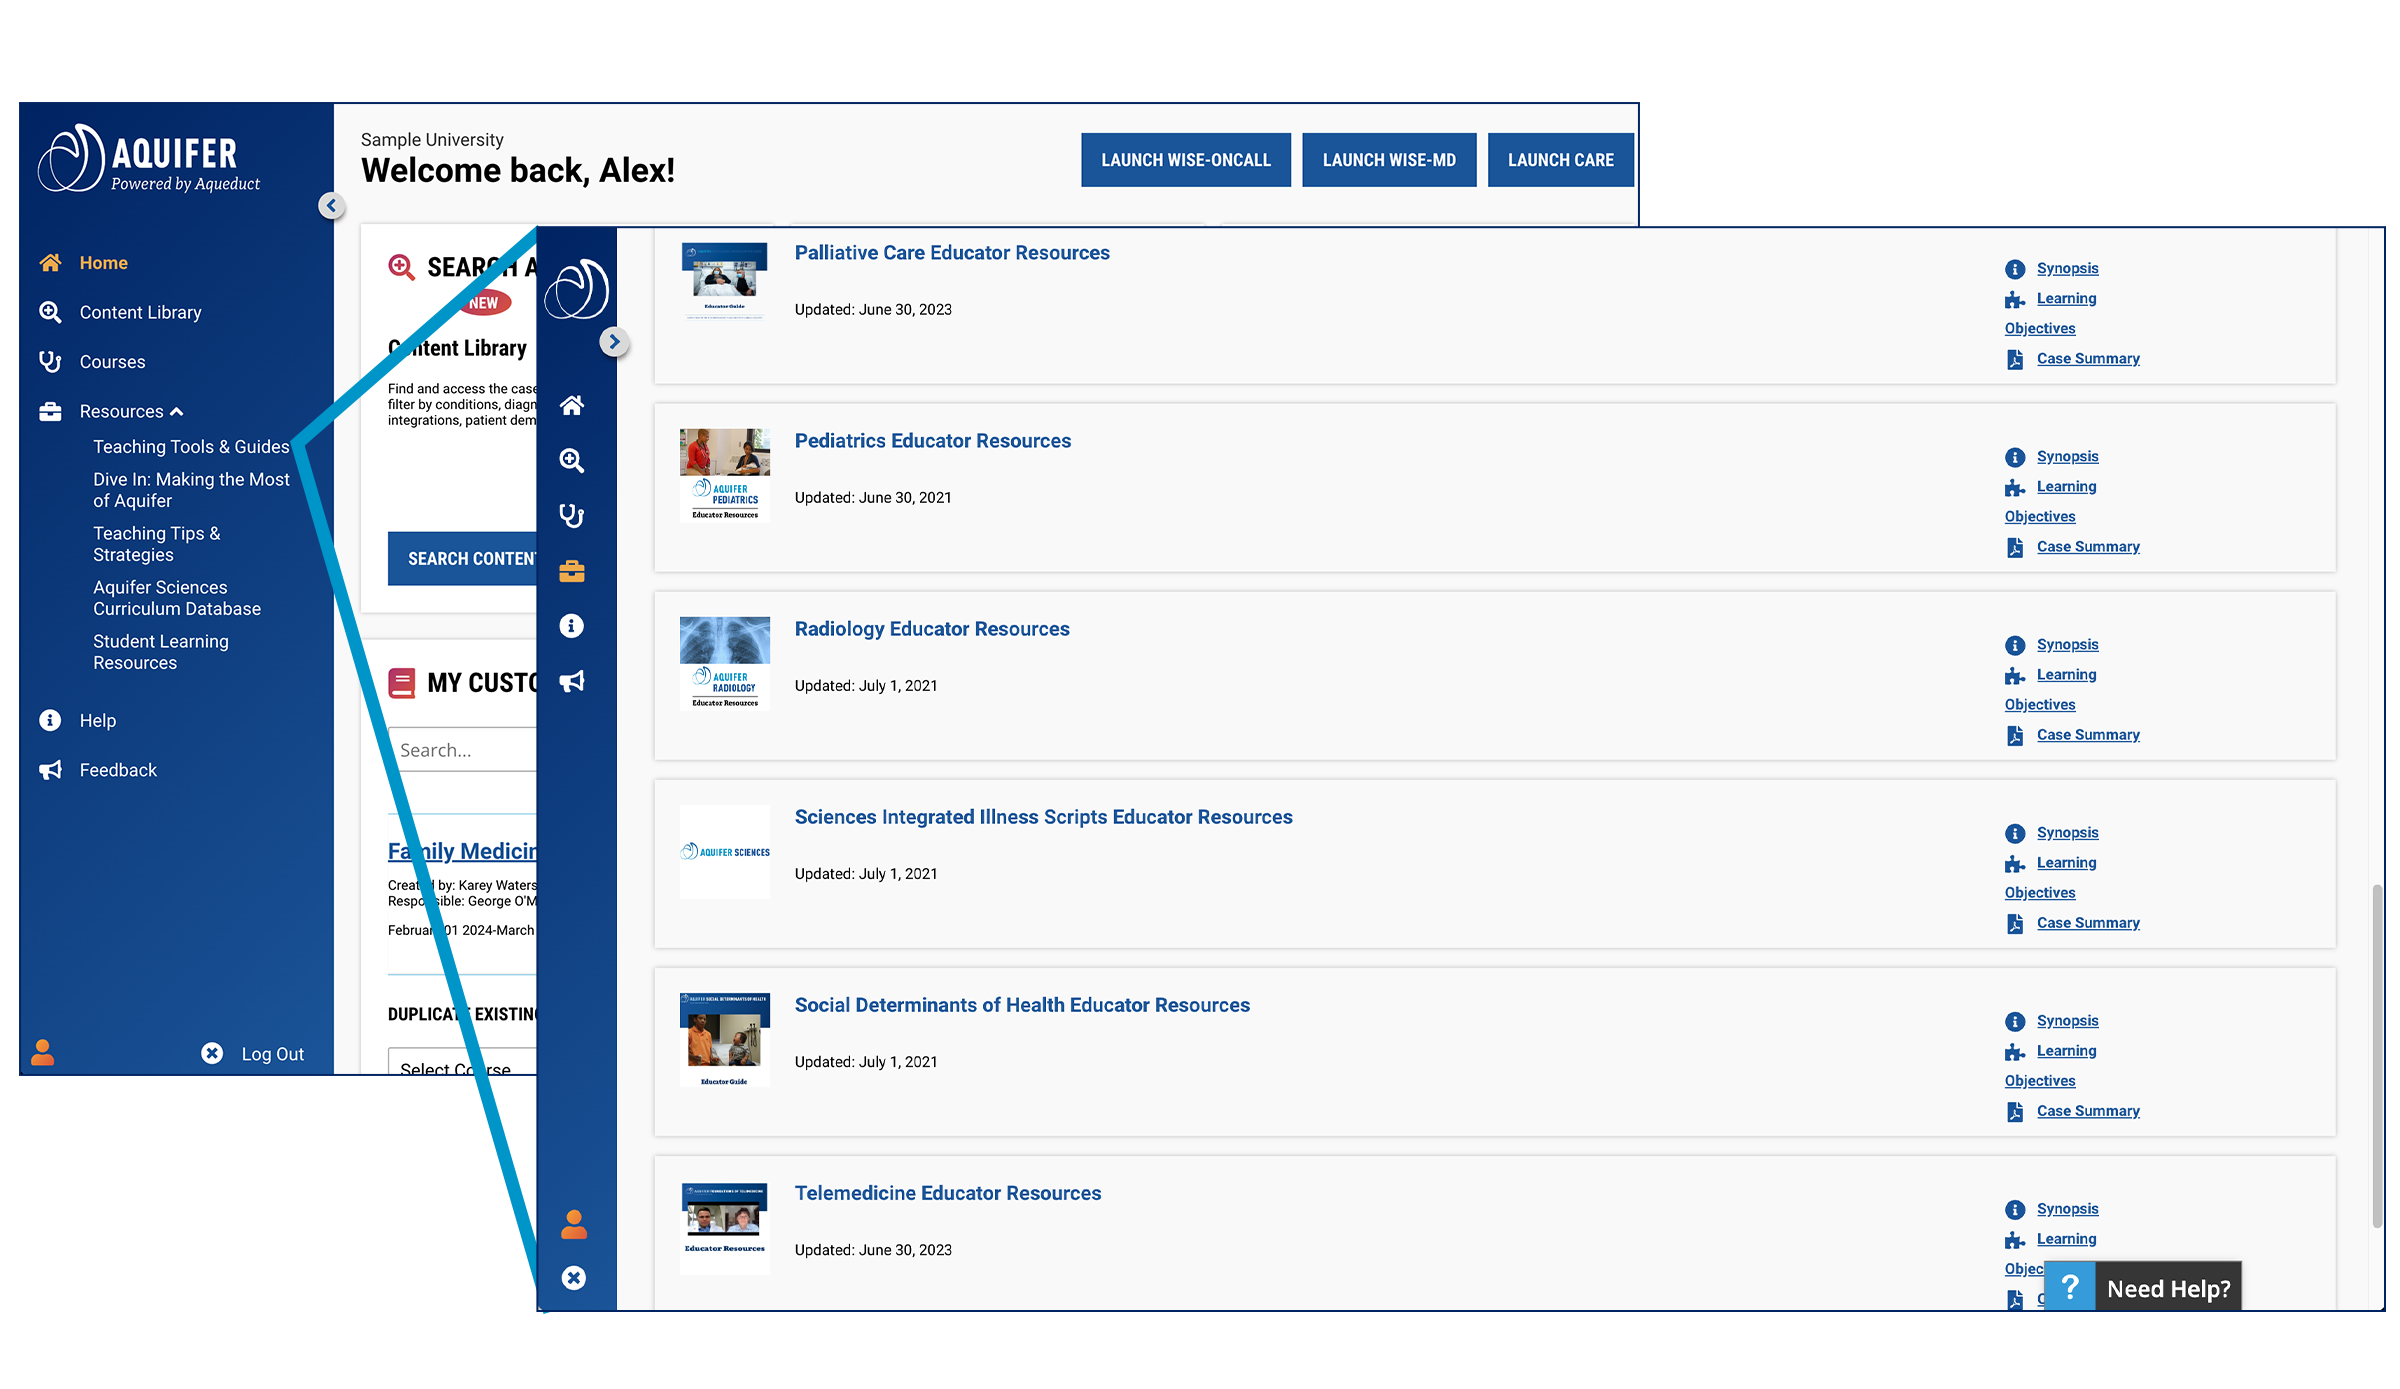
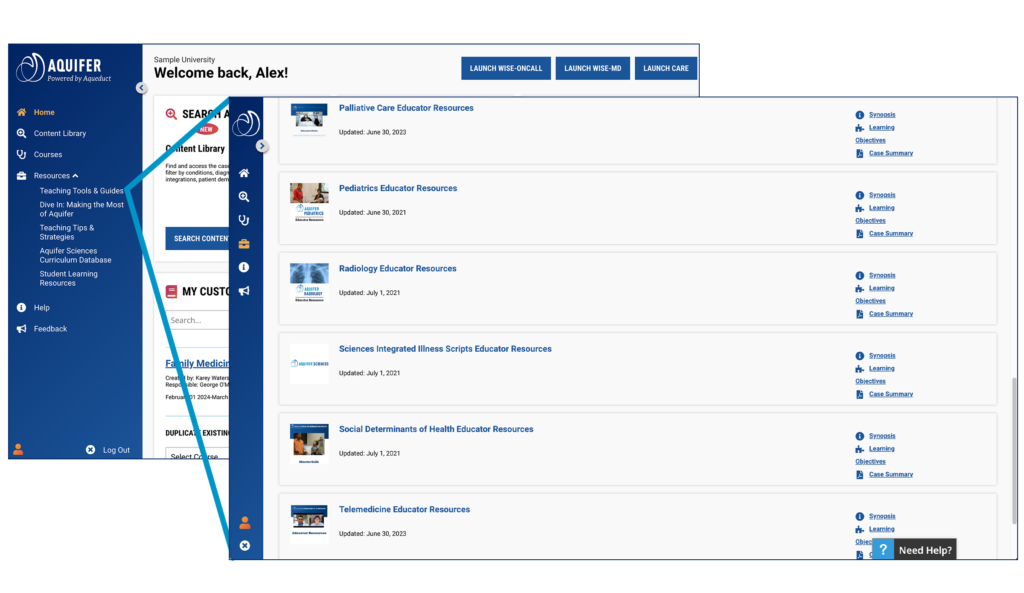
The Pediatrics Active Learning Modules are available to educators and administrators with current subscriptions to Aquifer Pediatrics or Aquifer Family Medicine. To access this resource, sign in to Aqueduct and open the resources tab on the left-hand side of the screen. Click on “Teaching Tools and Guides.” The Active Learning Modules are available for download in the Pediatrics Educator Resources section.

Aquifer Radiology Flipped Classroom Workshops

Enhance your students’ knowledge about radiology through Aquifer’s interactive Radiology Flipped Classroom Workshops. These modules were developed by a group of nationally recognized radiology educators and shown to influence student learning.


Included with your Aquifer Radiology subscription:

Flipped Classrooms are meant to be interactive learning sessions with the students (in a non-threatening setting for student participation) to reinforce materials covered in the case. Students like the Flipped Classrooms as an alternative to didactic lectures. It also gives them the opportunity to ask facilitators about any problems they had with the case.

There are 18 Flipped Classrooms corresponding to 18 Aquifer Radiology modules and Educator materials available on how to use Flipped Classrooms, what the concept of Flipped Classrooms entails, and how to implement them (video demonstrations, references, etc.). This is a great resource if you have never used the Flipped Classroom or are unfamiliar with the concept.

All Flipped Classroom cases have excellent radiographic examples, pertinent annotations, and are appropriated to the materials covered in the case. All modules are in PowerPoint format, with material embedded in the Notes of PowerPoint. This information is provided to the facilitator for each PowerPoint slide (what questions to ask students, the answers to the questions, what learning points to emphasize, etc.). This is not visible to the student when projected on the screen in PowerPoint. This allows any facilitator (from resident, fellow, to staff radiologist) to facilitate a great interactive session. Providing questions (and answers) to the facilitators should make them comfortable doing these sessions. Of course, the facilitator can ask own questions, etc. The notes are meant to provide a guide to the facilitator.

Educators can choose to add some of their own cases, delete examples, etc. It is essential that the student complete the Case prior to the Flipped Classroom. The Flipped Classroom reviews the pertinent learning materials using radiographic case examples. It is meant to be an interactive learning session with student participation. They are designed to last 60-90 minutes.

Documentation of teaching is important in many medical schools for faculty evaluation and promotions. Faculty who use these prepared Flipped Classrooms can document teaching time with medical students. Some medical schools will require a student evaluation of the presenter and this can be done by each institution’s policy.

Aquifer Radiology Cases and Flipped Classroom Workshop resources can be used to “Flip” your classroom, and make precious instructional time more productive and valued.

  1. Educator resources include:
    • Flipped Classroom pedagogy concepts
    • 18 Aquifer Radiology Flipped Classroom Workshop files
    • Video demonstration of Radiology Flipped Classroom
    • Pointers to implement your own Flipped Classroom teaching
    • References (links, including to the Aquifer grant supported work by O’Connor EE, Fried J, McNulty N, Shah P, Hogg JP, Lewis P, Zeffiro T, Agarwal V, Reddy S. Flipping Radiology Education Right Side Up. Academic Radiology, published online April 7, 2016. doi:10.1016/j.acra.2016.02.011. PMID: 27066755. This effort won the 2017 AUR Herbert M Stauffer Award for Best Educational Paper published in Academic Radiology in the year 2016

Aquifer Radiology Flipped Classroom Workshops:

    • Can be completed in a 60-90 minute session
    • contain excellent case images and annotations, chosen to emphasize learning outcomes in the corresponding Aquifer Radiology online case
    • are in PowerPoint format
    • flexible for educators’ adjustment to needs specific to their setting
    • include facilitator guidance for what to ask (with correct answers), what to emphasize, and active learning tasks to use for interactive classroom engagement in each workshop
    • lower the barrier for recruiting medical student educators, including radiology residents, who need teaching to fulfill program ACGME requirements
    • Promote far transfer of learning by providing opportunity for learners to APPLY what they learned from the online Aquifer Radiology cases to new examples

Outcomes with Aquifer Radiology Flipped Classroom Workshops:

  • Depend on prior student completion of the Aquifer Radiology online case
  • Ease documentation of faculty & resident teaching activity
  • Students love the Flipped Classroom as an alternative to traditional lecture-based didactic instruction
  • Interactive aspect of instruction cultivates better teaching-learning partnerships, as students are empowered/required to interact with instructors, unlike in lectures

Where to Find the Flipped Classroom Workshops

The Radiology Flipped Classroom Workshops are available to educators and administrators with current subscriptions to Aquifer Radiology. To access this resource, sign in to Aqueduct and open the resources tab on the left-hand side of the screen. Click on “Teaching Tools and Guides.” The Flipped Classroom Workshops are available for download in the Radiology Educator Resources section.

Case Analysis Tool

The Aquifer Case Analysis Tool is a structured worksheet to be completed by the student as they work through an Aquifer case, designed to enhance the development of clinical reasoning skills. Although built for Aquifer Pediatrics, the Case Analysis Tool can also be used with Aquifer Family Medicine, Internal Medicine, and Geriatrics cases.

The Case Analysis Tool also includes:

  • A complete Clerkship/Course Director’s Guide to using the tool
  • A suggested grading rubric
  • Answer keys for many Aquifer Pediatrics cases

The case analysis tool is a simple and elegant way to assist in the teaching of the clinical reasoning process as well as measure students’ learning from Aquifer virtual patient cases. Students’ performance using the structured tool clearly shows not only their understanding of the case material but also their developing knowledge of how diagnostic and management plans are derived. Furthermore, use of the tool enhances students’ learning experience by facilitating direct communication and individualized feedback.


How it Works

A staged process parallels the structure of the cases themselves, as well as the process by which clinicians assess patients. Using the validated case analysis form, the student captures specific requested information in sequence as she/he works through the case:

  • Epidemiology/patient profile,
  • Prioritized problem cues from the patient’s history and physical exam,
  • A problem statement,
  • A differential diagnosis, with each diagnosis supported by specific history and physical exam findings, and
  • A diagnostic and treatment plan, with a rationale given for each step.

The case analysis tool perfectly complements the clinical reasoning features of the cases, taking students’ ability to problem-solve to the next level. Students appreciate producing tangible results of their developing skills to use in discussion and feedback sessions. A few educators have even found it useful for helping students organize their thoughts about their non-virtual patients!

The case analysis tool was developed to accompany Aquifer Pediatrics, but may also be used in conjunction with Aquifer Family Medicine and Aquifer Internal Medicine cases. Answer keys are currently available for most of the Aquifer Pediatrics cases.

The case analysis tool was developed for the pediatric clerkship at Rush Medical College and validated through a joint project between Aquifer and Rush Medical College. Keith Boyd, MD, and Sharon Sholiton, MD, of Rush created a case analysis tool for use with Aquifer Pediatrics cases that provides an assessment tool to evaluate student learning from Aquifer Pediatrics cases. The validation project, funded and managed by Aquifer and led by then Aquifer Pediatrics Editor-in-Chief Sherilyn Smith, MD, further developed the tool to ensure that it accurately discriminates between those who understand the case content and can apply that knowledge in a structured assessment from those who cannot.

As the student works through each case, use of the tool facilitates the development of clinical reasoning skills by clearly delineating the steps involved in the patient evaluation and clinical care through the following steps:

  • The student identifies and documents pertinent data obtained via history and physical exam, and then succinctly summarizes the key information into a problem statement.
  • This focused patient assessment then drives the development of a prioritized differential diagnosis.
  • Finally, the student generates an initial diagnostic and treatment plan.
  • This staged process parallels the structure of the cases themselves, as well as the process through which clinicians assess patients. Using the tool requires the student to develop independent learning skills and allows the clerkship director to assess his/her clinical reasoning process and provide individualized feedback.

Where to Find the Case Analysis Tool

The Case Analysis Tool is available to educators and administrators with current subscriptions to Aquifer Pediatrics or Aquifer Family Medicine. To access this resource, sign in to Aqueduct and open the resources tab on the left-hand side of the screen. Click on “Teaching Tools and Guides.” The Case Analysis Tool is available for download in the Pediatrics Educator Resources section.
Learn More

Read our blog post on how to effectively use the Case Analysis Tool in your course or clerkship.

Using Aquifer Content in Team-Based Learning

Team-based learning (TBL) is an instructional method that fosters a more thorough understanding of concepts versus memorization of facts. Utilizing group work to promote active learning, TBL encourages learners to apply core content knowledge to work through exercises as a team.

Learners actively engage with the TBL format as each team member is held accountable not only to an understanding of the core material but also to contributing to the overall team and in-class discussions.

In the TBL method, learning occurs primarily from team members justifying their answers to each other through the use of application exercises and/or quiz type questions, while faculty serves as content experts. TBL takes advantage of the fact that the collective wisdom of a group exceeds that of each individual in the group.

Aquifer cases, from a variety of courses, can be used for Team-Based Learning.

For example, Aquifer Pediatrics has Active Learning Modules and Questions for Further Consideration that can be used as application exercises. The Basic Science questions, within Aquifer Pediatrics, provide useful prompts for integration of core principles into clinical care in the context of each the Aquifer Pediatric cases. These are basic science “tools” that provide one to two-page refreshers of the scientific principles for teaching clinicians.

Similarly, Aquifer Geriatrics cases can be used for TBL, by having students open a case and work through the case questions as a team.

Resource

Team-Based Learning Collaborative

References

Michaelsen LK, Knight AB, Fink LD, eds. Team-based learning: A transformative use of small groups. Westport, CT: Praeger; 2002

Michaelsen LK, Parmelee DX, McMahon KK, Levine RE, editors. Team-Based Learning for Health Professions Education: A Guide to Using Small Groups for Improving Learning. Sterling [VA]: Stylus Publishing, LLC; 2007