Editing Courses
Note: Course reports always reflect the students and cases assigned as of the date you are accessing the report. If you remove cases or users from a course, they will be removed from the report as well, so you will not be able to see historic completion information.
You can edit any of the information that appears on the Courses page about a course at any time. This includes your course name, description, start date, end date, and person responsible.
-
From the Aquifer course page, open the course you wish to update and click the Edit icon near the top right.

- Update the information you wish to change, and click "Update Course."

If you need to add cases to an existing course:
-
Open your course and click "Add Items."

-
You'll see a list of content that is available for you to add to your course, including cases as well as Integrated Illness Scripts, if your program has access to them. Use the search field to type in a case, Integrated Illness Script, or key word to quickly find the content you want to add. Select the content you wish to add by clicking the checkbox next to individual items. When you have selected all items to add to your course, click the “Add [number] selections to course” button.

-
You will see a confirmation modal. Click “Add selections now” to add the items to your course. Click “Cancel” to keep the course as is.

-
After adding cases, you’ll return to your course page and will see the new cases added to the list and the counters in the upper righthand corner of the Course Page have been updated.
Tip!
You can also ask the AI Assistant or use the searchable Content Library to filter and browse available cases and scripts by diagnosis, demographics, and much more. Simply click on Content Library in a separate tab, use the search and display features to make a list of the content you wish to include, and then return to the Add Items to Course page to select those cases and add them to your course.
Remove Cases from a Course
-
From your course page, click the Edit icon to go to the Edit Course page.

-
In the Course Content section, you will see a “Remove” button on each case or script. Simply click this to remove an item from your course. It will also be removed from student To-Do Lists.

Add or Remove Users from a Course
Add or Remove Student Users
-
Access the Edit Course page via the Edit icon on the Course Page.

-
Add Users by Group, by Email, or from the Selection Window.
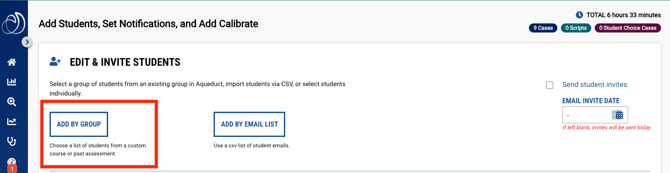
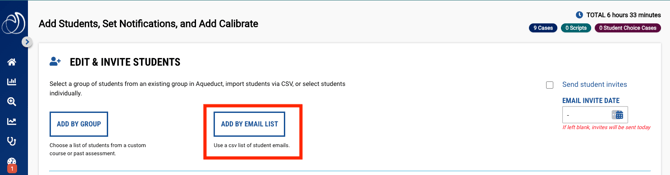

For more details on adding students to a course, please see Building Courses. -
Students added to the course can be removed by clicking the “x” next to their name.

Adding or Removing Course Users: Educators
-
Click the Edit icon on the Course Page.

- On the "Edit Educators & Administrators" card, use the dropdown menus to edit or add users.
Courses can only have one Responsible Person, but can have multiple Other Educators or Administrators.
Users who have been added as Other Educators or Administrators display underneath that dropdown menu and can be removed from the course by clicking the “x” icon next to their name.
Deleting a Course
In the event that you need to delete a course, any user with the role of Program Service Administrator, Curriculum Administrator, Lead Course Administrator, or Course Manager can remove a course.
Caution: Be sure that ALL course users no longer need to access the course and/or all associated reporting before removing a course. Be aware that deleting a course also deletes all of the associated cases and scripts from your students' To-do Lists.
Note that once an end date has passed, courses are marked as "inactive" but can be accessed on the Courses page by using the "Include inactive courses" toggle. This is often recommended over deleting a course and all associated information.
To delete a course, proceed through the steps below.
-
Be sure that you have downloaded and saved any reports that may be needed from this course. Reporting is not available for this course after it has been removed.

- To remove a Course, click on the course you want to remove. Then click the Trash can icon on the Course Page.

- You will receive a pop-up warning message. Click OK and the course will be deleted.
