Calibrate Reporting for Administrators

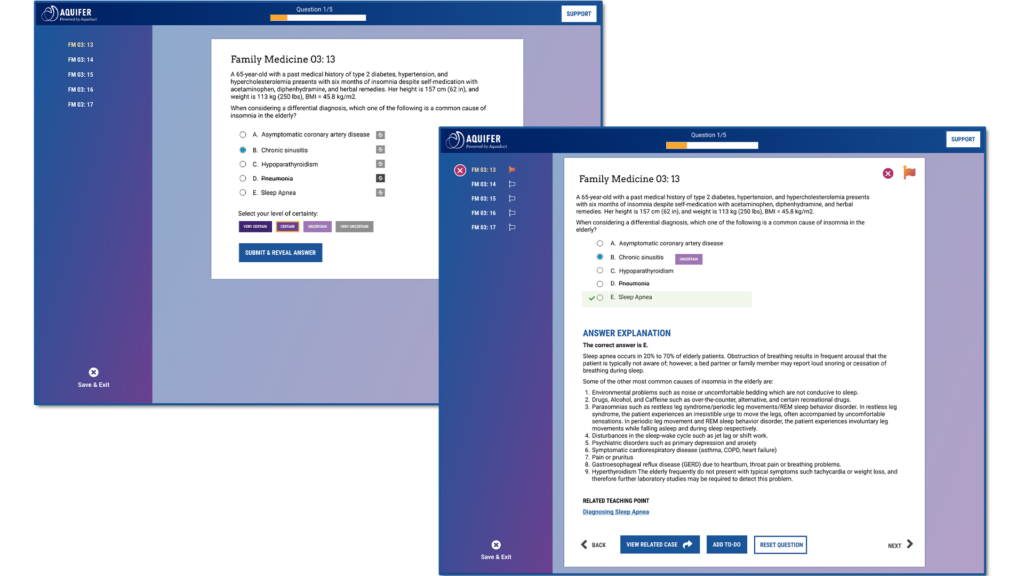
As faculty and administrators with Calibrate access, you can easily access cohort report progress from early to late assessment. You can drill down to a high-level view of individual student performance, including a flag for which students are on or off track with summarized performance notes to inform conversations. Item-level reports allow for exploration across one or multiple cohorts and help identify curricular strengths and gaps.

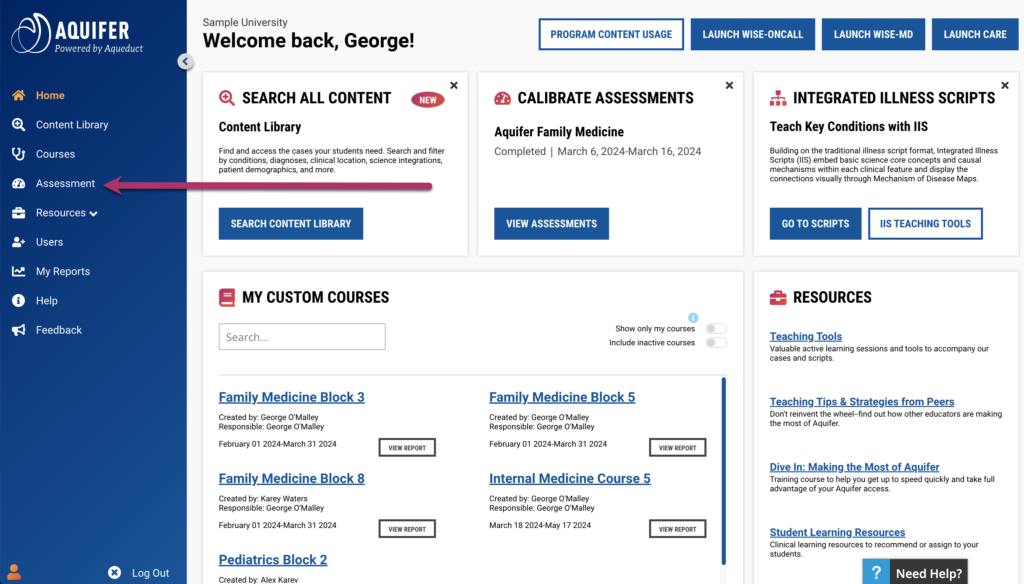
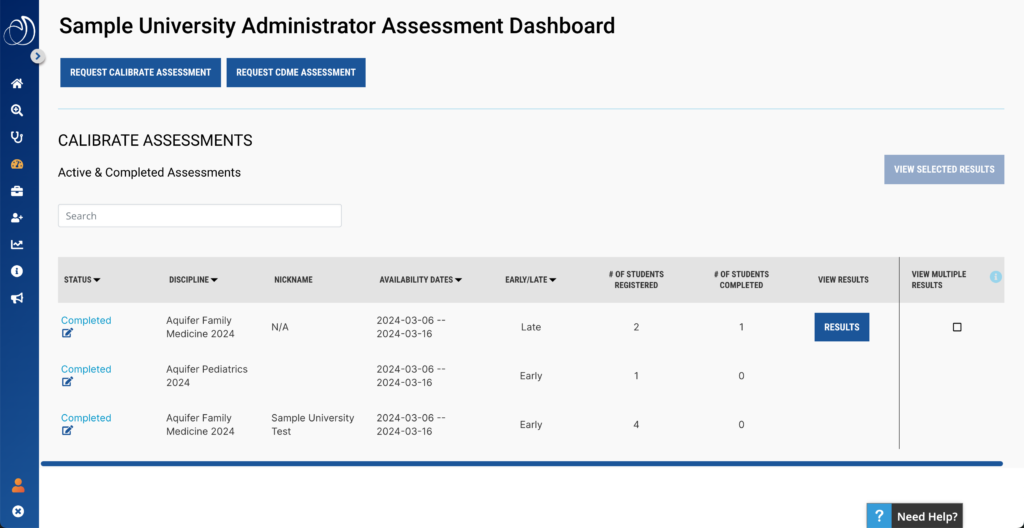
You can access the Educator Report directly from the Assessment Dashboard:

Access Assessments

To view the Educator Reports, click the blue Results Button next to the assessment. If you would like to select multiple assessments for comparison purposes, tick the checkbox next to the Results button for each assessment and then click the “View Selected Results” button.

The Cohort Progress Summary

When you select the first or early assessment results, you see two tabs, the first is the Cohort Progress Summary. The second is the Curricular Performance: Item Details

The progress summary tab shows a snapshot of the student’s learning early in a rotation. You and your students can use this information to identify potential gaps in knowledge and areas for growth. The report provides a breakdown for every student who was assigned the assessment.

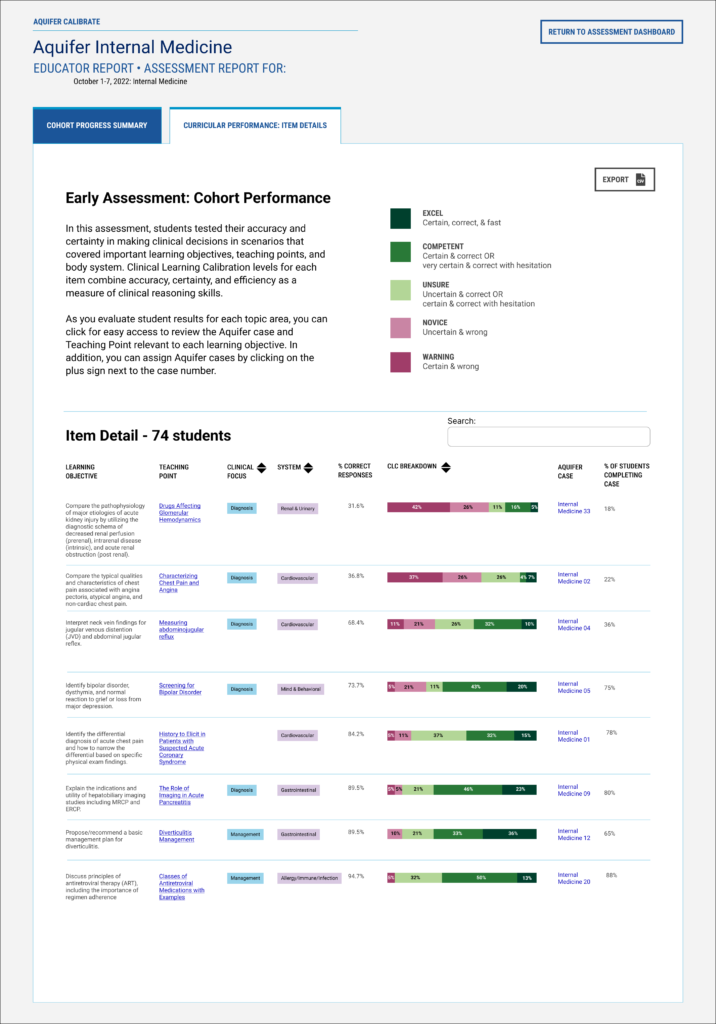
Curricular Performance: Item Details

Students tested their accuracy and certainty in clinical decisions in scenarios covering important learning objectives, teaching points, and body systems. Clinical Learning Calibration levels for each item combine accuracy, certainty, and efficiency to measure clinical reasoning skills. This tab shows the Clinical Learning Calibration for the cohort.

Compare Early and Late Cohort Progress

This tab compares early and late results for all learners assigned to both assessments. This information can help students continue personalizing their study plans for the optimal development of clinical reasoning skills.

The breakdown in this section compares early and late results for all learners who were assigned both assessments.

Curricular Performance: Item Details (late assessment)

As with the early assessment, the Curricular Performance tab for the late assessment shows the students’ Clinical Learning Calibration levels for each item. 

As you evaluate student results for each topic area, you can click for easy access to review the Aquifer case and Teaching Point relevant to each learning objective.

Learn more about Calibrate through this introductory video:

Calibrate Reporting for Students

Calibrate provides reports that give you what you need to create efficient study plans, track your progress, target learning before an end-of-course exam, and have productive conversations with your faculty to guide your learning.

Once you complete the assessment, you are immediately taken to your results for that assessment. You will also receive an email stating you have completed the exam, and it will include a link to your dashboard so you can review your results.  At any time, you may return to your Calibrate Dashboard to access past results and review future assessments that have been set for you.

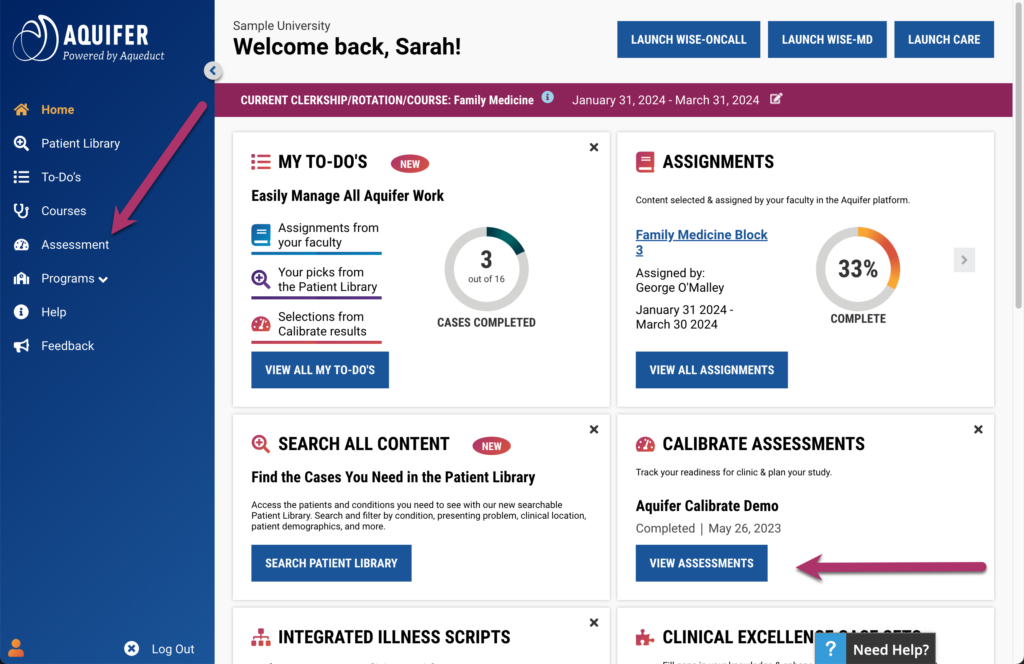
To access your Calibrate reports from the home screen , click on “Assessment” from the left-hand side menu, or alternatively, click the “View Assessments” card.

Access Assessments

This will display the Calibrate dashboard. Every assessment assigned to you will be listed in the dashboard.

If you have not taken your assessment, you will see the words “Not Available” listed under “Reports.”

Reports are available for completed assessments. From the “Reports” dropdown menu, you can select either your Individual Progress Report or your Personal Performance Report.

Once you open your results, you will start at the Results Overview tab.

This tab breaks down your accuracy, certainty, and efficiency compared to peers from healthcare programs who took the exam at a similar time in their rotation. 

The next tab calibrates your knowledge and certainty to help you identify where your knowledge and certainty were aligned – or misaligned.

This tab aims to help you calibrate your knowledge and how confident you are in that knowledge.

Each item is detailed to help you determine what you know, how confident you are in that knowledge, and whether your confidence and knowledge align.

Clicking the detail drop-down will show you the Question/Learning Objective, an answer/explanation of the teaching point, the clinical focus and system, and which case to reference for the whole learning point. You can also add notes and the case to your To-Do list as you build your learning plan.

This tab filters and identifies patterns in your learning calibration. This allows you to identify strengths and opportunities for growth or improvement.

This tab filters and identifies patterns in your learning calibration. This allows you to identify strengths and opportunities for growth or improvement.

Below the chart, you can filter the data to find gaps in your knowledge. You can sort by the following:

  • System
  • Clinical Focus
  • Accuracy
  • Certainty
  • Clinical Learning Calibration

The final tab is your Learning Plan and To-Do list. It lists any cases you have added and an area to take notes. The learning plan has multiple sections. 

The first section shows your notes and to-do list. You can sort, review, and track your progress through Aquifer cases and Integrated Illness Scripts.

The next section of the tab allows you to write your learning plan. You can list the main insights you have learned from taking the assessment. You can ask yourself what your next steps will be to help you progress in the areas in which you struggled and how you will keep on track.

Section three allows you to record any other thoughts or questions you want to remember for your plan or to discuss with a coach, instructor, or peer.  Section 4 gives you the ability to share your learning plan. You can share with a coach or anyone who can help you refine and implement your plan.

Your reports show your accuracy, certainty, and efficiency compared to all other students taking the same assessment – not your institutional cohort. Your Calibrate reports links to Aquifer answer explanations and cases you can include in your learning plan. 

Actual patients don’t come with tidy answers, and neither do Calibrate reports. Rather than providing question stems and answers, Calibrate encourages you to look for patterns in your results and to take action.

Welcome to Integrated Illness Scripts

Welcome to Aquifer’s Integrated Illness Scripts! We hope you enjoy our latest teaching and learning tool, which integrates basic science and clinical learning.

Integrated Illness Scripts are an innovative teaching and learning tool specifically designed to promote cognitive integration and provide a framework for learners to link basic science and clinical knowledge. Building on the traditional illness script format, Integrated Illness Scripts embed basic science core concepts and causal mechanisms within each clinical feature.

If you are unfamiliar with Integrated Illness Scripts, we have deep resources to get you up to speed.

Using Integrated Illness Scripts

Incorporating Integrated Illness Scripts into your course or curriculum is a great way to reinforce the linkage between basic science and clinical concepts in your students’ minds. Designed for use in both the classroom and the clinic, scripts can support all levels of students and faculty.

  • In a basic science course, scripts deliver clinical context that helps make content stick.
  • In clinic, scripts remind students of basic science concepts and the ‘why’ behind conditions to help inform better, safer clinical decisions.
  • For faculty, scripts provide easy-to-use tools with nationally-developed content, enabling comprehensive teaching spanning disciplines.

Learn more about how to use Integrated Illness Scripts.

Accessing Integrated Illness Scripts

Integrated Illness Scripts are accessible from your Aquifer account in the searchable Content Library. The Content Library can be accessed on your home screen.

Access Content Library

The Illness Scripts are always shaded blue, so you can distinguish them from our cases.

Script synopses give you a quick link to a summary and a view of the Mechanism of Disease Map for each condition.

Inside Integrated Illness Scripts

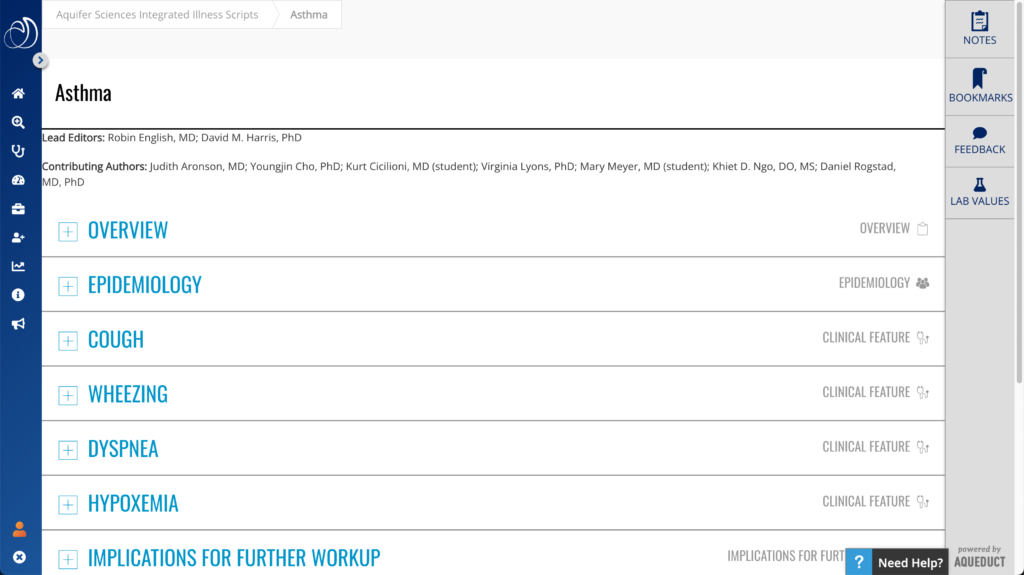
Each Integrated Illness Script includes a brief Overview, followed by the Epidemiology section. References with links are included throughout. Next, you will find the most common Clinical Features of the disease—up to 6 for each condition—with a causal explanation focusing on the ‘why’. Each Clinical Feature is linked to the relevant basic science core concepts.

Integrated Illness Script Example

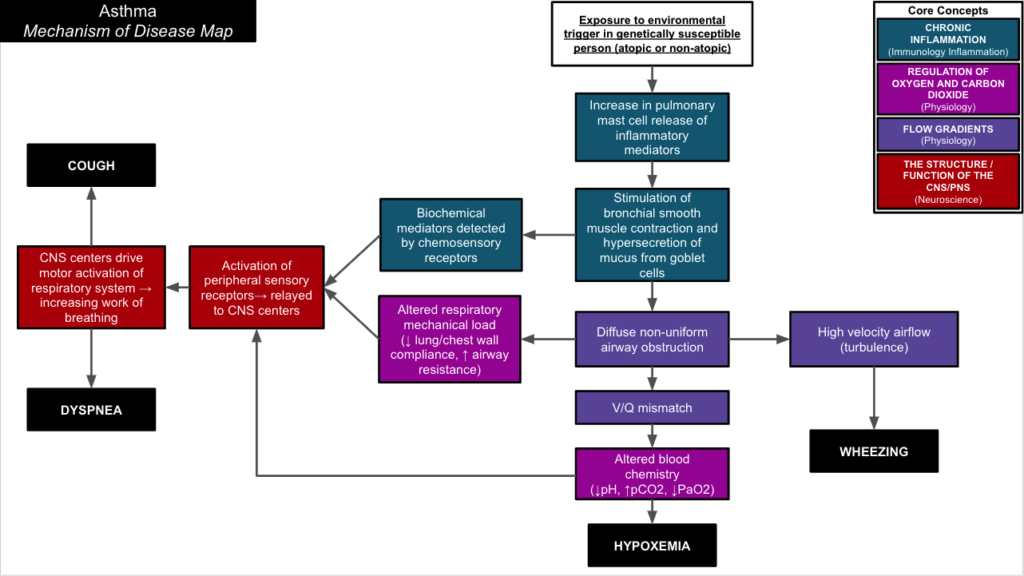
In the Implications for Further Workup and Management sections, students can enter responses on key implications for consideration. Responses to these sections are visible in reports for both students and faculty. Mechanism of Disease Maps are a visual summary of the learning on each condition, tracing the path from the original insult (or disease trigger) through the causal mechanisms to the resulting clinical features seen at presentation, all tied to the basic science core concepts.

Learn more about the anatomy of an Integrated Illness Script.

Using Aquifer’s improved notes and bookmarking features, located in the toolbar on the right side of your screen, students can take notes, bookmark sections of a script, and reference lab values.

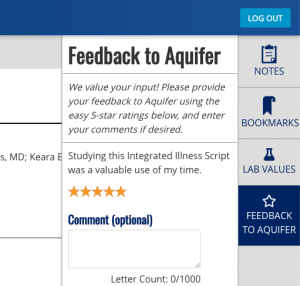
We encourage all users—including faculty and staff—to use the feedback section to share thoughts, comments, and suggestions about this new resource.

Feedback for Integrated Illness Scripts

Finding Content & Creating Custom Courses

Using the Searchable Content Library

You can use the searchable Content Library to quickly find the Integrated Illness Scripts you want to use—and to add scripts to a new custom course. In your content library, Integrated Illness Scripts behave just like Aquifer’s cases.

It’s easy to find the Integrated Illness Scripts you need to add to a course on a relevant system or discipline for easy reference and deeper learning, to support students in need of remediation, or to combine with cases for a focused didactic session or activity.

Integrated Illness Scripts are mapped to the following filters:

  • Clinical Discipline

  • Body System

  • Patient Age

  • Location

  • Clinical Focus

  • Aquifer Content

You can refine your search by filtering by Condition/DiagnosesBasic Sciences, and Clinical Excellence Curricular Threads.

Once you’ve found the content you need, click “Add” next to each case or script and create a new custom course from your selection.

Adding Scripts to Existing Custom Courses

If you have a custom course that is already in progress, or you have a set of cases you reuse, you can add Integrated Illness Scripts to your existing custom courses at any time to enhance your students’ learning and provide valuable reference guides.

Add Integrated Illness Scripts to an Existing Course

Tracking Student Progress

Your students’ progress in Integrated Illness Scripts is tracked in Aquifer’s reporting, similar to the way case work is tracked.

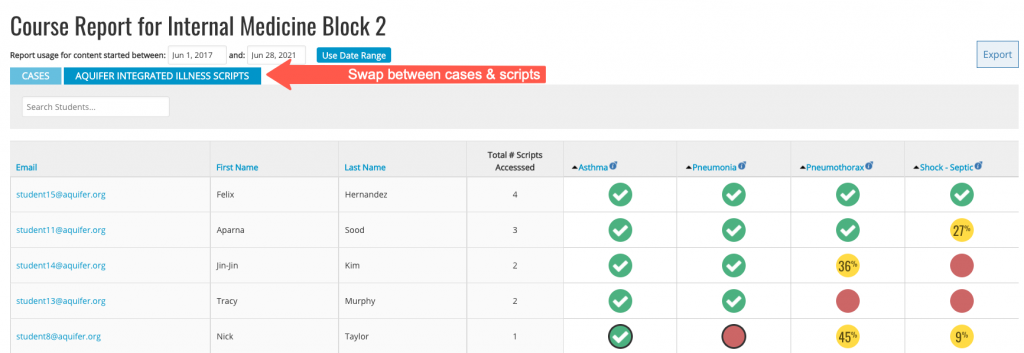
If your custom course includes both cases and scripts, you’ll notice that your Course Report now includes tabs for each. Your export from this view will include work completed in both cases and scripts.

Integrated Illness Script Course Report

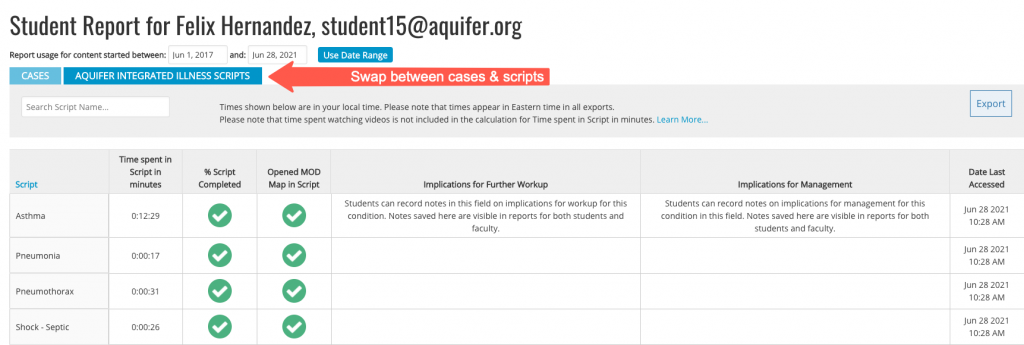
In the individual Student and Script Reports, more details are included, such as time spent viewing a script, whether the Mechanism of Disease Map was viewed, and any notes that students added in the implications for further work-up and management sections.

Integrated Illness Script Student Report

Teaching Guides & More

To find out how to use Integrated Illness Scripts in your course or curriculum, be sure to review the Aquifer Integrated Illness Scripts Educator Guide and ready-made Integrated Learning Sessions available in the Educator Resources section on your Aquifer account Courses page.

You’ll also find best practice integration examples in our blogs and webinar recordings, and many more resources on the Using Integrated Illness Scripts page.

Duplicate Courses to Create a New Custom Course


Save time creating custom courses with our Duplicate Course feature. You can copy all the content and/or users from an existing course into a new custom course in just a few quick steps.  Any course—including existing custom courses and Aquifer signature courses—may be duplicated. Once you’ve created the new custom course you can give it a new name and description, and edit it further by adding or removing content and users at any time.
1. From your home page, click “Courses” on the side of your screen and then choose the content and/or users that you want to copy.

Courses button

2. Once you are in a course, click the Duplicate Course button.


3. On the Duplicate Course page, enter:

Course Name: We suggest using a consistent naming convention that includes course and rotation name, such as “Family Medicine Clerkship: Block 4”.

Description: We suggest including instructor name, instructions for the course, which cases and/or scripts are assigned, due date, and anything else your students need to know.

Person Responsible: Select the user responsible for the course from your list of eligible administrators. The person responsible will be visible on the course page to all students and administrators associated with the course and will be notified when the course reaches its end date to either delete or extend the date of this course.
Start Date: Will be visible to all course users.

End Date: This date will show on the courses page for all associated users. When the end date is reached, the person responsible for the course will be notified and asked to delete or extend the date for this course.

Copy Users: If this is a Custom Course to which you have assigned specific student and/or faculty users, you will have the option to copy those users over to your new course. 

Verify the Course Content: You will see a list of content available in the duplicated course. You can remove any items that are not necessary.

Once you are done, click “Create Course” to create the new course.


4. You will then receive a notification of successful course creation. If you did not copy any users, you will return to the Course page.

If you checked the box for “Copy Users”, you will see the screen below. Your copied users will appear automatically in the email addresses field. Check the box to send an email invitation to users. You can select a later date, or send immediately by selecting today or leaving the date blank.

Note: You can edit the email list on this screen to add or remove users. You can also add or remove users from the course later (see below).


5. From your new course page, you can edit your custom course to add or remove users and content at any time. Learn how to add or remove users and cases.

Editing & Removing Custom Courses

Custom courses allow flexibility to meet the needs of your program or students. It’s easy to edit a custom course to update the course title, start date, or student instructions; or add or remove cases, Integrated Illness Scripts, and users assigned to your course at any time.

After your course ends, please help keep your program’s course list current by removing your old courses after you have downloaded the reports you need.

Editing Custom Courses

Note: Course reports always reflect the students and cases assigned as of the date you are accessing the report. If you remove cases or users from a custom course, they will be removed from the report as well, so you will not be able to see historic completion information.

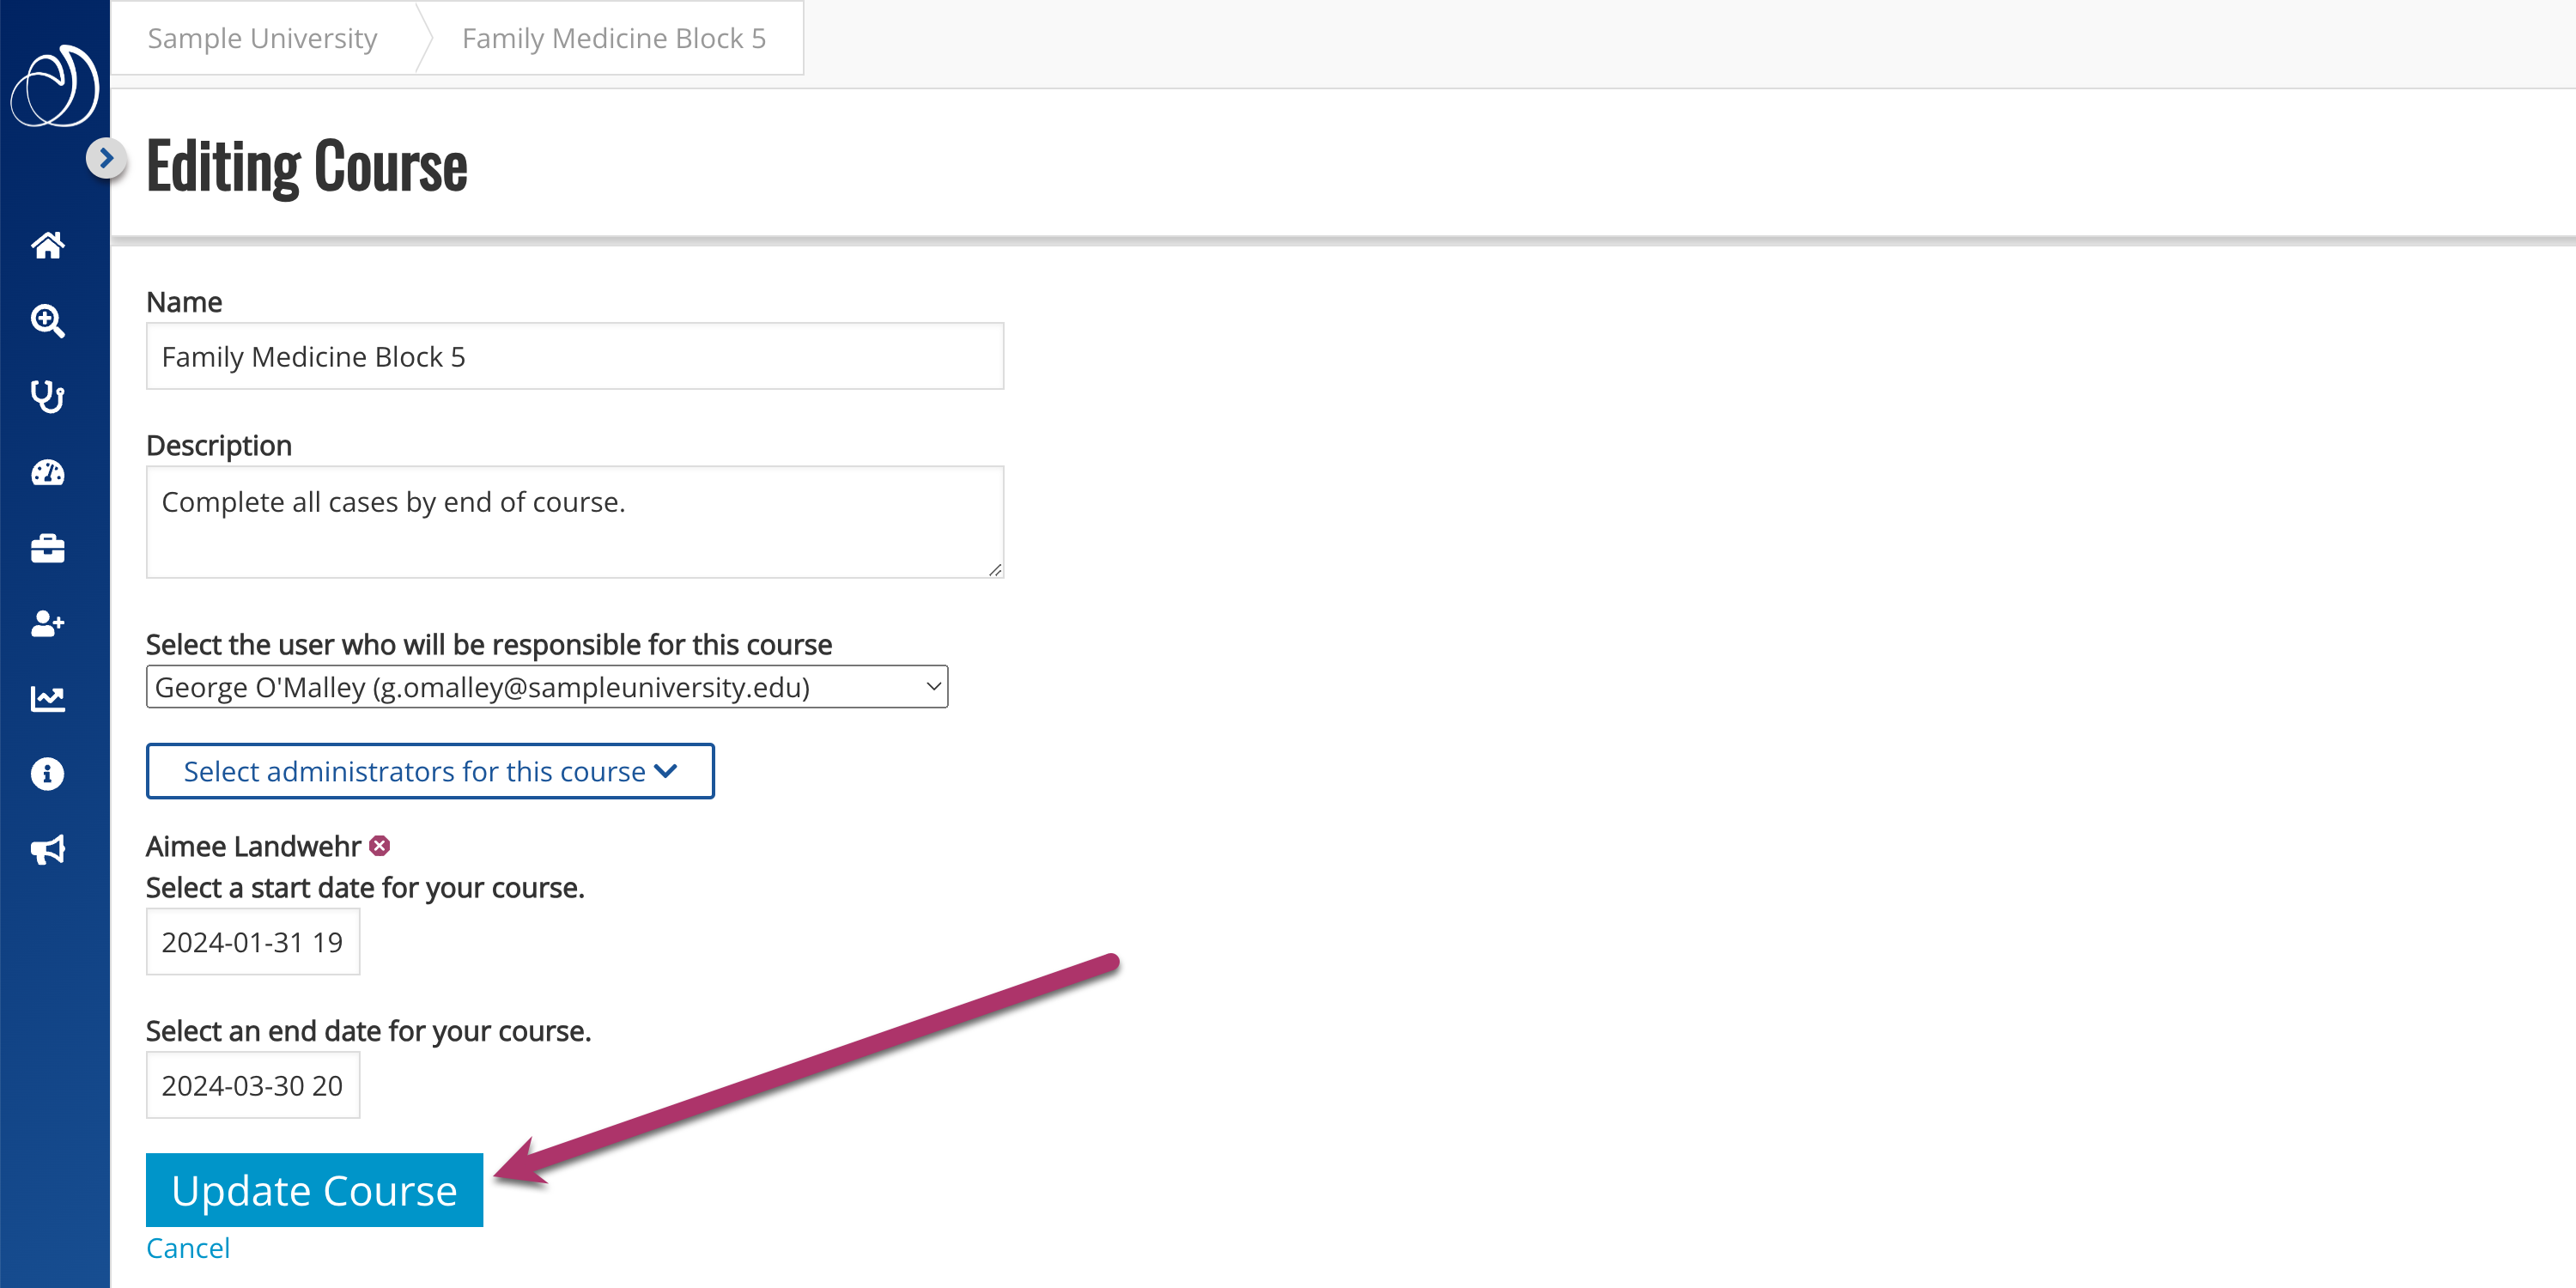
You can edit any of the information that appears on the Courses page about a custom course at any time. This includes your custom course name, description, start date, end date, and person responsible.

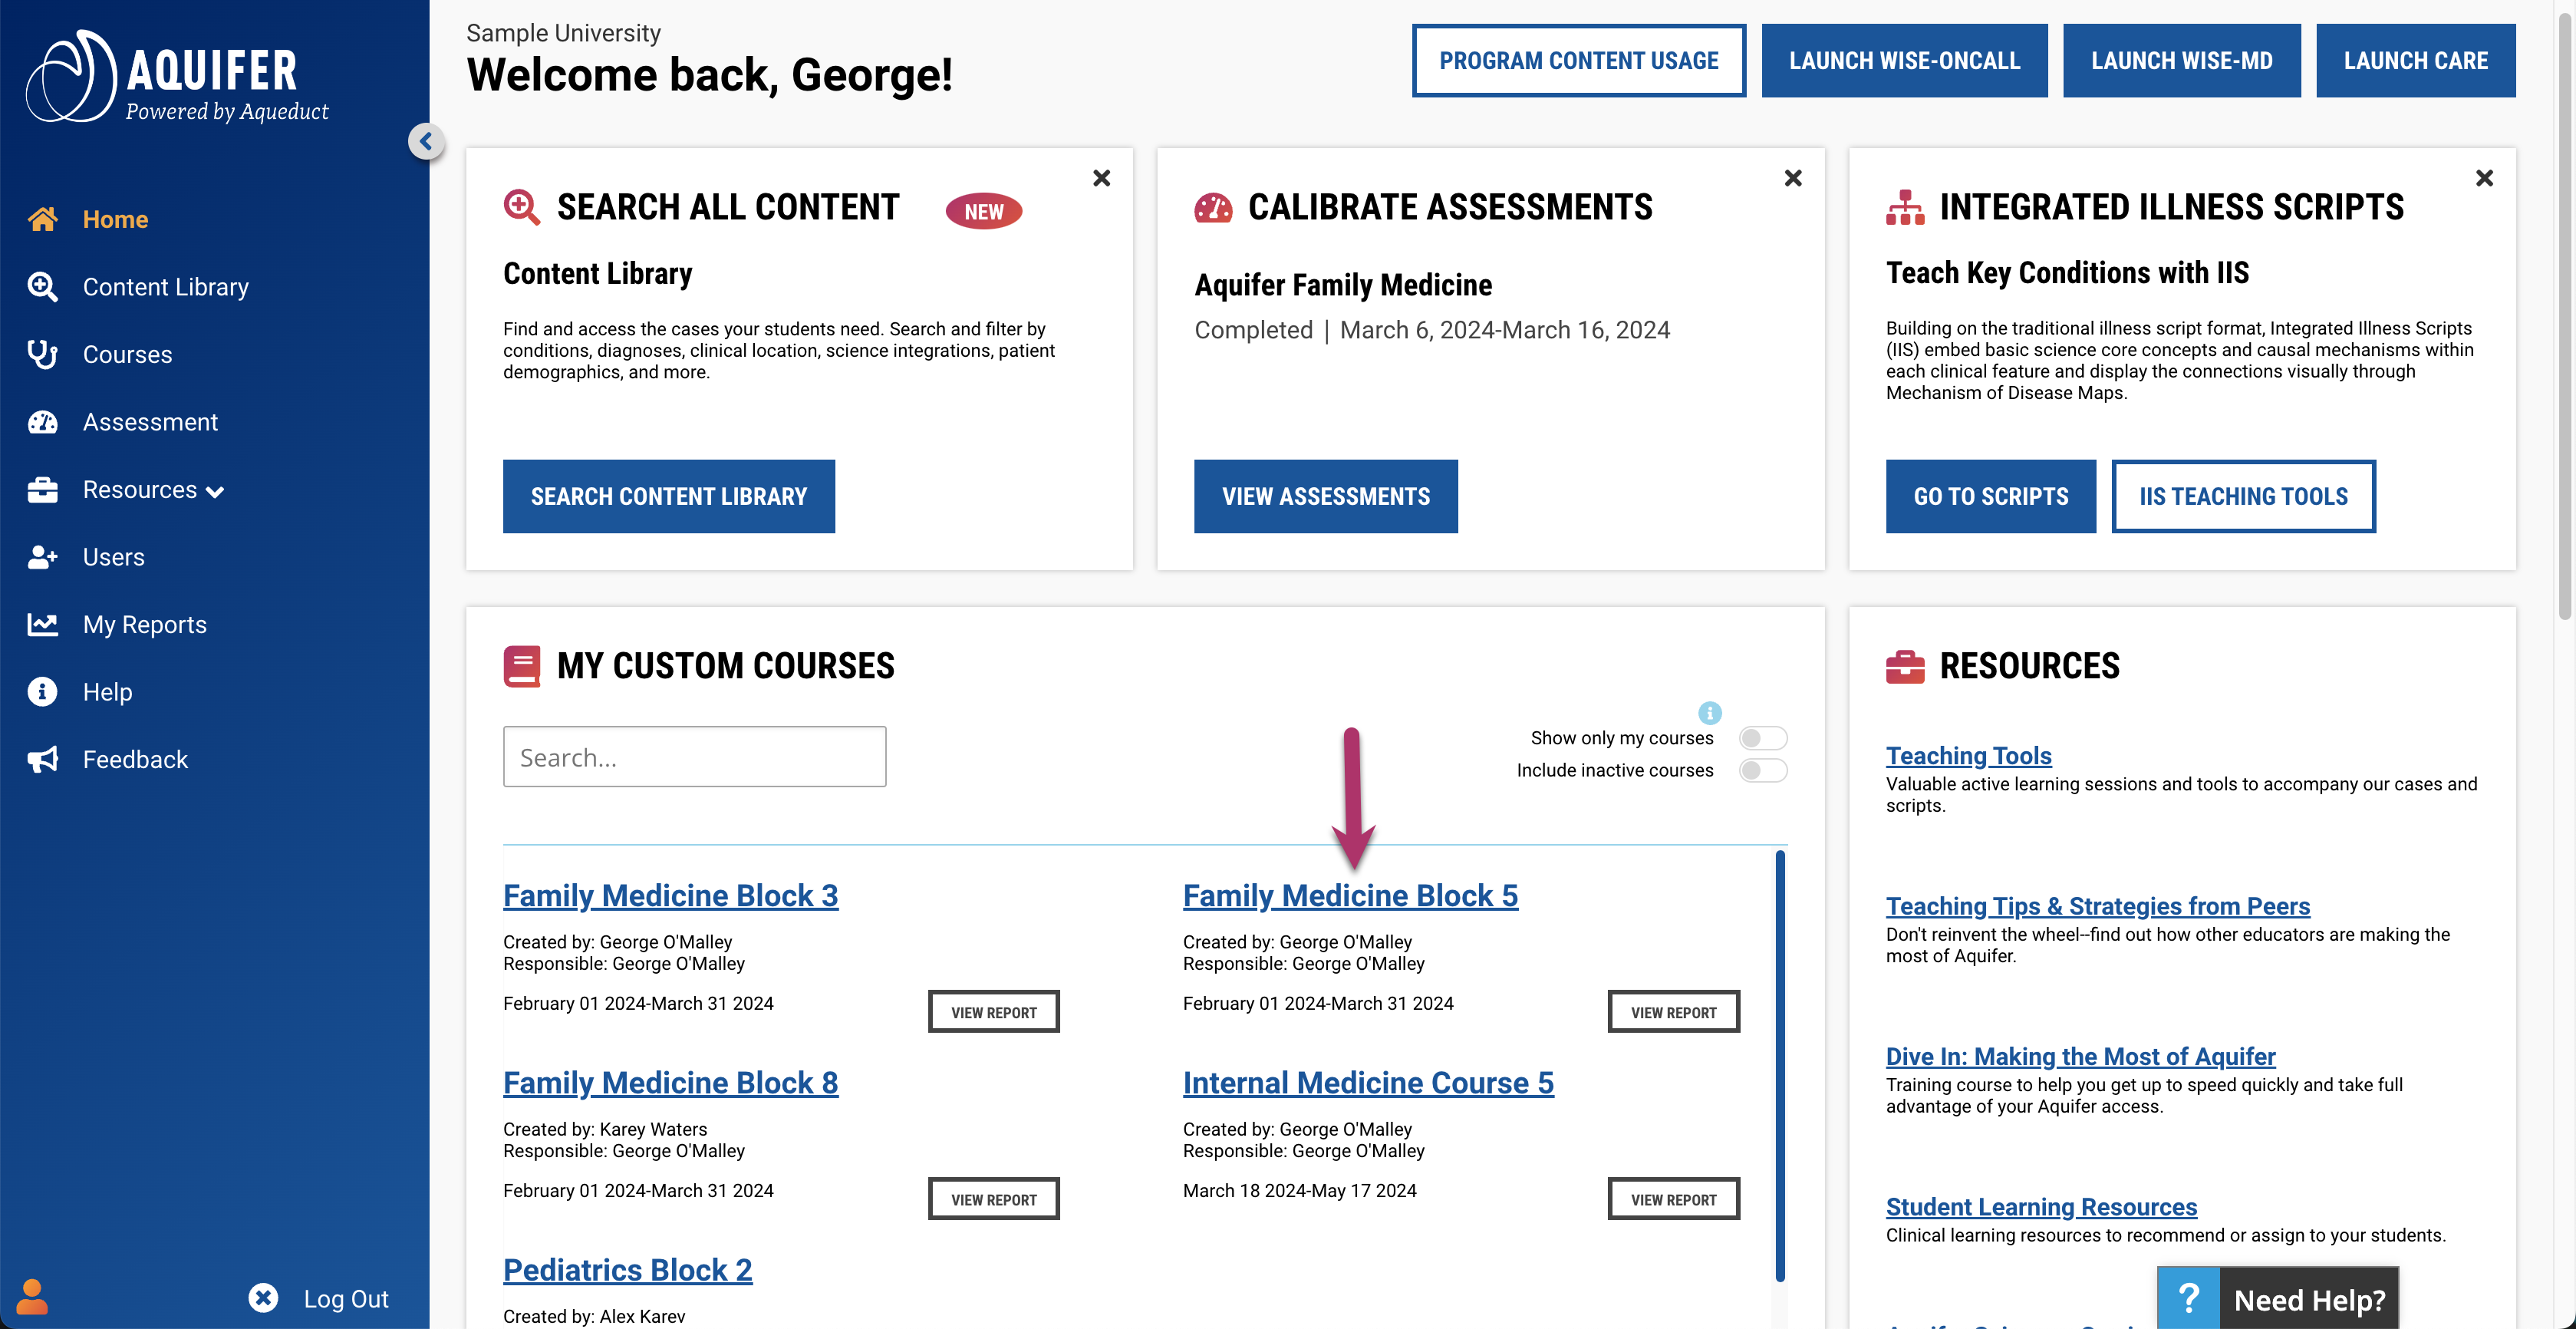
1. From the Aquifer home page, you can directly select the course that you want to edit by clicking the course name in the “My Custom Courses” section.

Select course from home page

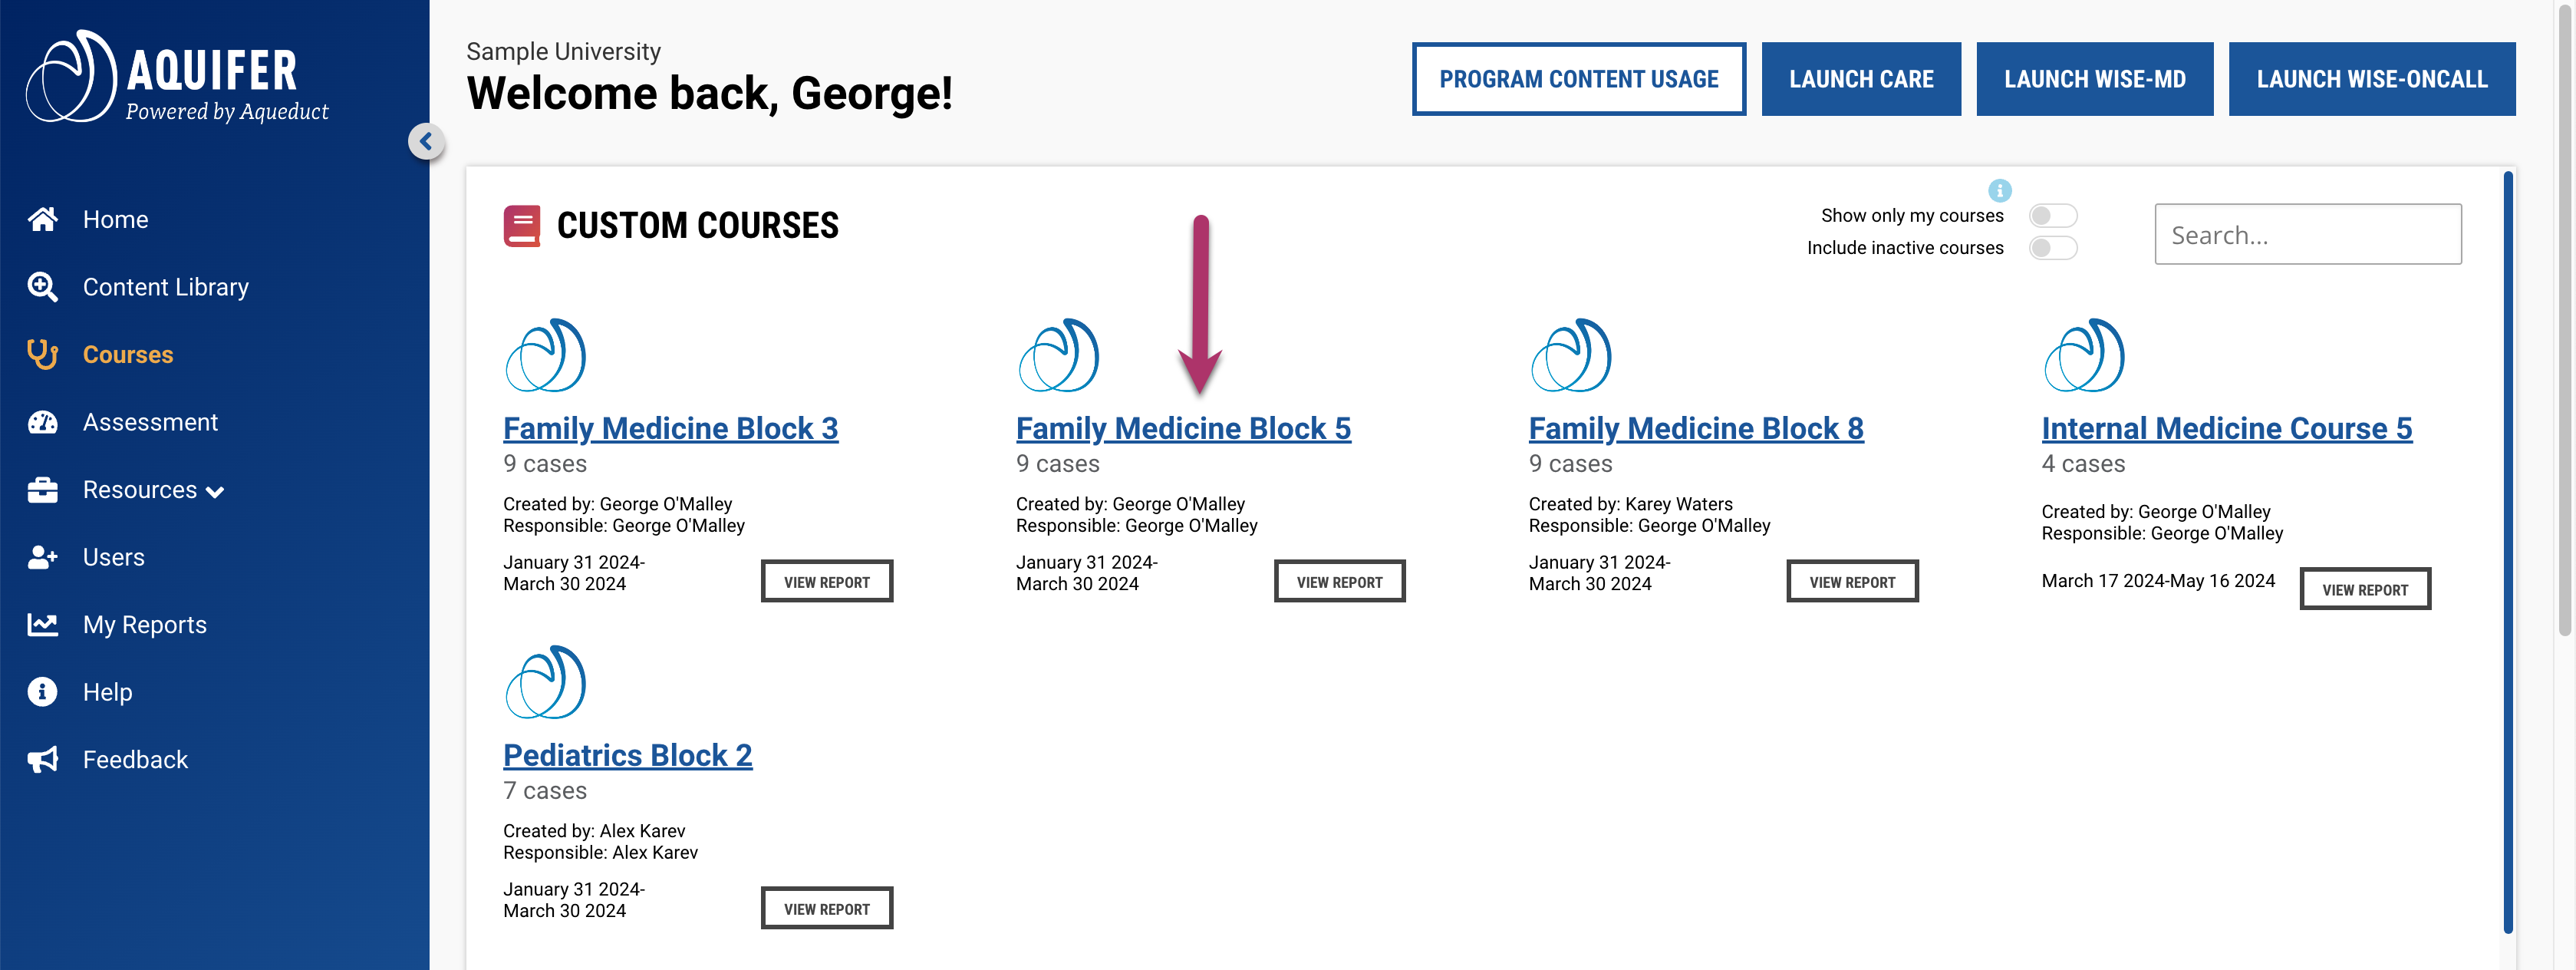
1b. Alternatively, you can select “Courses” in the left-hand menu. This will take you to your courses page. From there, click the course that you wish to edit.

Select Course page from home page
Select Course from Course Page

2. Update the information you wish to change, and click Update Course.

If you need to add cases to an existing custom course:

1. Open your custom course and click Add Cases.

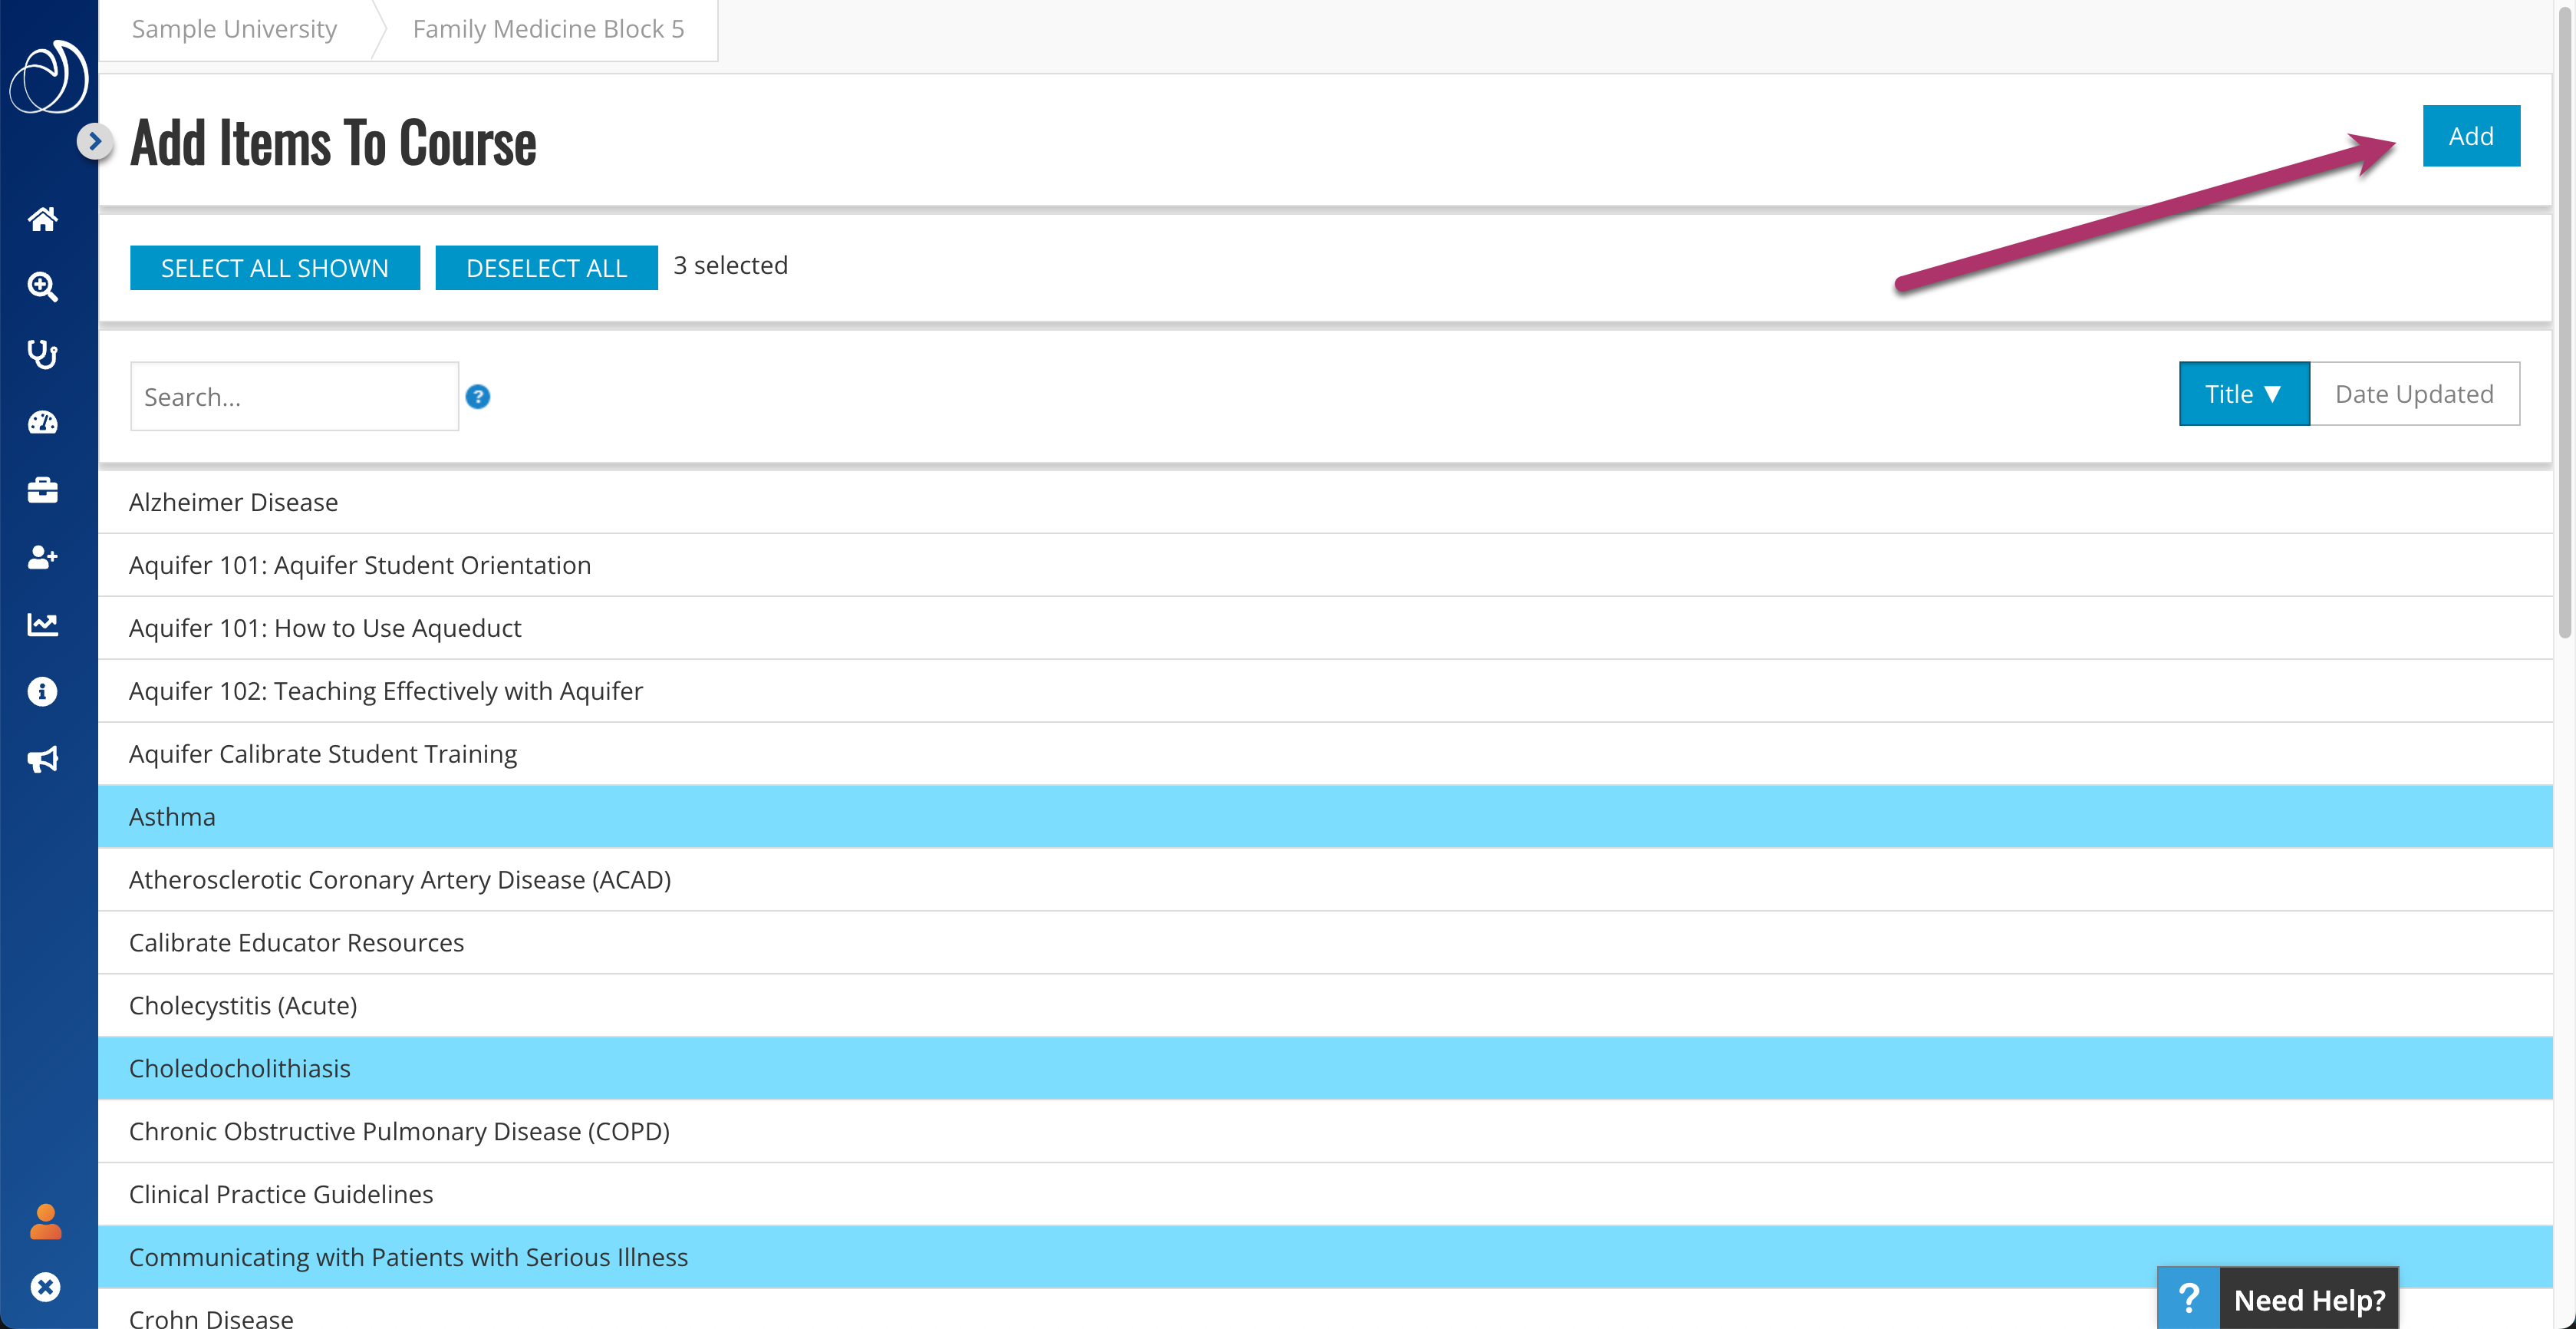
2. You’ll see a list of content that is available for you to add to your course, including cases as well as Integrated Illness Scripts if your program has access to them. Use the search field to type in a case or an Integrated Illness Script to quickly find the content you want to add.  Select the content you wish to add by clicking on individual items, or using the Select All Shown button.

Select and Add Courses

3. Click Add in the upper right-hand corner. After adding cases, you’ll return to your course page and will see the new cases added to the list.

Tip! You can also use the searchable Content Library to filter and browse available cases and scripts by diagnosis, demographics, and much more. Simply click on Content Library in a separate tab, use the search and display features to make a list of the content you wish to include, and then return to the Add Items to Course page to select those cases and add them to your course.

4. After adding content, you’ll return to your course page and will see the new content added to the list.

Remove Cases from a Custom Course

1. From your custom course page, click Remove Items.

Click remove items

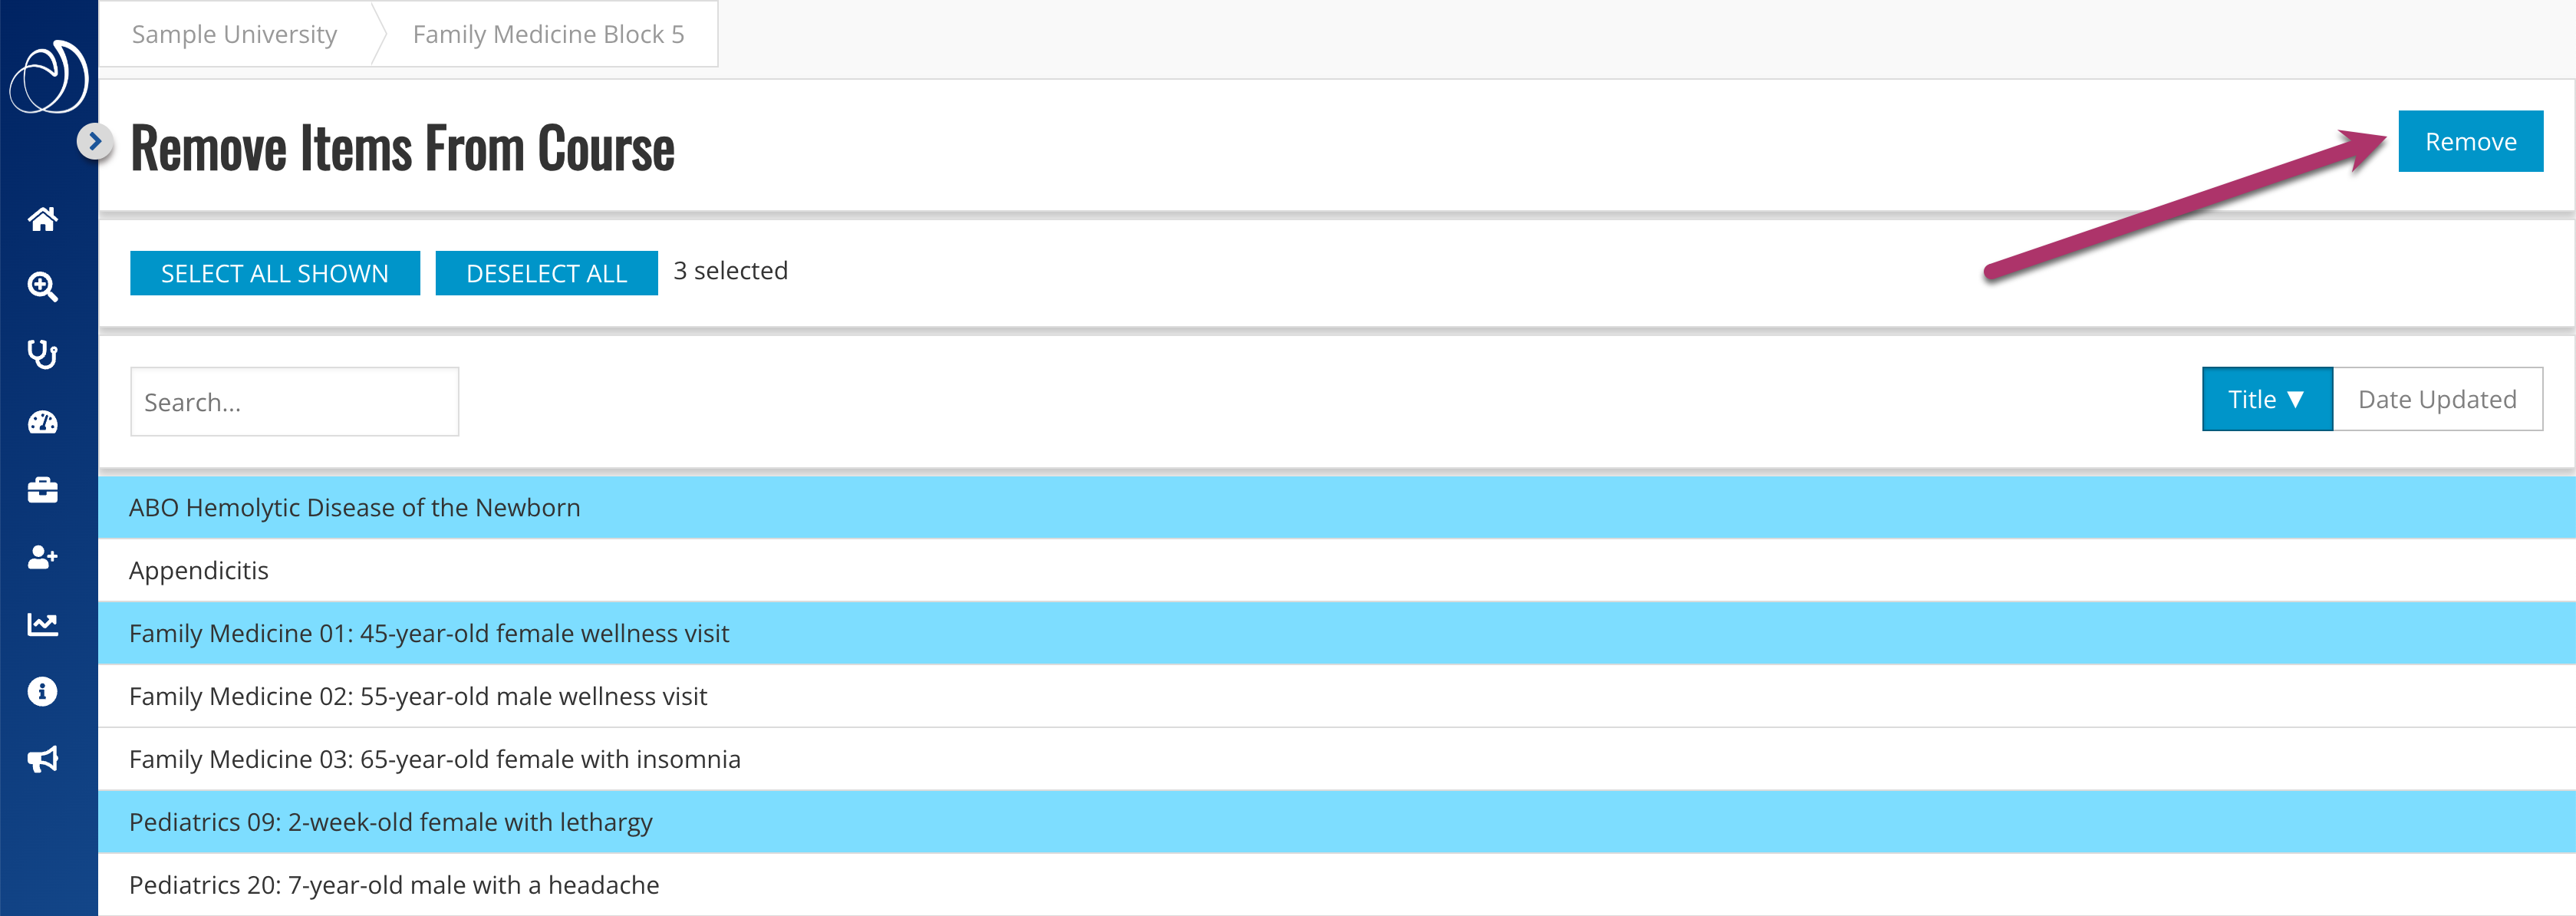
2. You’ll see a simple list of the cases and Illness Scripts included in your course. Select the cases or Scripts you wish to remove and click the Remove button in the upper right-hand corner.

Select and Remove Items

Add Users

There are two options to add users to a custom course. Please see the Creating Custom Courses instructions for details.


Remove Users

Removing users from a custom course will discontinue their access. Students who are removed will no longer be able to see or access the course and will longer appear in the course report. Be sure to download any needed reports before removing students.

1. From the course page, click Course Users.

Click Course Users

2. Select the user/s you wish to remove from the course from the list. Use the search field to search by first name, last name, or email address to find your user/s quickly.

3. Click Remove Selected Users.

Select and remove users

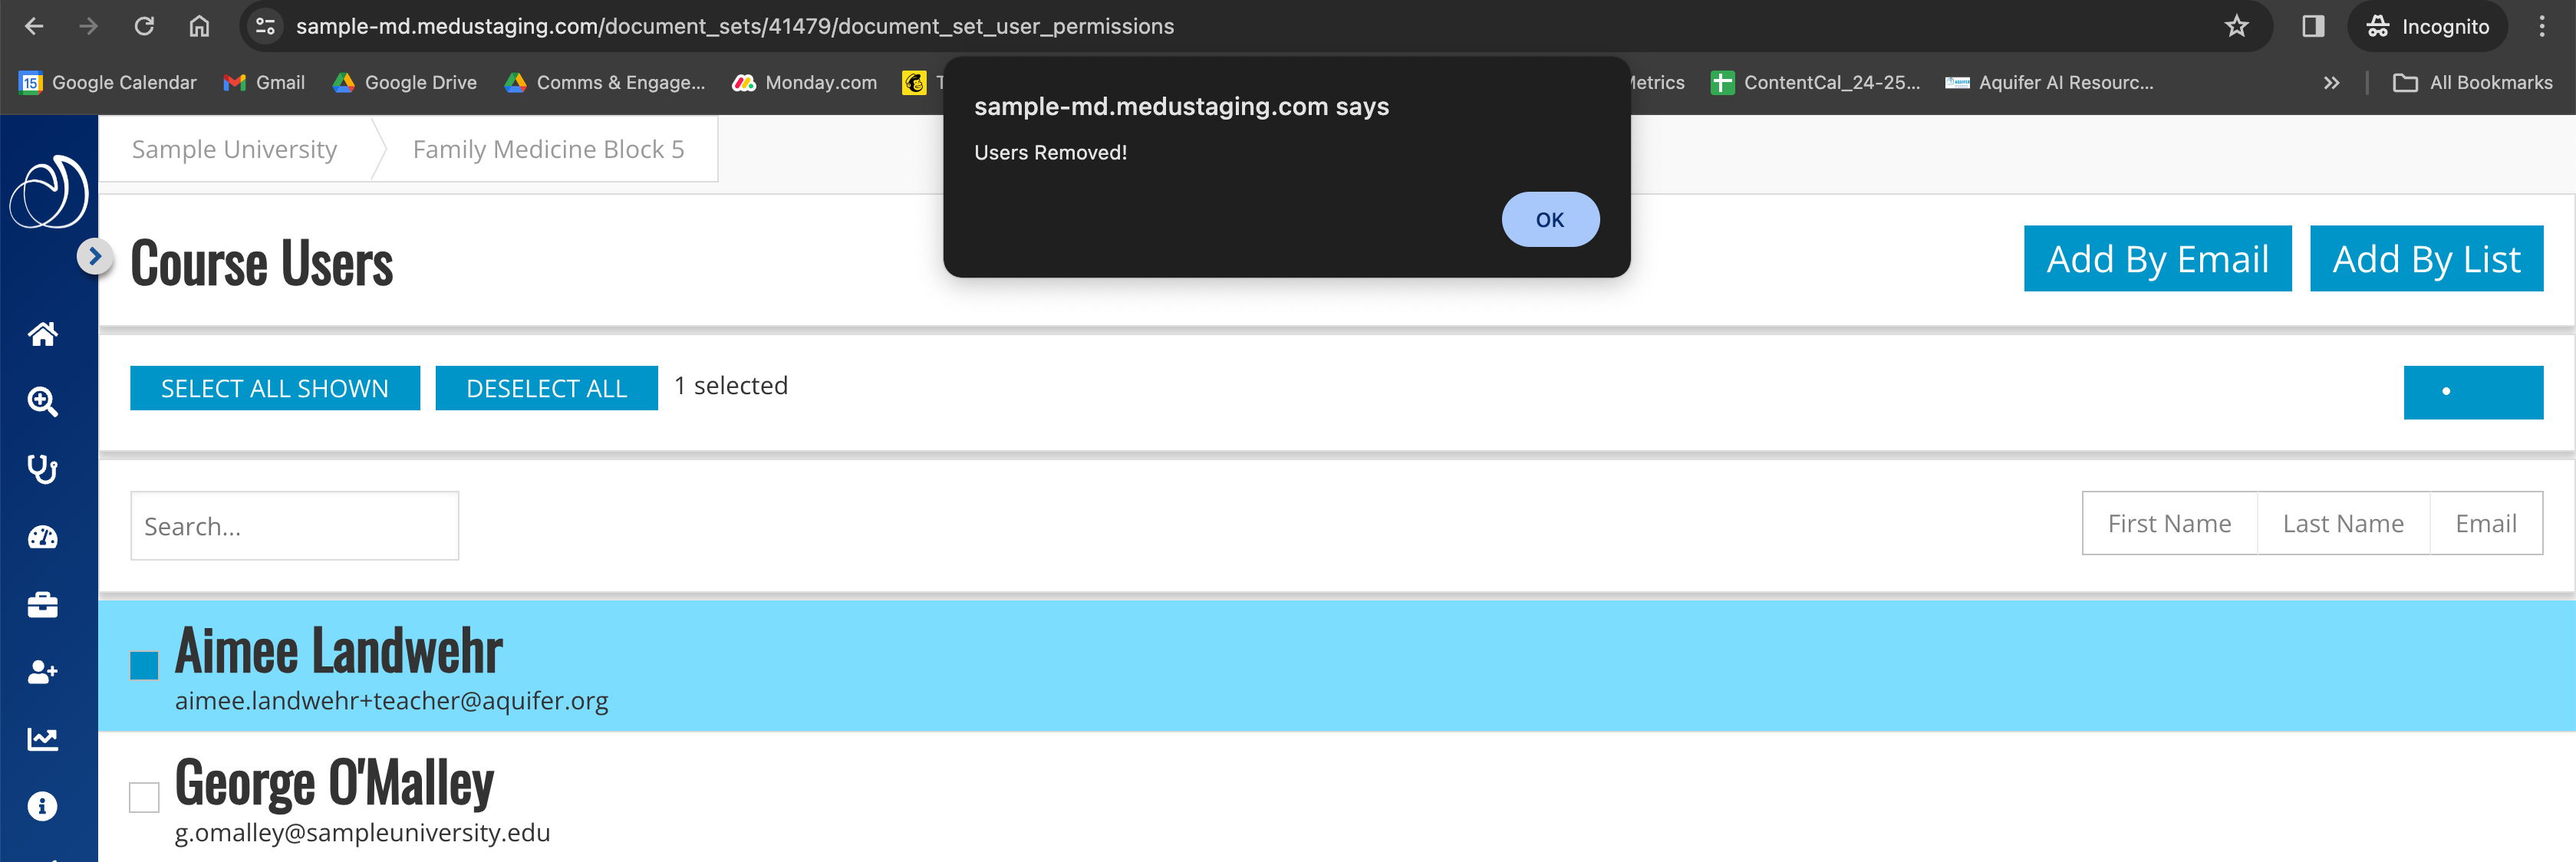
4. You will see a pop-up message asking if you are sure you want to remove the users. Click OK.

User removed notification

A confirmation message will appear in the light blue bar at the top of the page if your users were successfully removed.


Deleting a Custom Course

Help keep your program’s course list current by removing old custom courses. To help you manage this process, the person responsible for each custom course created after August 3, 2018, will receive an email notification when the course end date is reached, asking them to extend the date or remove the course. Any user with the role of Program Service Administrator, Curriculum Administrator, Lead Course Administrator or Custom Course Manager can remove a course.

Please be sure that ALL course users no longer need to access the course and all associated reporting before removing a course.

To remove, proceed through the steps below.

1. Be sure that you have downloaded and saved any reports that may be needed from this course. Reporting is not available for this course after it has been removed.

2. To remove a Custom Course, click on the course you want to remove. From the course page, click the Delete button on the right side.


3. You will receive a popup warning message. Click OK and the course will be deleted.

Managing & Removing Student Users


After students are added to your program, it’s easy to manage your student users in Aqueduct. Administrative users with student user management permissions (view roles and permissions) have the ability to:

  • Remove rostered students from your program
  • Export a student list
  • Send email invitations to students at any time
  • Sort and filter students in a variety of ways

At the start of each academic year, please remove students who no longer need to access Aquifer courses. This will keep your user counts accurate, make your student user list easy to manage, and keep your account up-to-date.


The Student User Panel

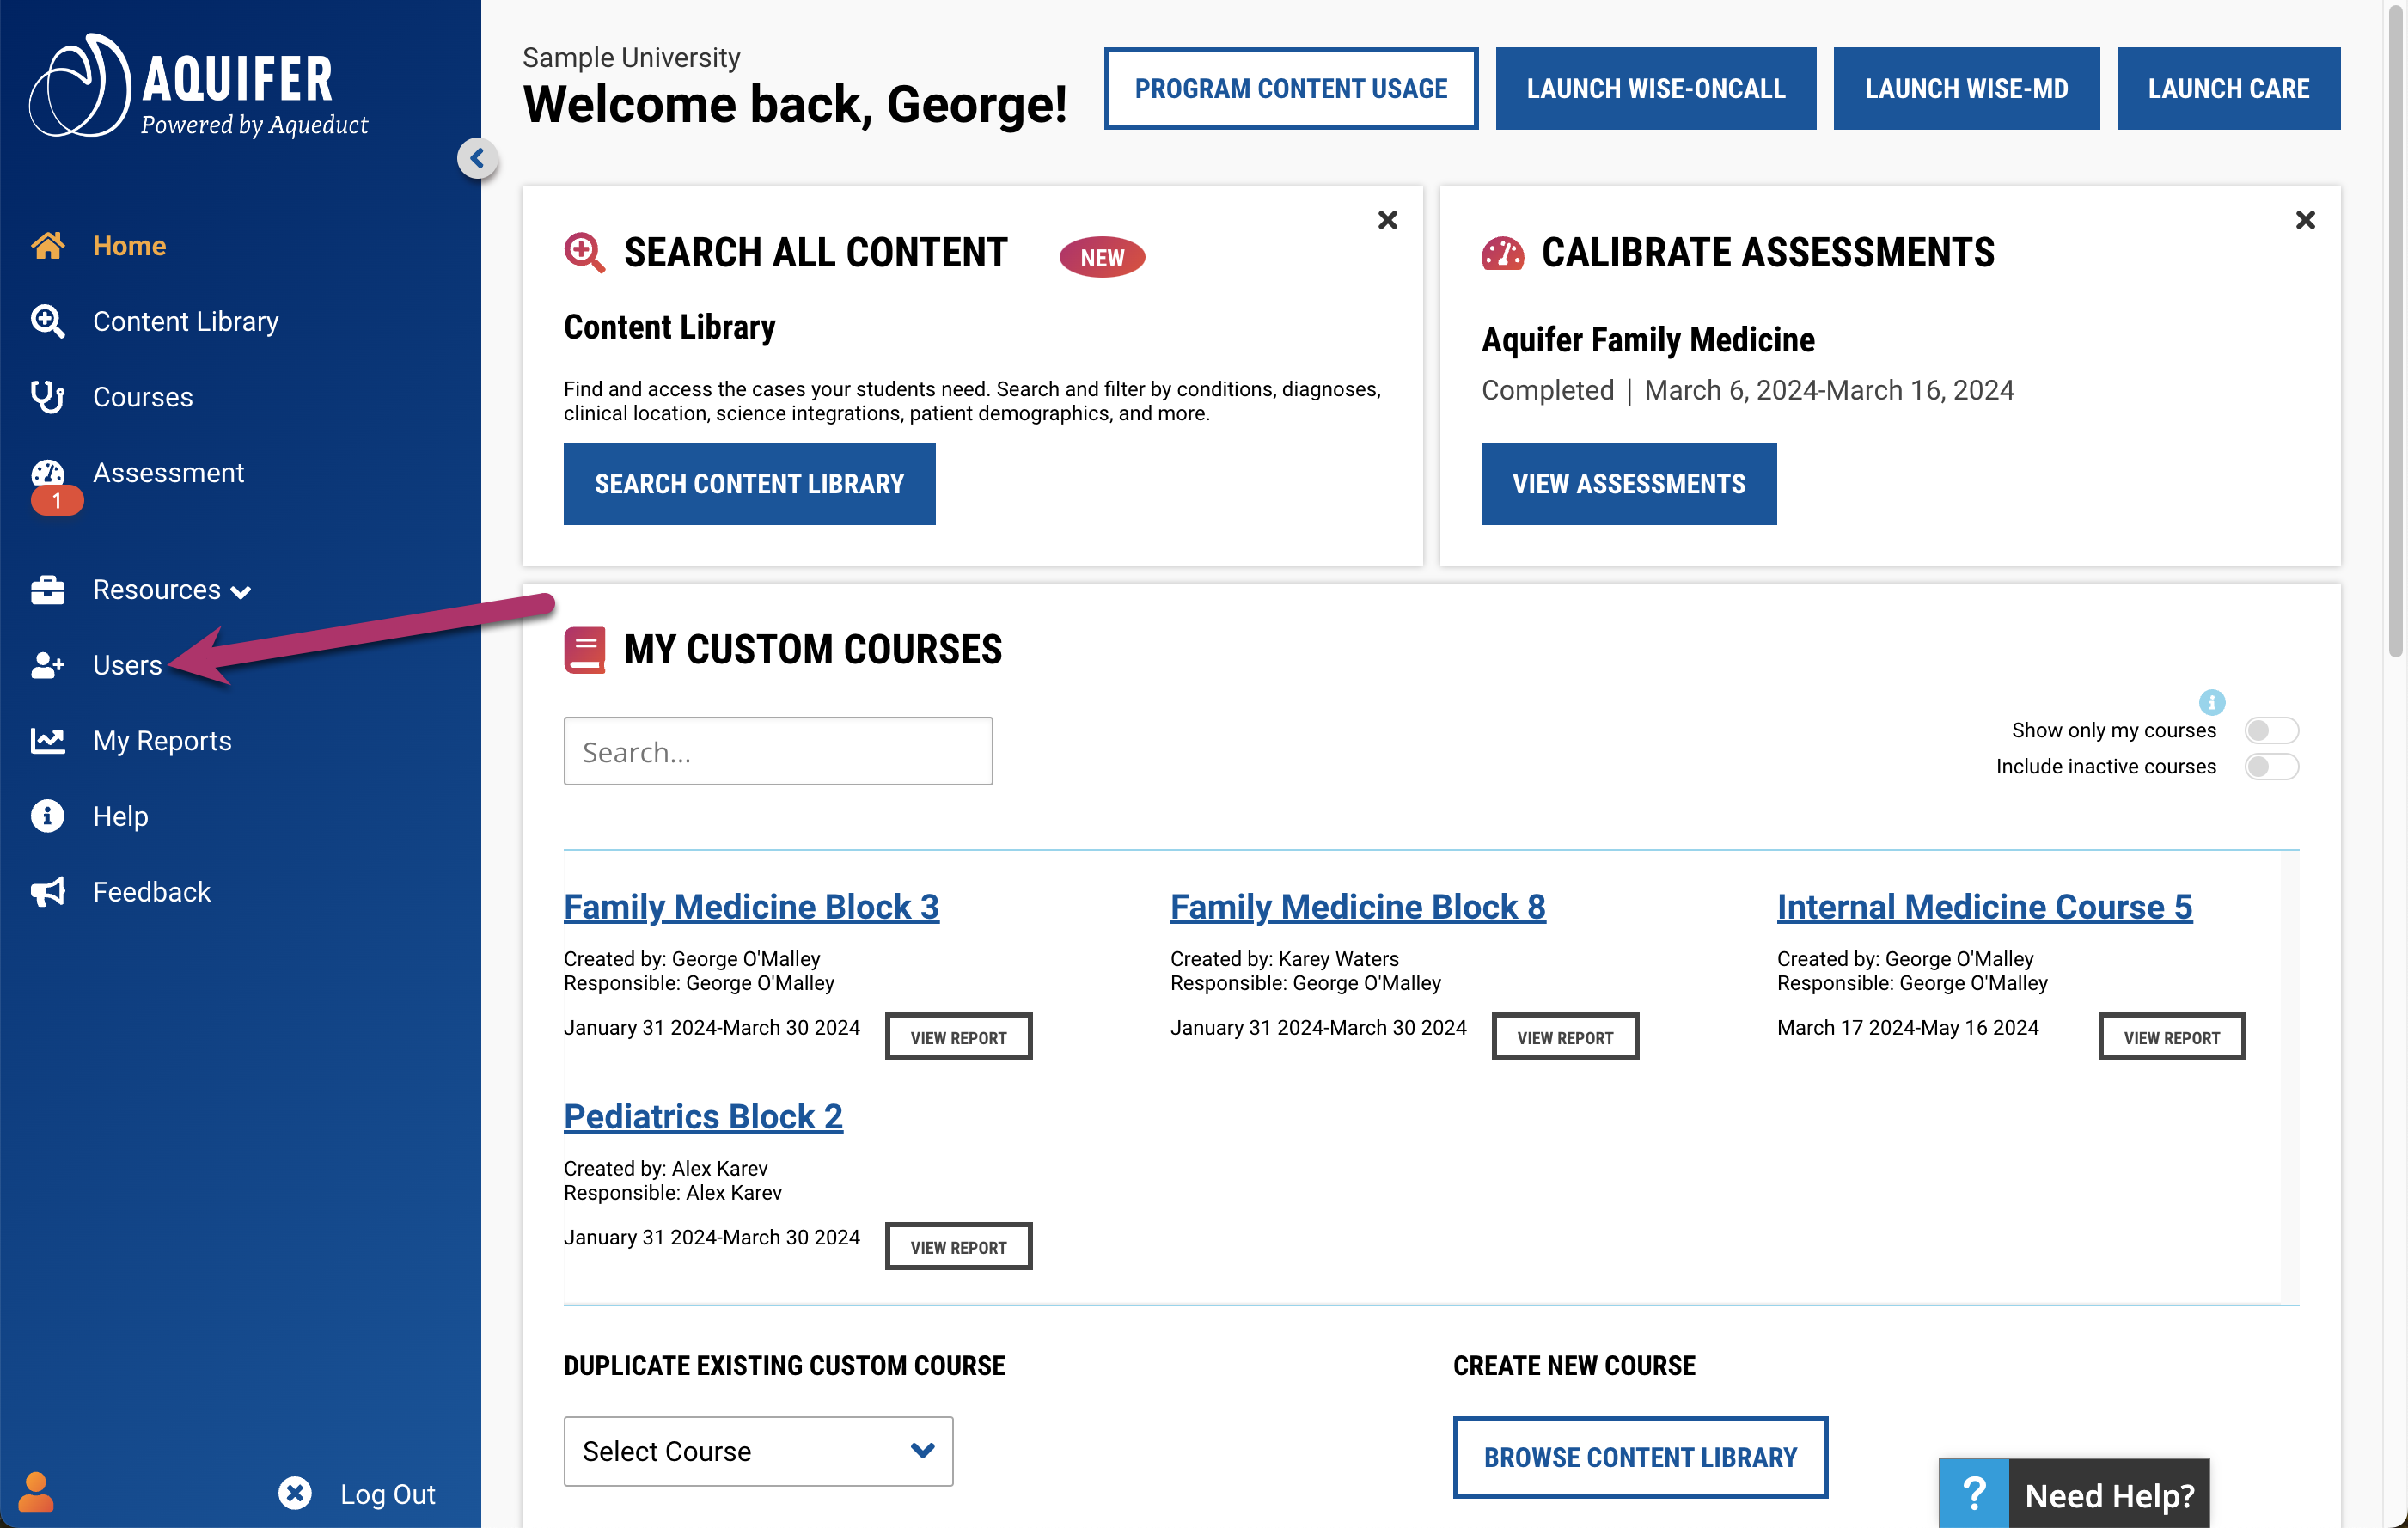
To access the student user panel, click on Users in the side navigation. From the program users page, click on the Students tab.

Select Students Tab

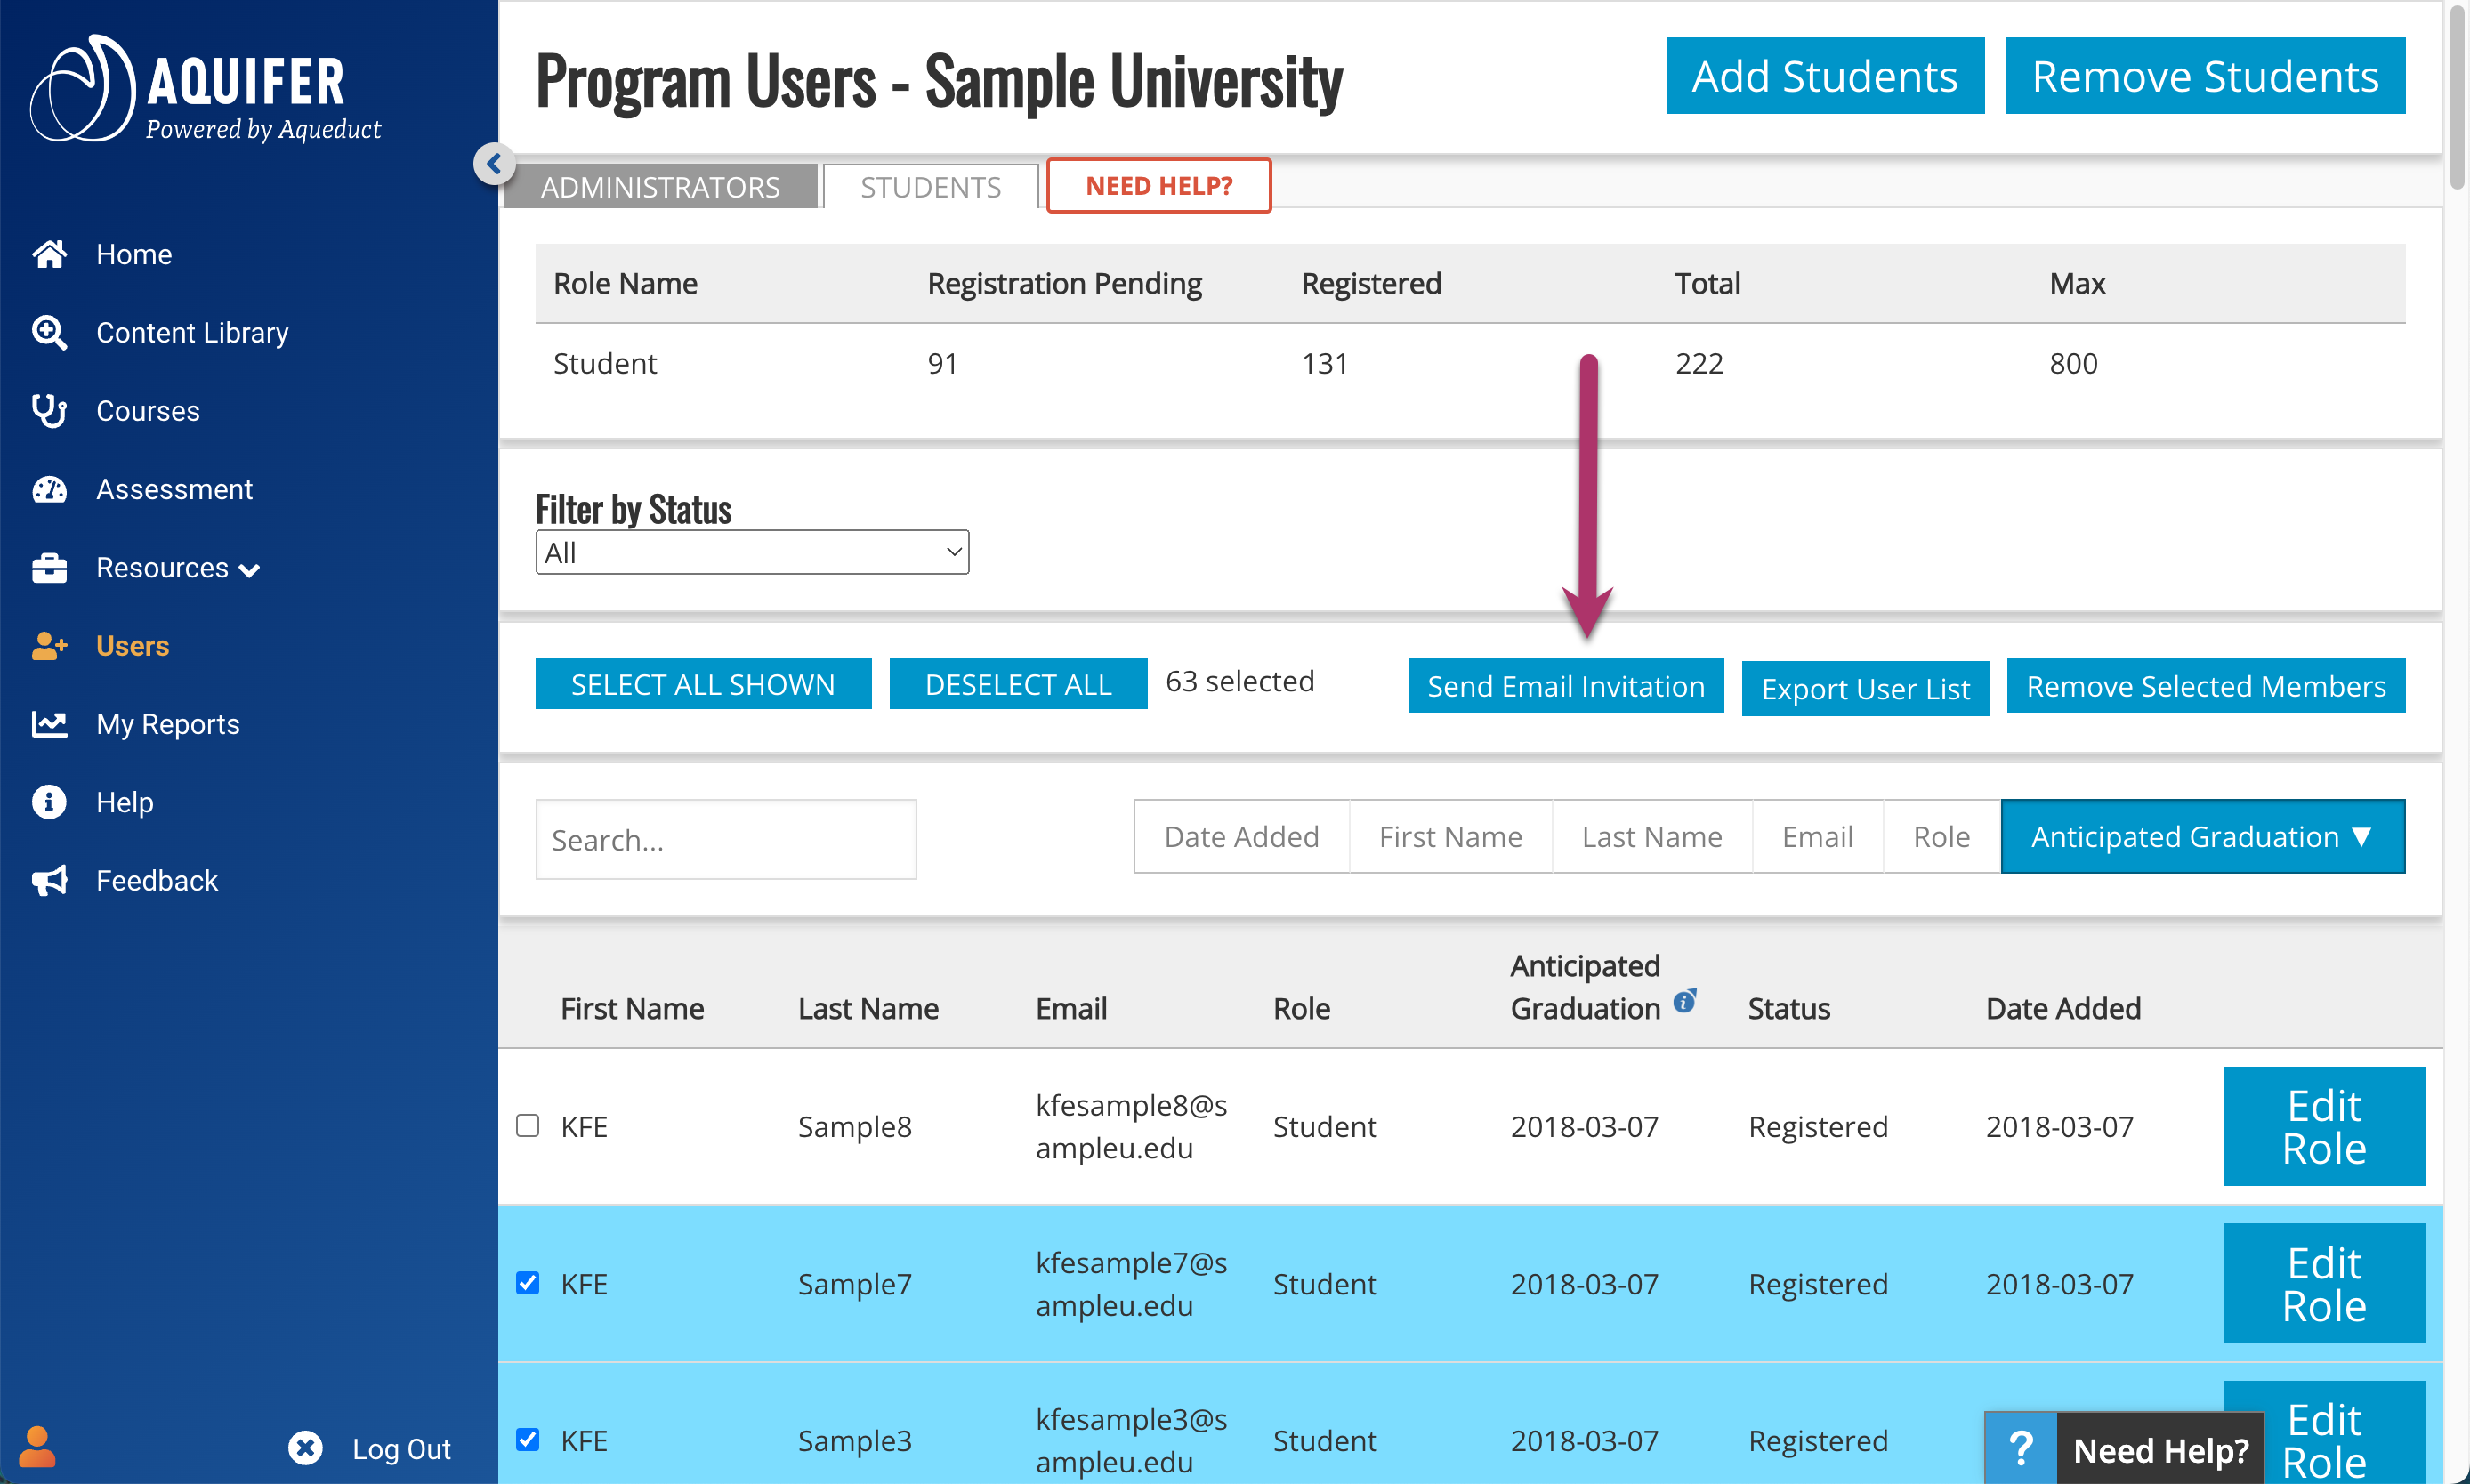
The top of the Student User Panel displays your student user counts at a glance. Counts include:

  • Registration Pending: the number of students who have access to your program but have not registered in Aqueduct yet
  • Active: Students who have completed their registration
  • Total: All students currently rostered in your program (both registration pending and active)
  • Max: The maximum number of students that may be added based on your institution’s current subscription

Below your student statistics, you’ll see a full list of your students with a variety of options for filtering, sorting and selecting. You will also see Send Email Invitation, Export User List, and Remove Selected Members buttons. These three options are inactive until users are selected

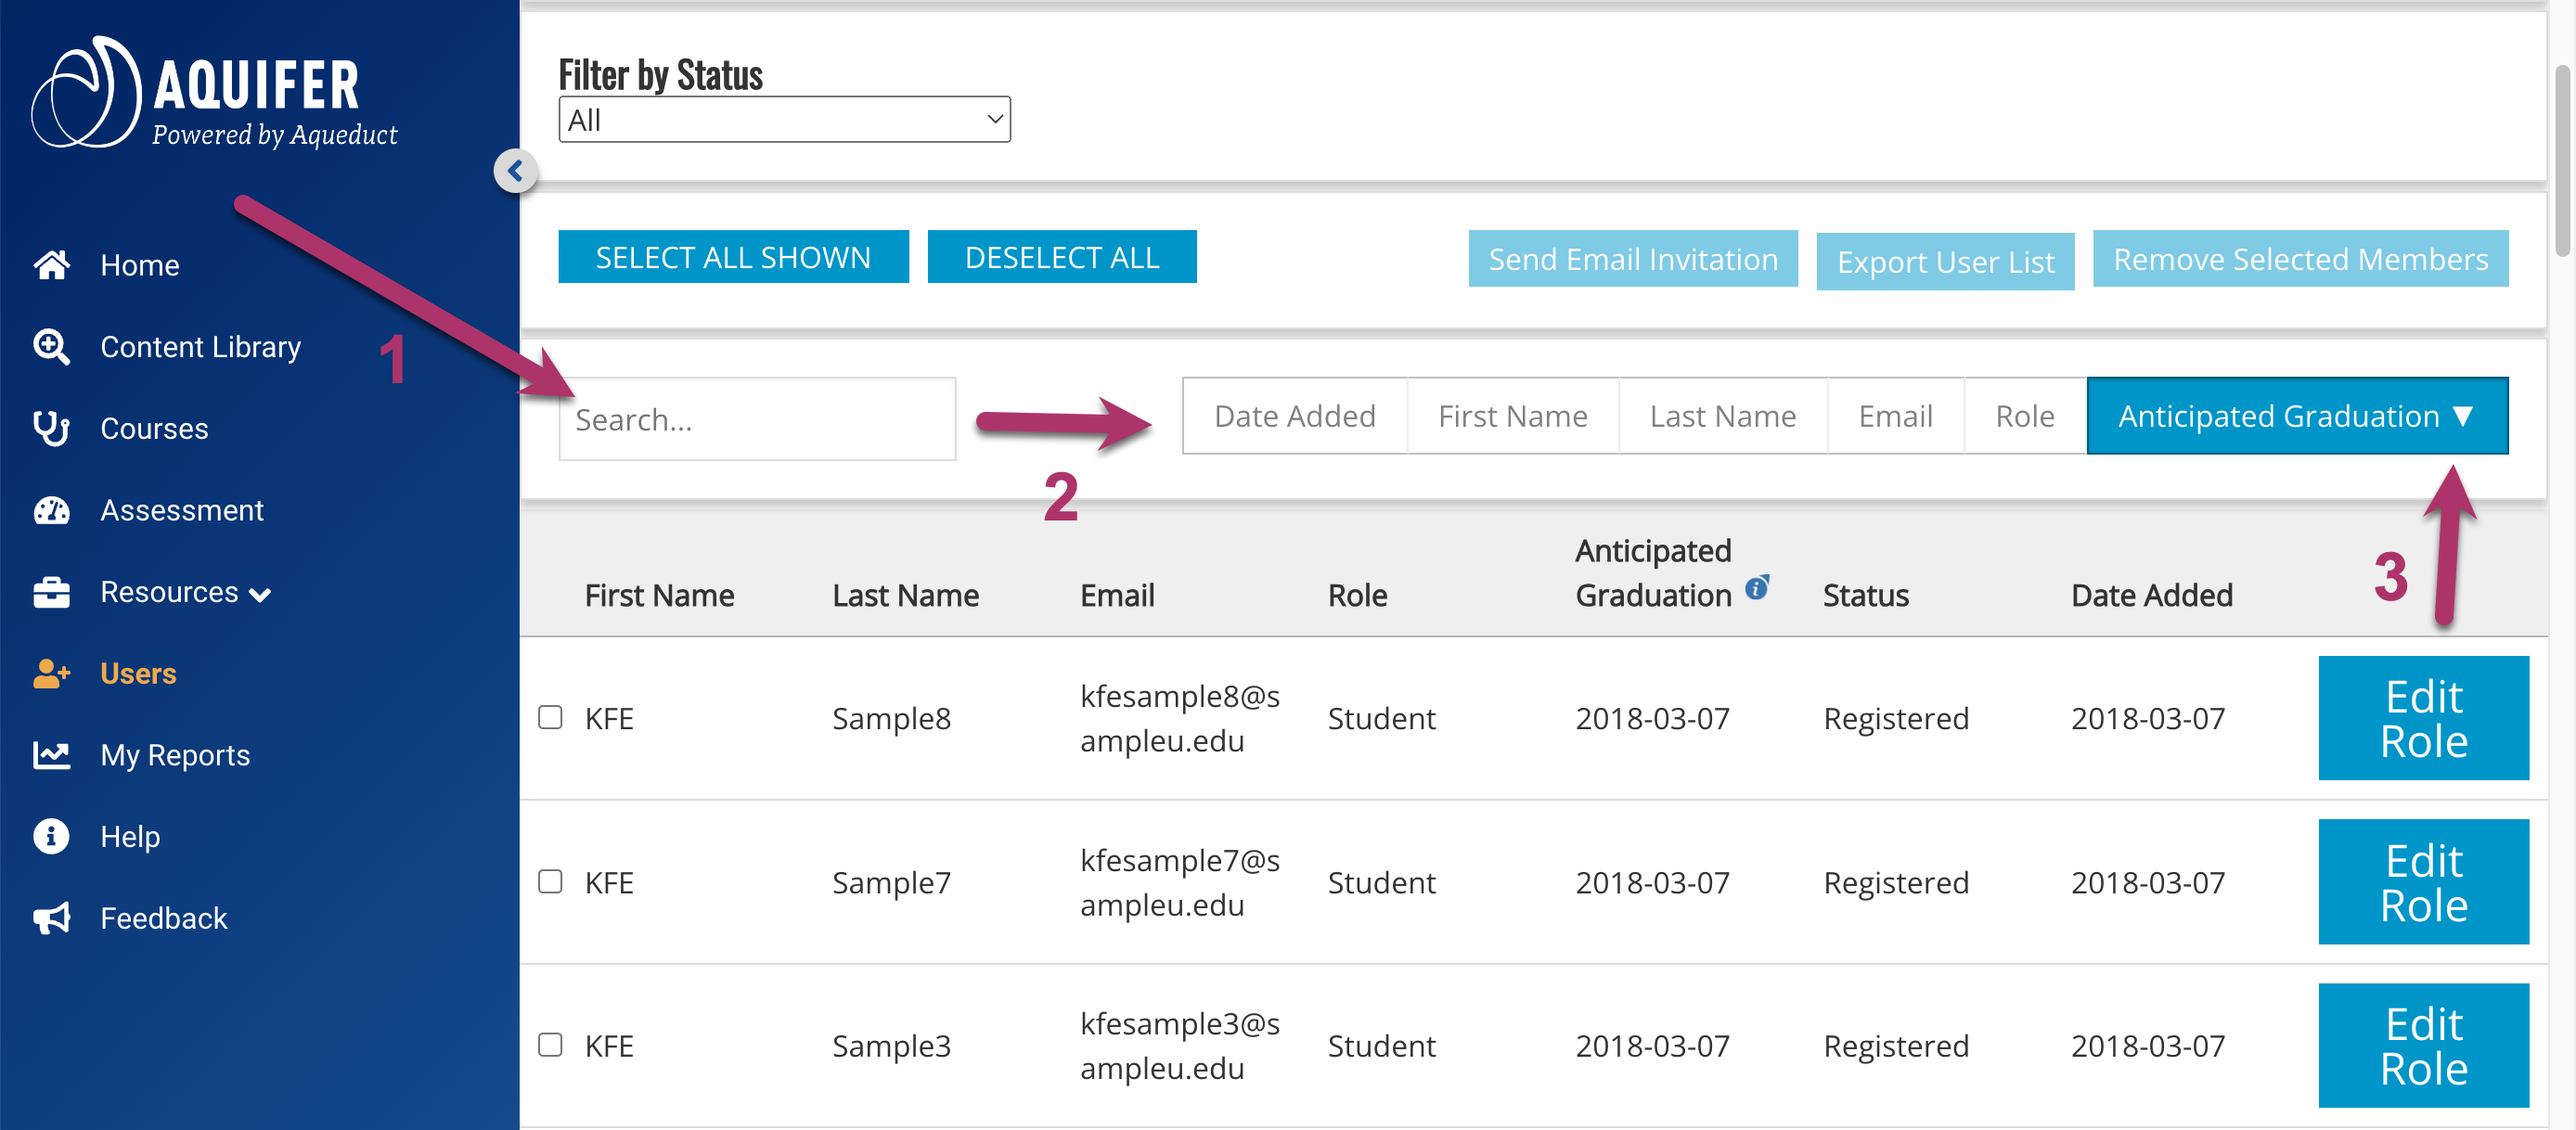
There are a variety of options available for sorting your student list. You can Search by last name, first name, or email address in the search field (1).

You can also sort in ascending or descending order by date added, first name, last name, email, or anticipated graduation date.

Please note first name, last name, and anticipated graduation date is entered by the students when they complete their registration status and will not be available for students who have a status of “registration pending”.

To sort, click on the button for the field you wish to select (2). The button you select will turn a darker blue while your sort is active, and a pointer will appear next to the text indicating if your list will be sorted in ascending or descending order (3). Click the button again to change the sort order.

Filter and Sort Options

Aqueduct’s user panel allows you to Filter by Status. Use the dropdown menu to sort the list of students below by registration status.

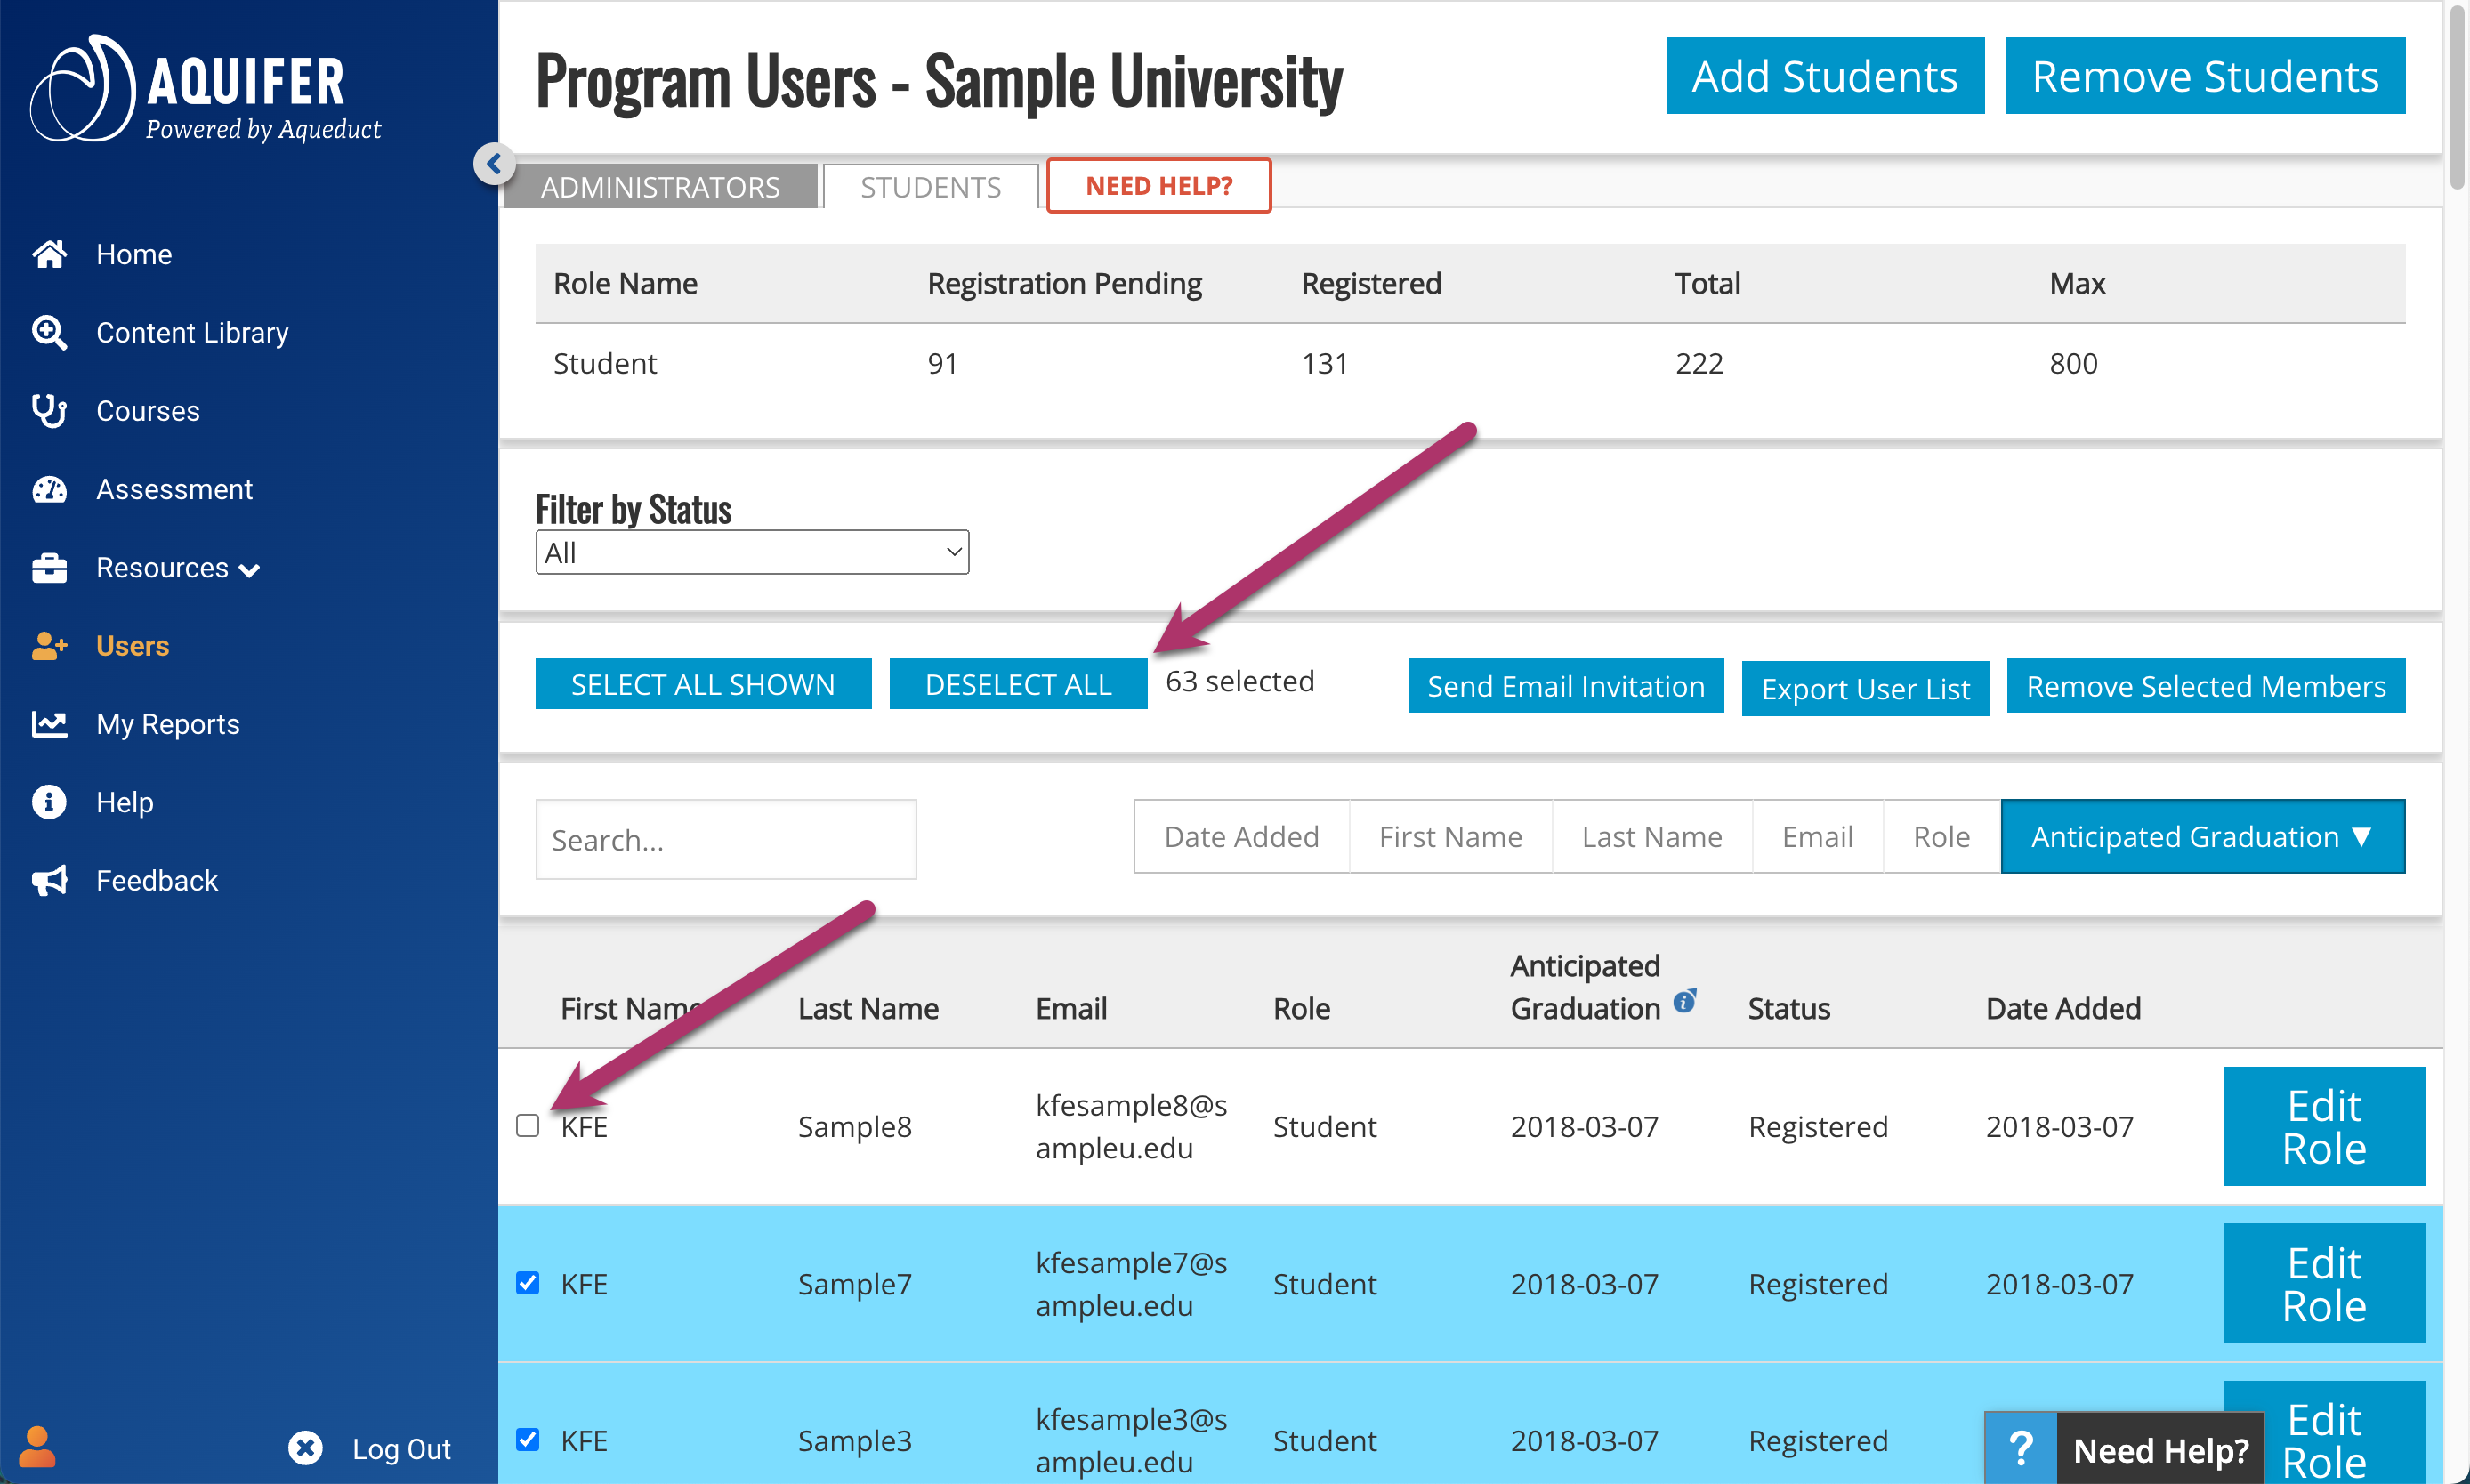
In order to use the student user management tools, you will need to select the group of students you wish to manage. After using the filter and sort options to display the list of students as you’d like, there are two methods to select and deselect students.

  1. Use the Select All Shown or Deselect All buttons above the list.
  2. Check the box next to each student you wish to select. Check the box again to deselect the student.

Selected students are highlighted, and show a checkmark in the box next to their name.

Selecting and Deselecting Students

Student User Management Tools

Managing your student users is easy with the ability to send email invitations and export user lists.

Administrative users can send email invitations to students with a Registration Pending status only. It is recommended to re-send email invitations to students who have not logged in after several months (or a length of time that matches the needs of your program) to ensure that students are making use of their Aquifer courses.

To send an email invitation, select the students you wish to email, and click the Send Email Invitation button.


You will receive a pop-up prompting you to confirm that you wish to send an email to the selected students. Click OK to continue sending the email invitation.


After emails are successfully sent, you will see a confirmation note in the box at the top of the page.


Please note: Emails will not send to students with an Active status. If you select students with a mix of statuses, emails will send to only those who have not yet registered. After clearing the pop-up, the message at the top of your screen will show which emails were sent to students.

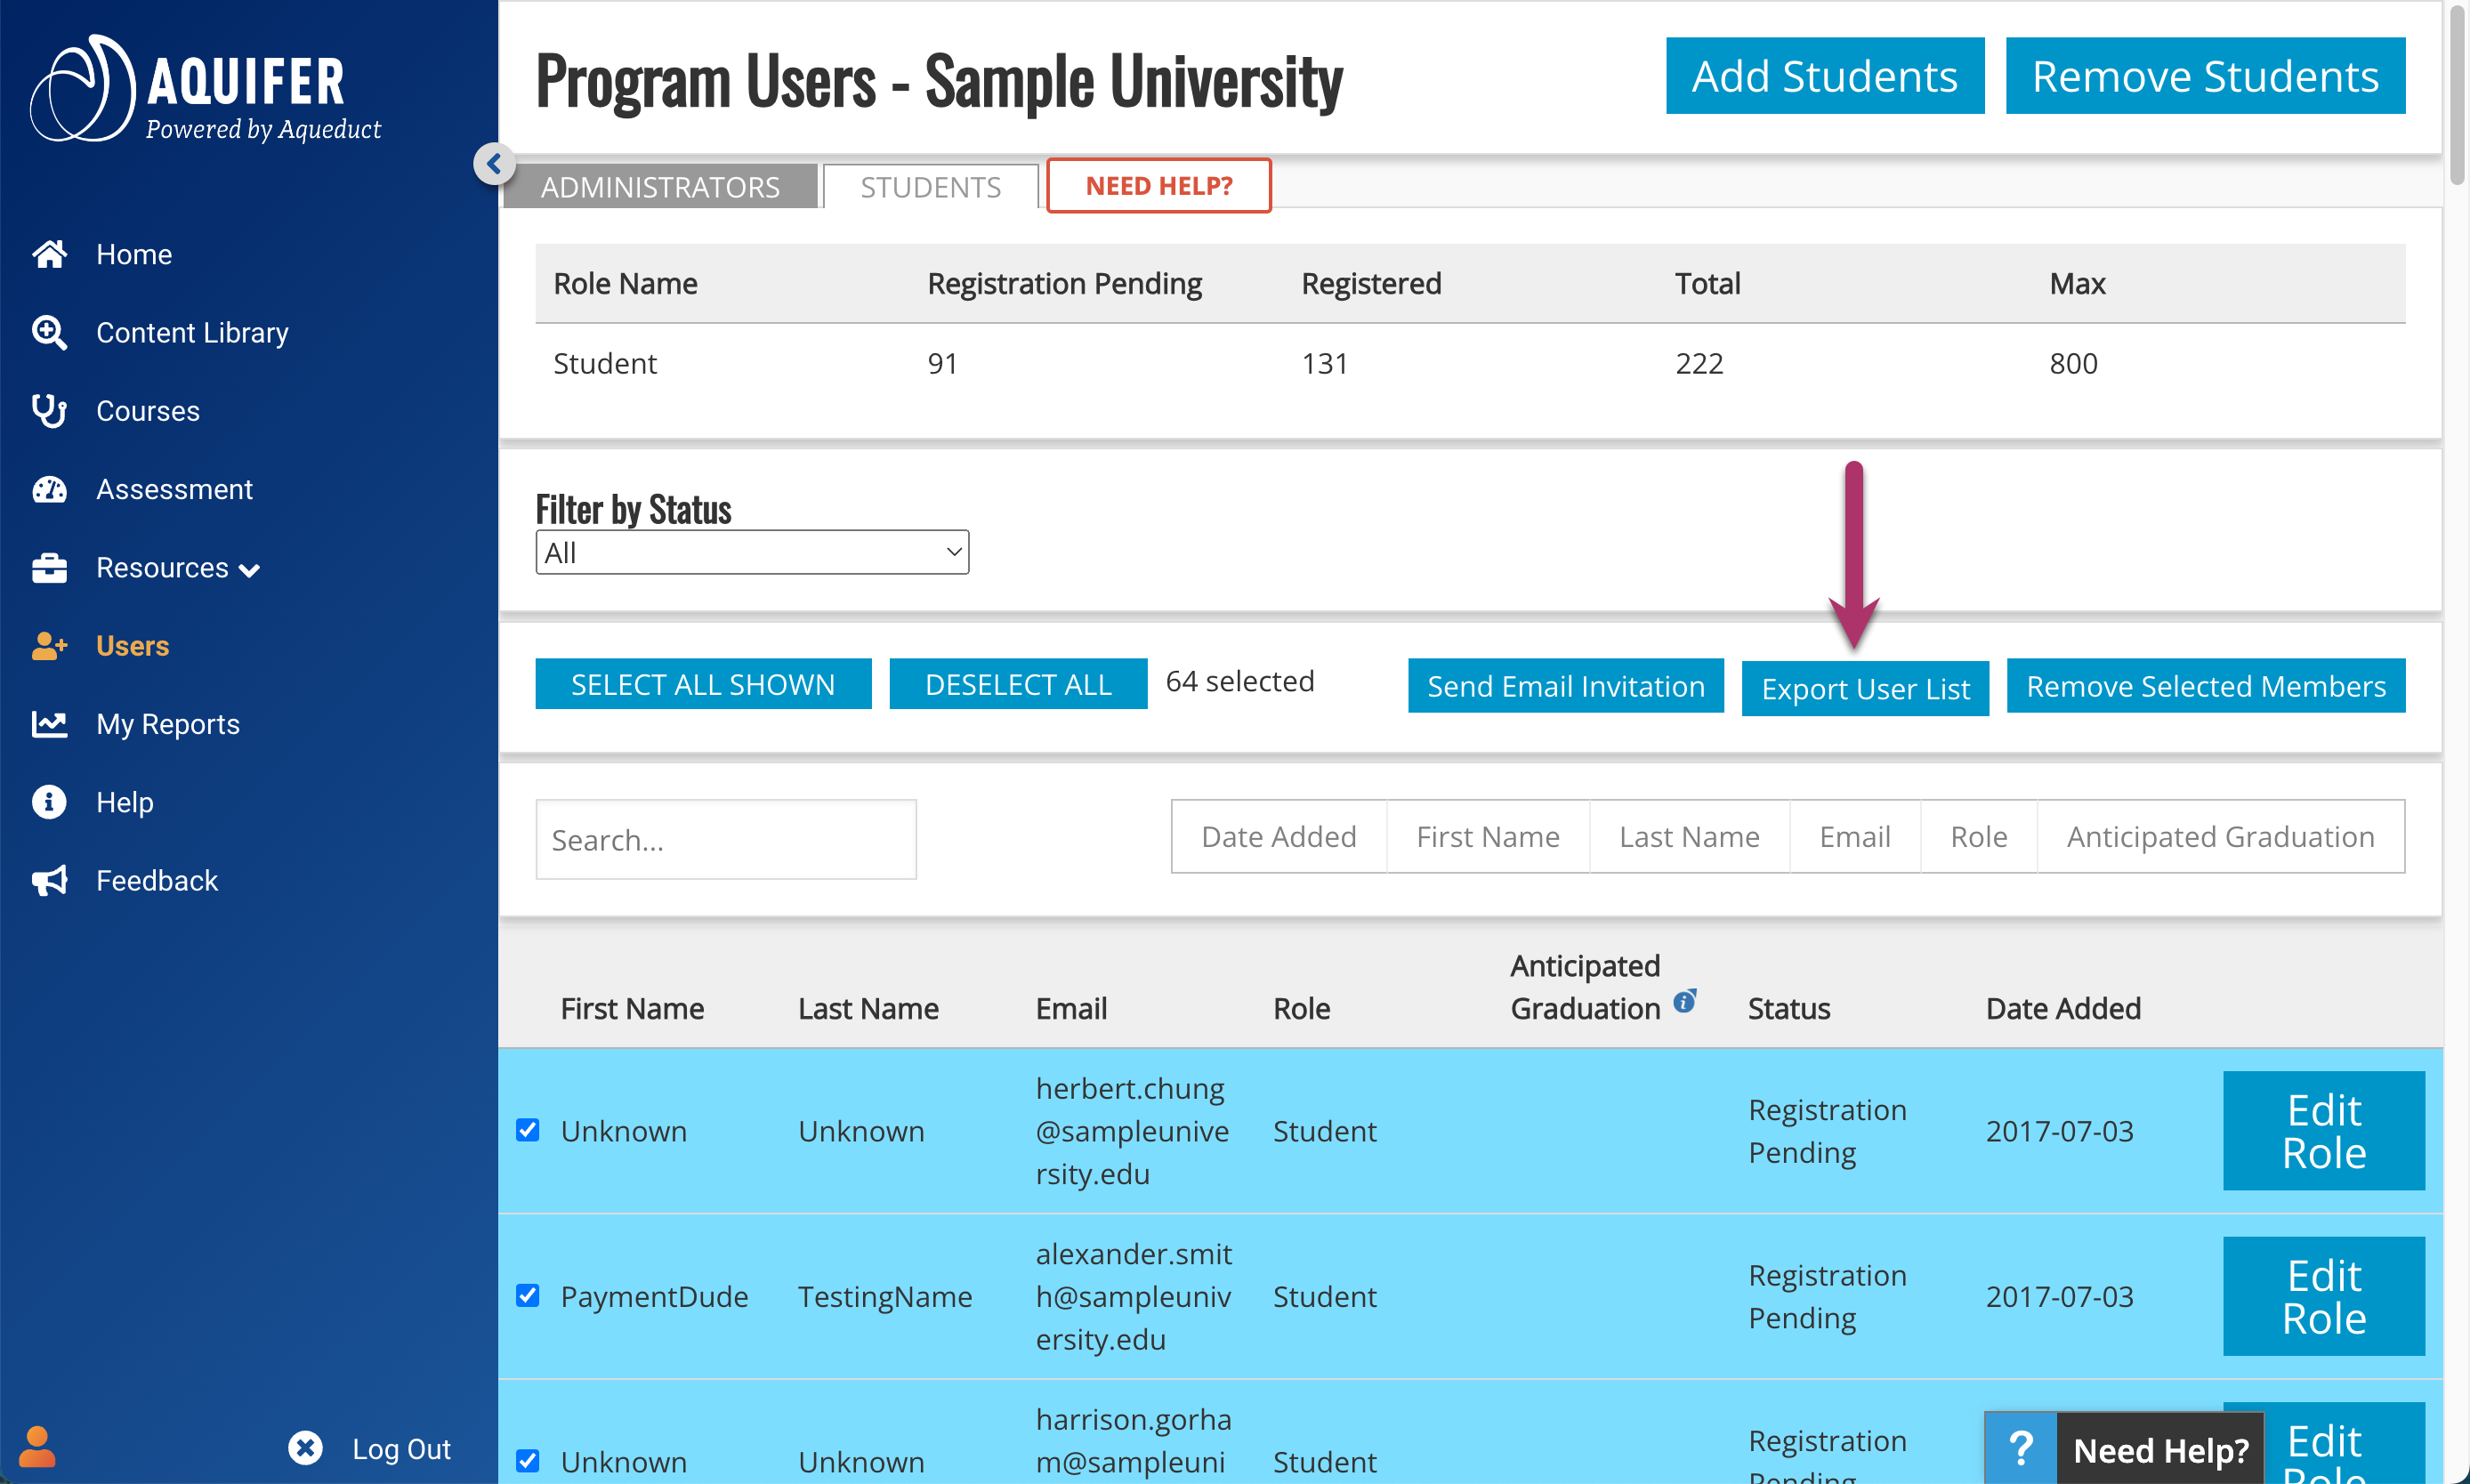
To export a list of users to a csv file, select the students you wish to export and click the Export User List button. Your browser will direct you to download and save the csv file for your use.


Removing Students from Your Program

Removing students from your program will discontinue their access to your Aquifer courses.

Warning: Download Reports Before Removing Students

Be sure to download any and all reporting associated with the student/students you are planning to remove. Once removed, a student’s coursework will not appear on the case or course reports.

There are two ways to remove students from your program.

To batch remove students using a list of email addresses, click the Remove Students button at the top of the page.

Remove Students Button

On the Batch Remove Students from Program page, add the student emails (comma separated) that you wish to remove from your program and click Remove Students.

You will receive a pop-up message asking to confirm the removal of the listed students. Click OK to confirm that you wish to proceed.

Next, you will review the list of students to be removed and then click “Remove Students.”

Review Removed Students

After the process completes, you will see a confirmation in the notification bar at the top of the page.

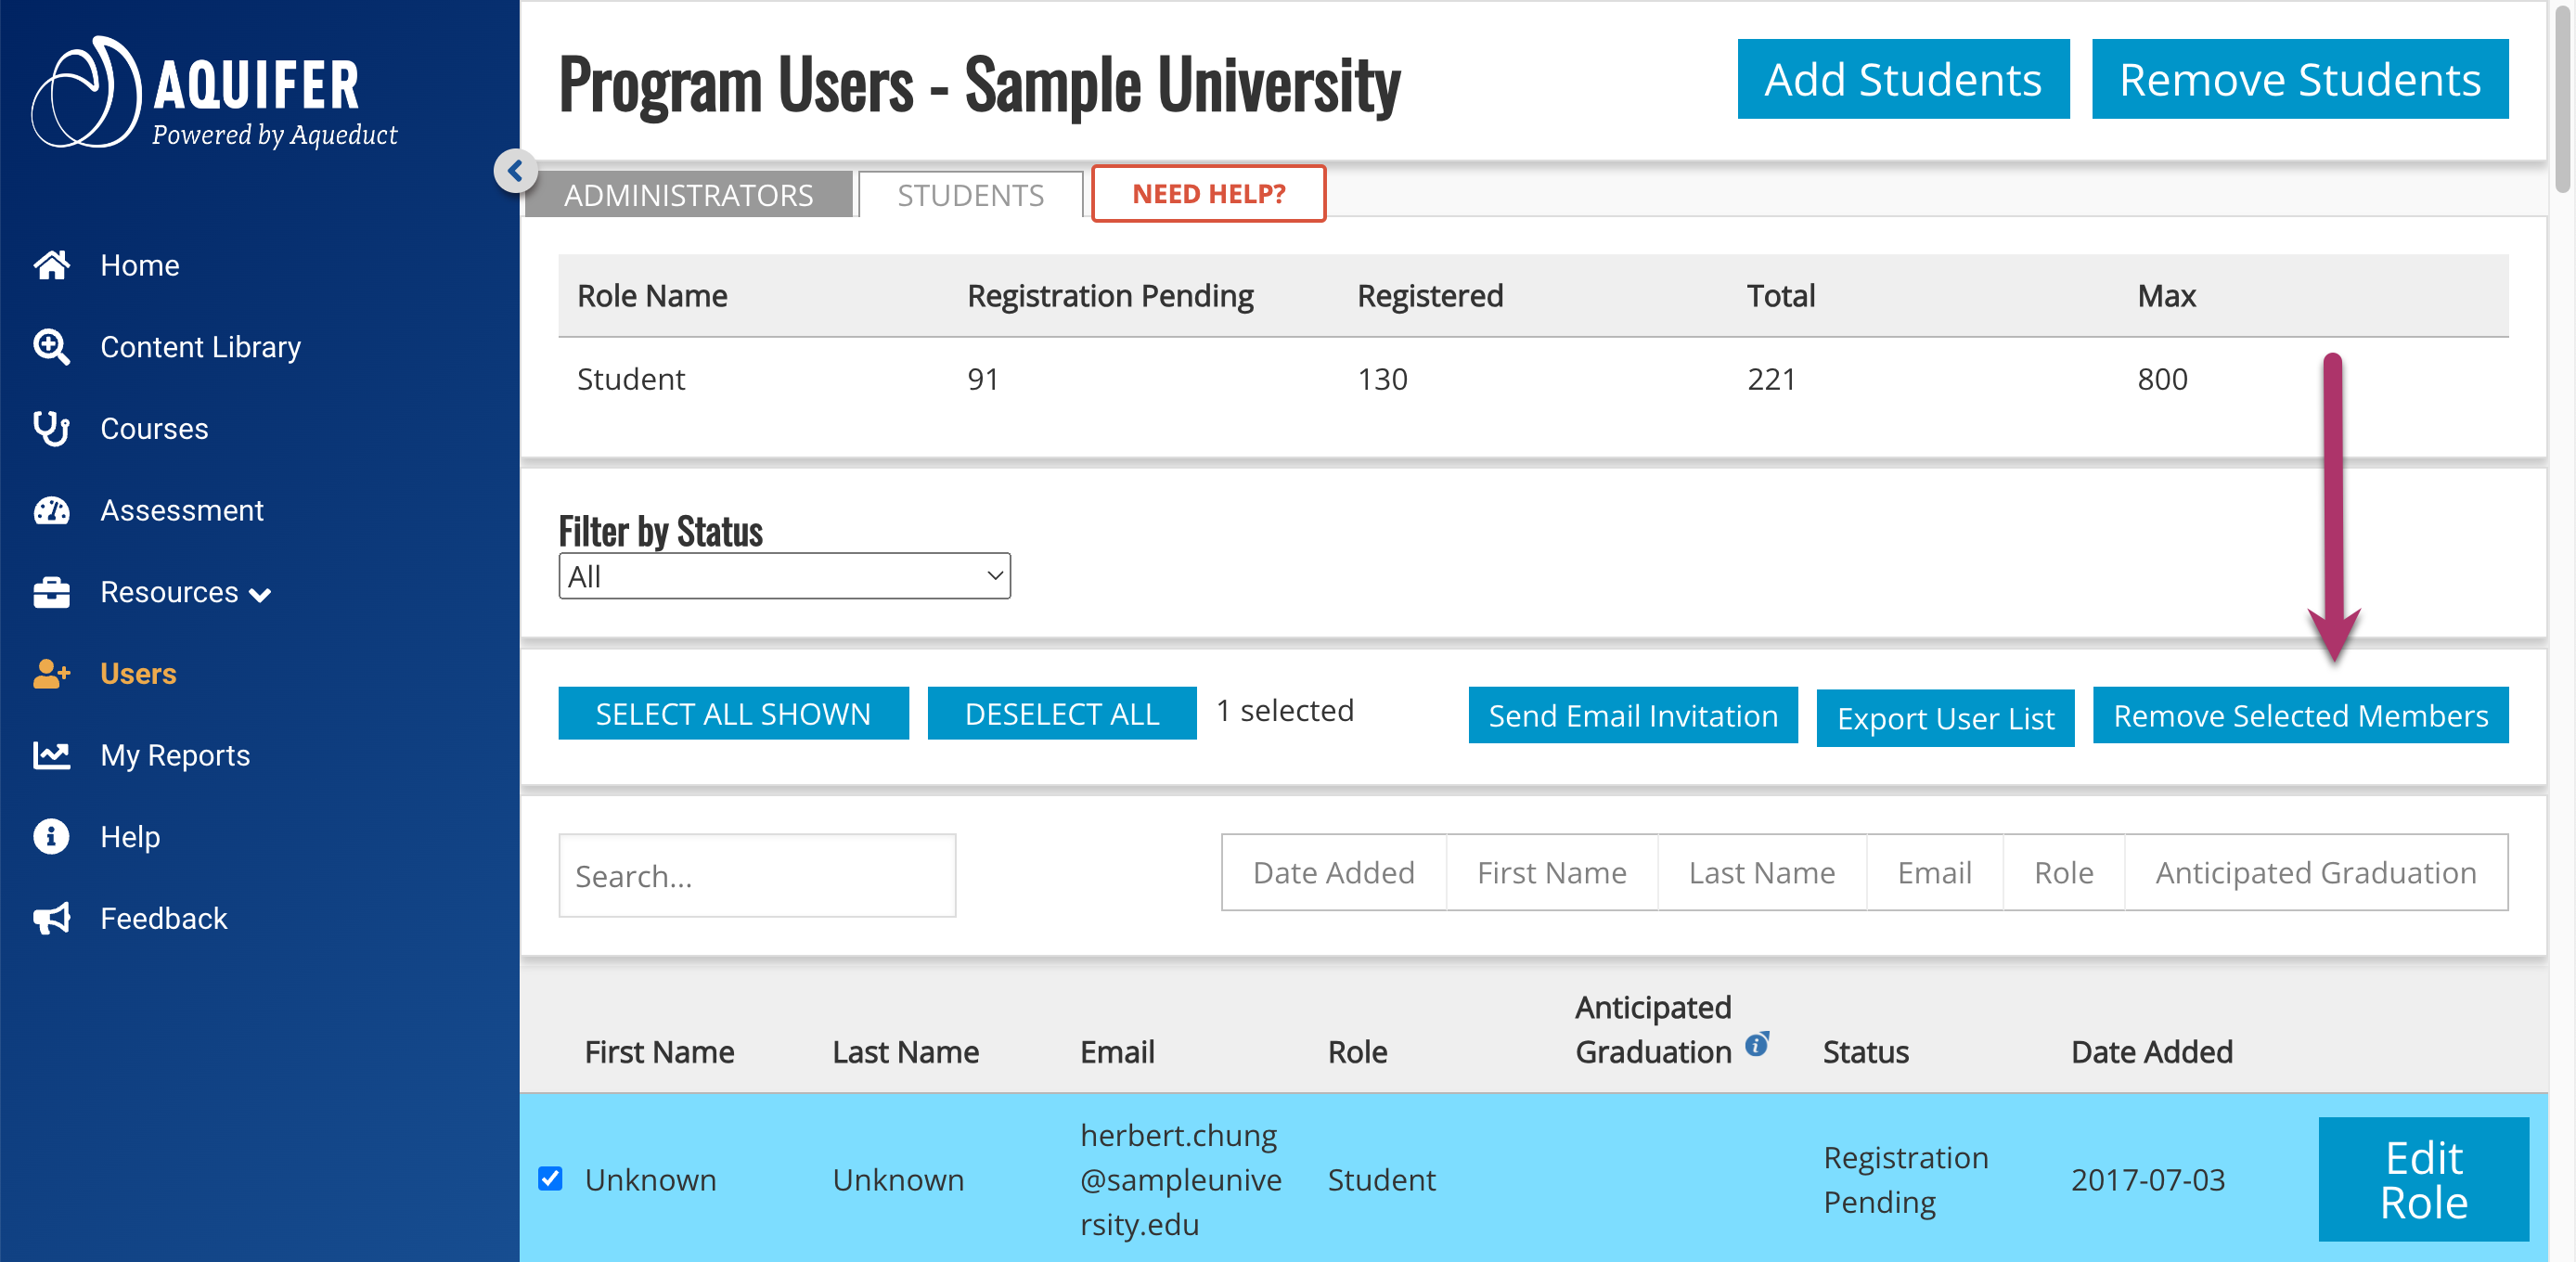
You can also remove students by selecting them from the student user list, and clicking on the Remove Selected Members button. This method is recommended for individual or small groups of students.


Like the batch removal process, you will see a pop-up notification asking you to confirm deleting the selected students. Click OK to continue.


After the process completes, you will see a confirmation in the notification bar at the top of the page.

Note: When students are removed from a program, they are automatically added to the Aquifer Alumni program. From the Alumni program, they will be able to access Aquifer’s free course content or purchase an individual subscription or continuing education module.

Building Clinical Reasoning Skills

Building Clinical Reasoning Skills

Research shows that physicians who are able to provide a semantically rich summarization of a case are much more accurate in making a clinical diagnosis.

Teaching clinical reasoning is one of Aquifer’s foremost educational goals. In following a virtual patient from presentation to outcome, students hone their skills in recognizing and interpreting clinical signs and symptoms. Each of our cases follows a structure that highlights the components of clinical reasoning––from gathering knowledge of the patient’s history and risk factors to making an informed opinion of the patient’s clinical status to developing a differential diagnosis, selecting diagnostic studies, and implementing a management plan. Through active engagement your learners can use deliberate practice to cultivate their clinical reasoning skills.


How is clinical reasoning learned?

Contribution by Valerie Lang, MD, MHE

Medical knowledge is essential, but insufficient, for effective clinical reasoning. Students need to organize their knowledge in a way that allows them to identify and solve clinical problems. (Norman, Charlin, et al.) The “dual-processing” model of clinical reasoning identifies two processes: Type 1 (fast, “instinctive,” heuristic) and Type 2 (slow, analytical). (Norman) There is much debate over which type is more error-prone (Norman, Eva, Croskerry), but it is generally acknowledged that experts use Type 1 reasoning when faced with problems in their field, but switch to Type 2 reasoning when faced with unfamiliar problems. Novices tend to use Type 2 but tend toward Type 1 reasoning as they develop experience. (Norman, Eva, et al.)

To develop skills in clinical reasoning, students need deliberate practice applying their knowledge to clinical cases (Eva, Norman), either virtual (e.g. paper, on-line, standardized patient) or real (e.g., patient care), and have the opportunity to reflect on the diagnostic and treatment decisions they make. Real clinical experience is essential, but idiosyncratic. Students may not encounter patients with the ideal breadth of conditions or at a stage of their illness that is most helpful for developing reasoning skills. With the increase in hand-offs in inpatient settings, students are more likely to meet their patients after a diagnosis has already been established. The lost opportunity to evaluate “fresh” patients is associated with decreased learning. (Lang)

How do Aquifer cases help students learn clinical reasoning?

Aquifer cases provide students with the opportunity for deliberate practice in clinical reasoning. The context in which clinical reasoning is learned is important. Students are more likely to correctly solve a case if it is presented in the same context in which it was learned. (Durning, et al.) The real clinical environment is highly complex and data-heavy, and can cognitively overload the novice learner. (Merrienboer) By providing an authentic clinical and social context for cases, while reducing the amount of cognitive overload, Aquifer virtual patient cases give students a robust opportunity to develop their clinical reasoning skills in a setting that is specifically designed for their level.

Most of the Aquifer virtual patients present with an undifferentiated complaint or lab abnormality, such as cough or anemia. Students practice identifying the key findings from the history, physical exam, and test data. They synthesize the case into a concise summary statement, identify a differential diagnosis, and learn the relative diagnostic value of each of the key findings. They make decisions about what tests and treatments are important for identifying and resolving the patient’s problem. At each step, they must commit to a decision, then receive feedback and explanations about the correct and incorrect responses. This provides practice in a safe, but interactive environment. It gives students a framework to approach real patients with similar problems in a more sophisticated manner. (Edelbring, et al.)

Norman G. Research in clinical reasoning: past history and current trends. Medical Education 2005;39:418-27.

Liaison Committee on Medical Education. Standards for Accreditation of Medical Education Programs Leading to the M.D. Degree. May 2012.

Charlin B, Boshuizen HP, Custers EJ, Feltovich PJ. Scripts and clinical reasoning. Medical Education 2007;41:1178-84.

Boshuizen HP, Schmidt HG. The development of clinical reasoning expertise. Clinical Reasoning in the Health Professions2008:113-21.

Norman G. Dual processing and diagnostic errors. Advances in Health Sciences Education: Theory and Practice 2009;14 Suppl 1:37-49.

Norman GR, Eva KW. Diagnostic error and clinical reasoning. Medical Education 2010;44:94-100.

Croskerry P. Clinical cognition and diagnostic error: applications of a dual process model of reasoning. Advances in Health Sciences Education 2009;14:27-35.

Norman G, Young M, Brooks L. Non-analytical models of clinical reasoning: the role of experience. Medical Education 2007;41:1140-5.

Lang VJ, Mooney CJ, O’Connor AB, Bordley DR, Lurie SJ. Association between hand-off patients and subject exam performance in medicine clerkship students. Journal of General Internal Medicine 2009;24:1018-22.

Edelbring S, Dastmalchi M, Hult H, Lundberg IE, Dahlgren LO. Experiencing virtual patients in clinical learning: a phenomenological study. Advances in Health Sciences Education: Theory and Practice 2011;16:331-45.

Koens F, Mann KV, Custers EJ, Ten Cate OT. Analysing the concept of context in medical education. Medical Education2005;39:1243-9.

van Merrienboer JJ, Sweller J. Cognitive load theory in health professional education: design principles and strategies. Medical Education 2010;44:85-93.

Program Level Reports


Program Course Usage Report

The Program Course Usage report is designed to provide a high-level view into total usage of Aquifer courses by your program during a given period of time.

To access the Program Course Usage report:

1.Select Programs from the top menu navigation.

2.This will take you to Your Programs. Click the Program Course Usage button.

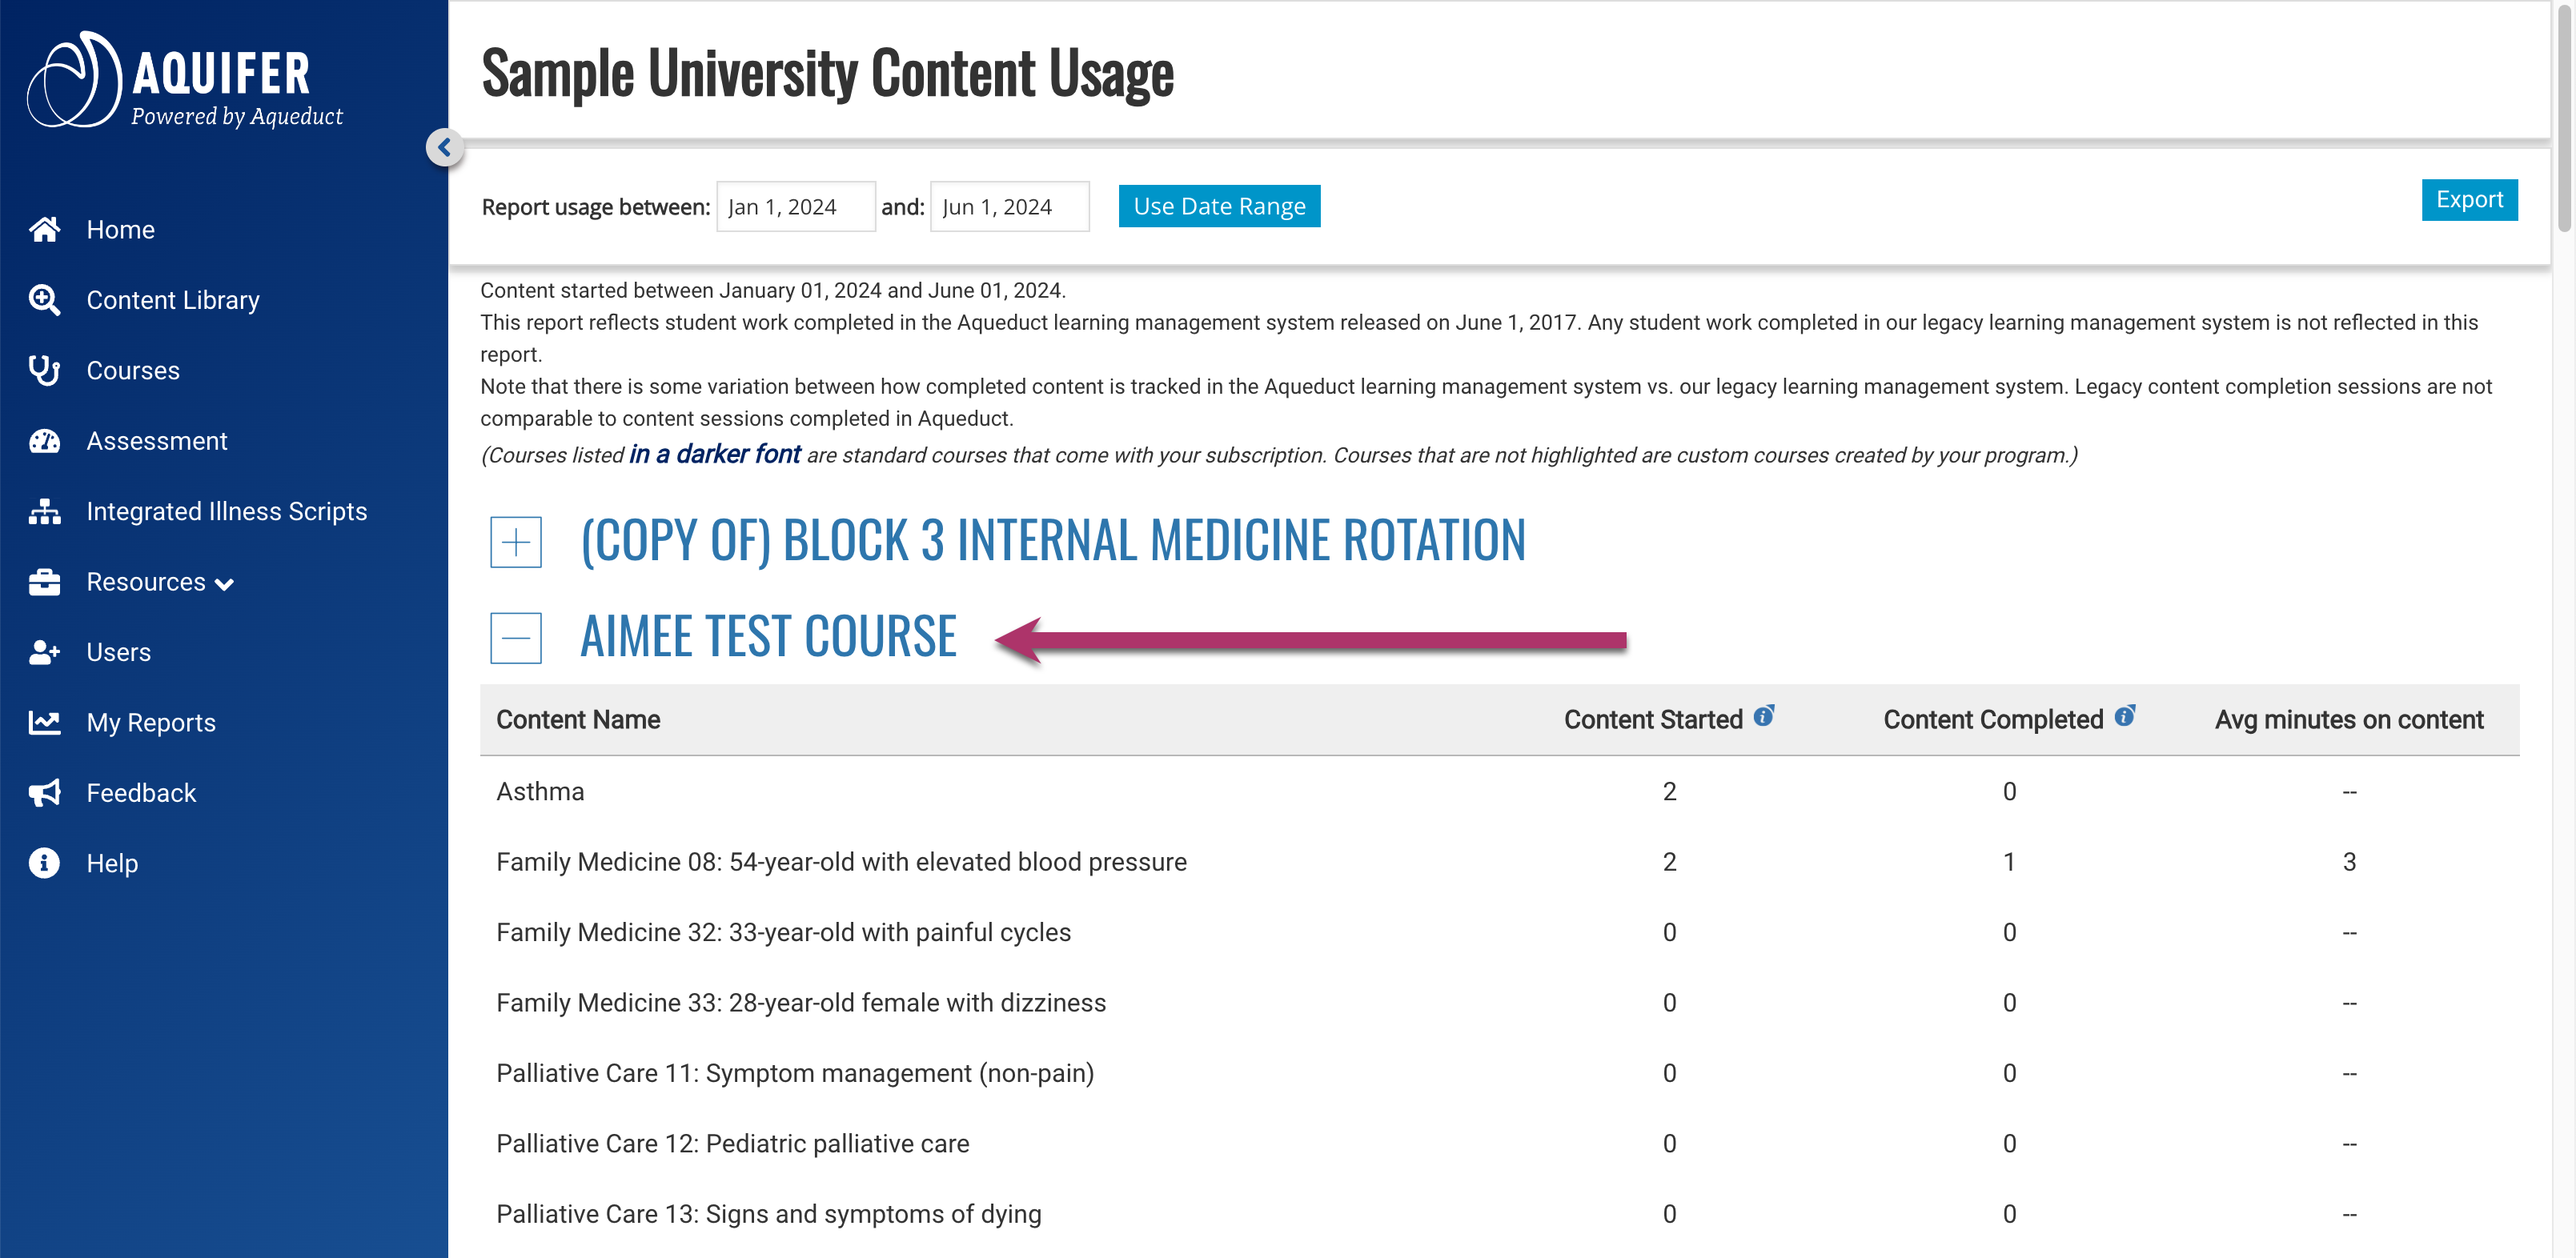
3.Select a date range, if desired, and click Use Date Range to refresh the report. Click on the program name (or +) to reveal the report. Note that if you’re enrolled in multiple programs, you’ll see all of your programs listed here. Select the one you wish to view.

The Program Course Usage Report includes a list of courses your program has access to, including both standard Aquifer courses (highlighted in grey) and custom courses created by your program (not highlighted). For each course, the following data is shown:

  • Number of cases in the course
  • Number of cases started
  • Number of cases completed by users in your program during the date range you selected
  • Name of the person assigned to be responsible for Custom Courses (created after July 2018)

Program Case Usage Report

The Program Case Usage report is designed to provide a high-level view into total usage of individual cases within Aquifer courses by your program during a given period of time.

To access the Program Case Usage report:

1.Select Courses from the top menu navigation.

2.This will take you to a list of your Courses. Click the Program Case Usage button.

3.You’ll see a list of your courses displayed. Click on the course name (or +) to reveal the report of an individual course. You can reveal more than one course at a time. Select a date range, if desired, and click Use Date Range to refresh the report.

For each of your courses, the Program Case Usage Report includes:

  • A case list
  • Number of cases started
  • Cases completed
  • Average time (in minutes) it has taken students to complete each case. You may hover over the ‘i’ icon on each of the columns to get a definition of the measurement.

Managing & Removing Administrative Users


After administrators are added to your program, it’s easy to manage your administrative users in Aqueduct. Users with administrative user management permissions (view roles and permissions for details) have the ability to:

  • Remove administrators from your program
  • Export an administrative user list
  • Edit administrator user roles
  • Send email invitations to administrators at any time
  • Sort and filter administrators in a variety of ways

The Administrative User Panel

The administrative user panel provides at-a-glance information and useful tools to help you manage your users.

To access the administrative user panel, click on Users in the side navigation after you have signed in.

Click Users on Home Screen

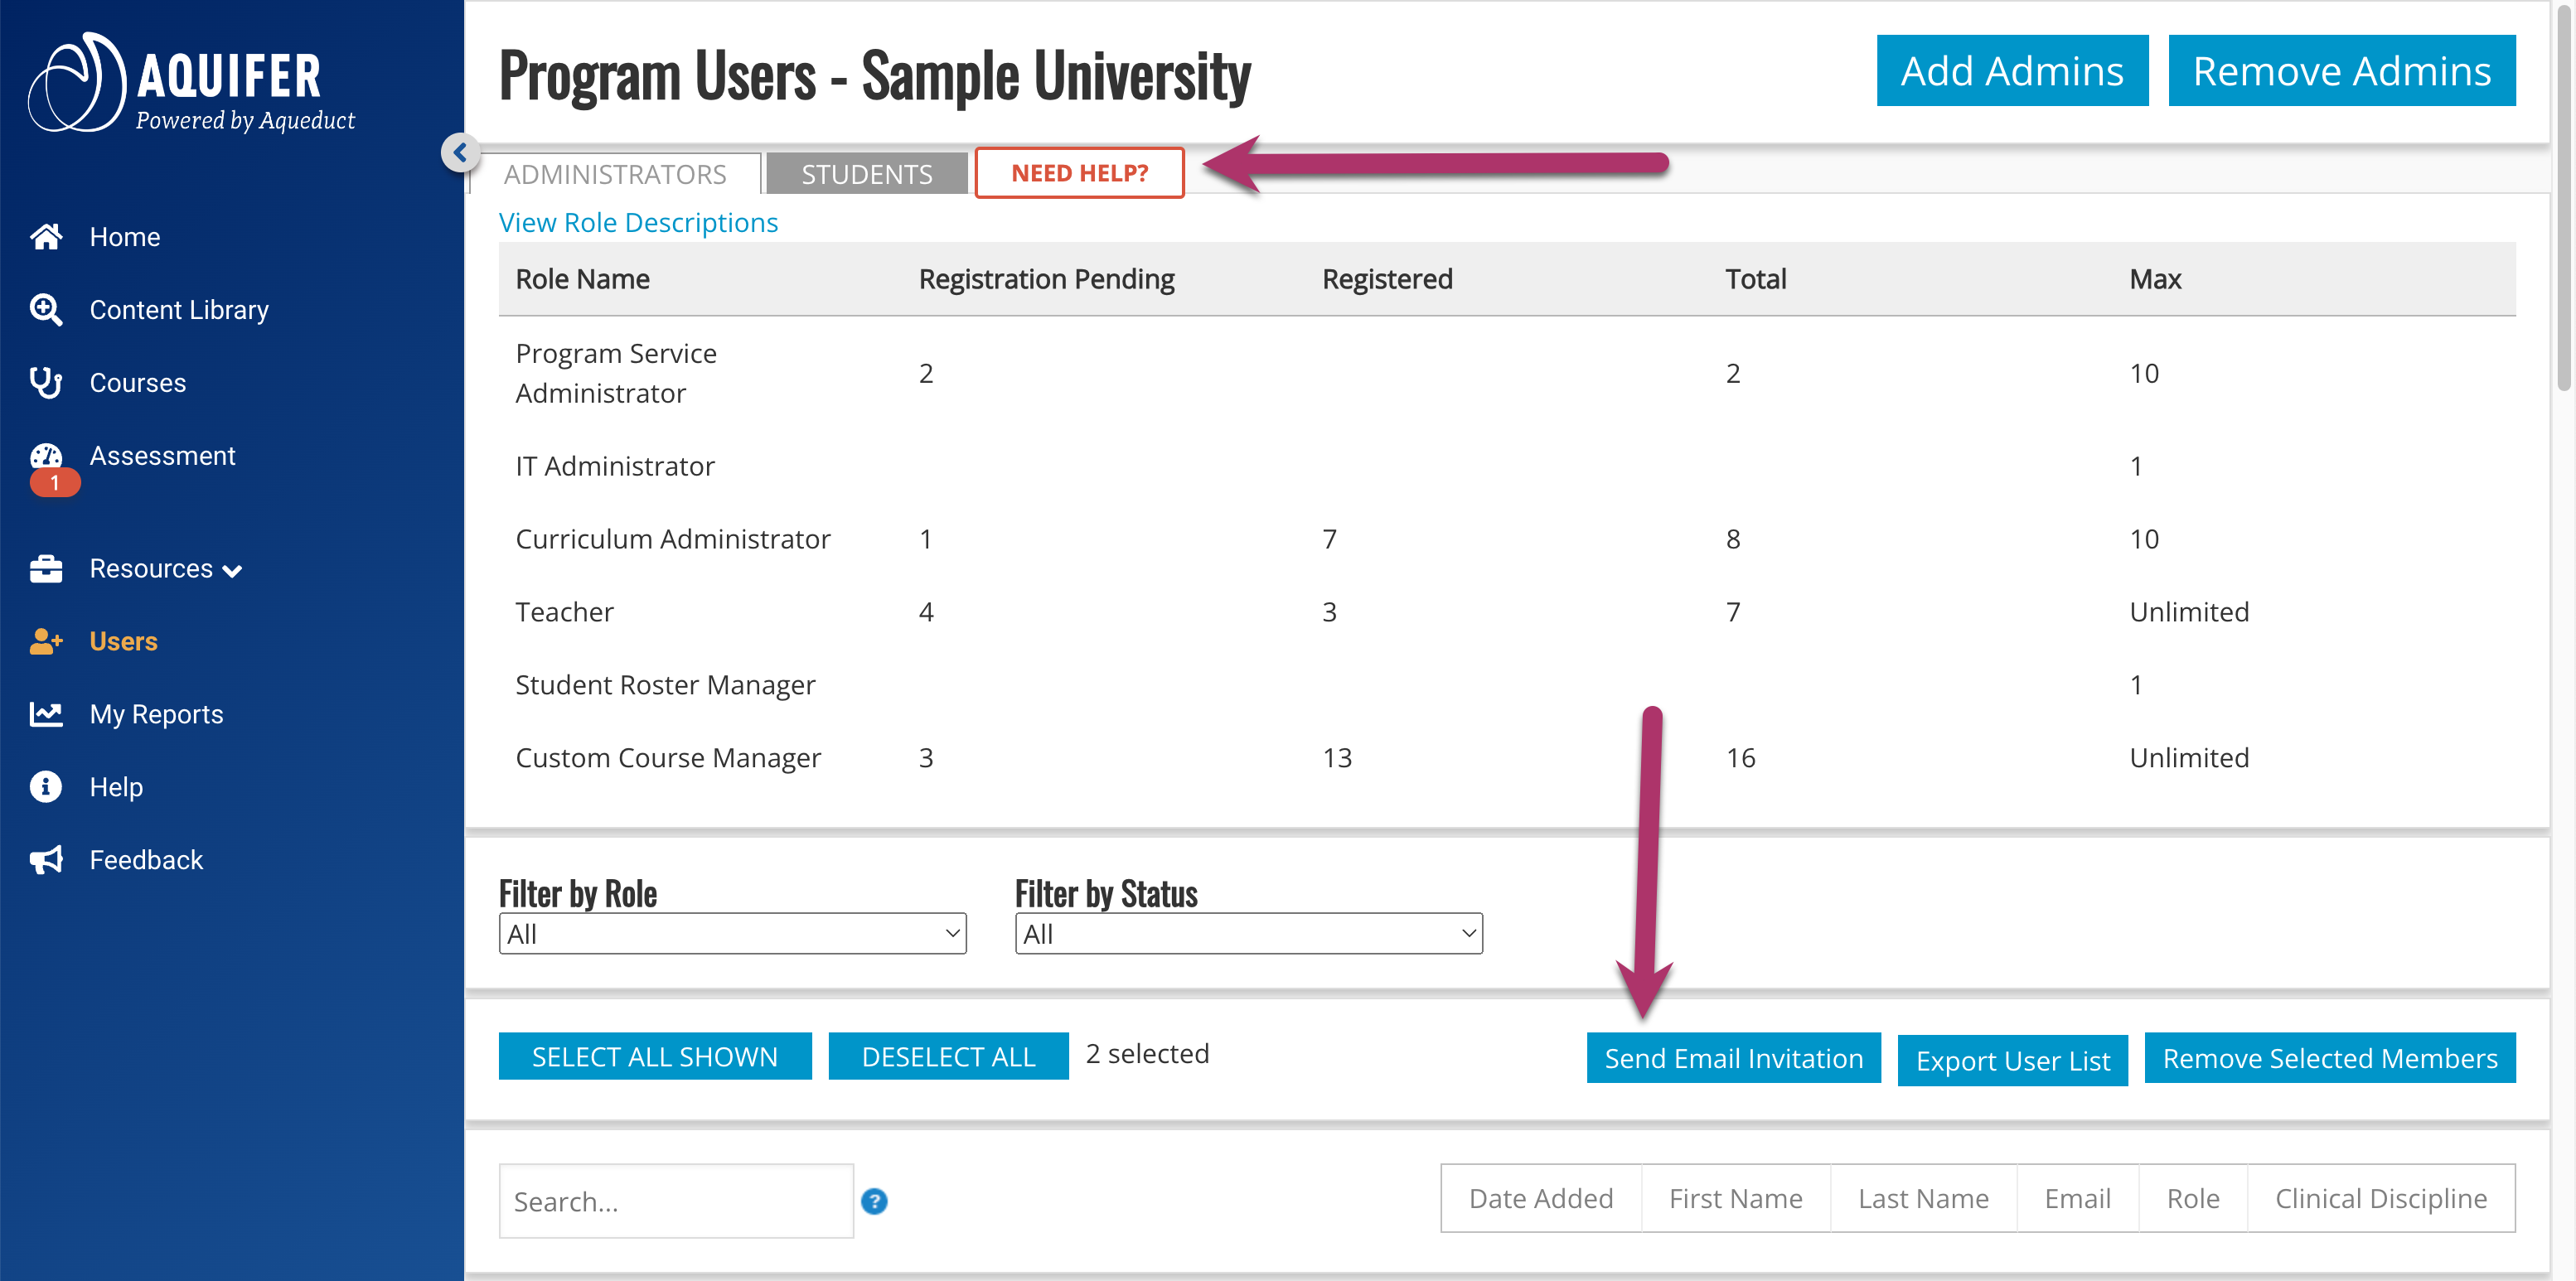
Once you have navigated to the Administrative user panel, you’ll notice that the Administrators tab will be activated automatically. Please note that student users are accessed separately by clicking on the “Students” tab.

Select Users

The top of the Administrator User Panel displays your admin user counts at a glance, listed by their assigned role. Counts include:

  • Registration Pending: The number of admin users who have access to your program but have not registered in Aqueduct yet
  • Active: Administrators who have completed their registration
  • Total: All admin users currently rostered in your program (both registration pending and active)
  • Max: The maximum number of admin users that may be added based on your institution’s current subscription

You will also see Send Email Invitation, Export User List, and Remove Selected Members buttons. These three options are inactive until users are selected.

All users are listed at the bottom of this page and may be sorted, filtered, and exported in a variety of ways.

There are a variety of options available for sorting your administrator list. Below your admin user statistics, you’ll see a full list of your admin users with a variety of options for filtering, sorting and selecting. You can Search (1) by last name, first name, or email address in the search field.

Aqueduct’s admin user panel allows you to Filter by Role and Filter by Status. Use the dropdown menus to sort the list of admin users below by Aqueduct role assignment or registration status.

You can also sort in ascending or descending order by first name, last name, email, role, clinical discipline, and date added (2). Please note first name, last name, and clinical discipline is entered by users when they complete their registration and will not be available for administrators who have a status of “Registration Pending.” The role field indicates the role assigned to the user in Aqueduct.

To sort, click on the button for the field you wish to select (3). The button you select will turn a darker blue while your sort is active, and a pointer will appear next to the text indicating if your list will be sorted in ascending or descending order. Click the button again to change the sort order.

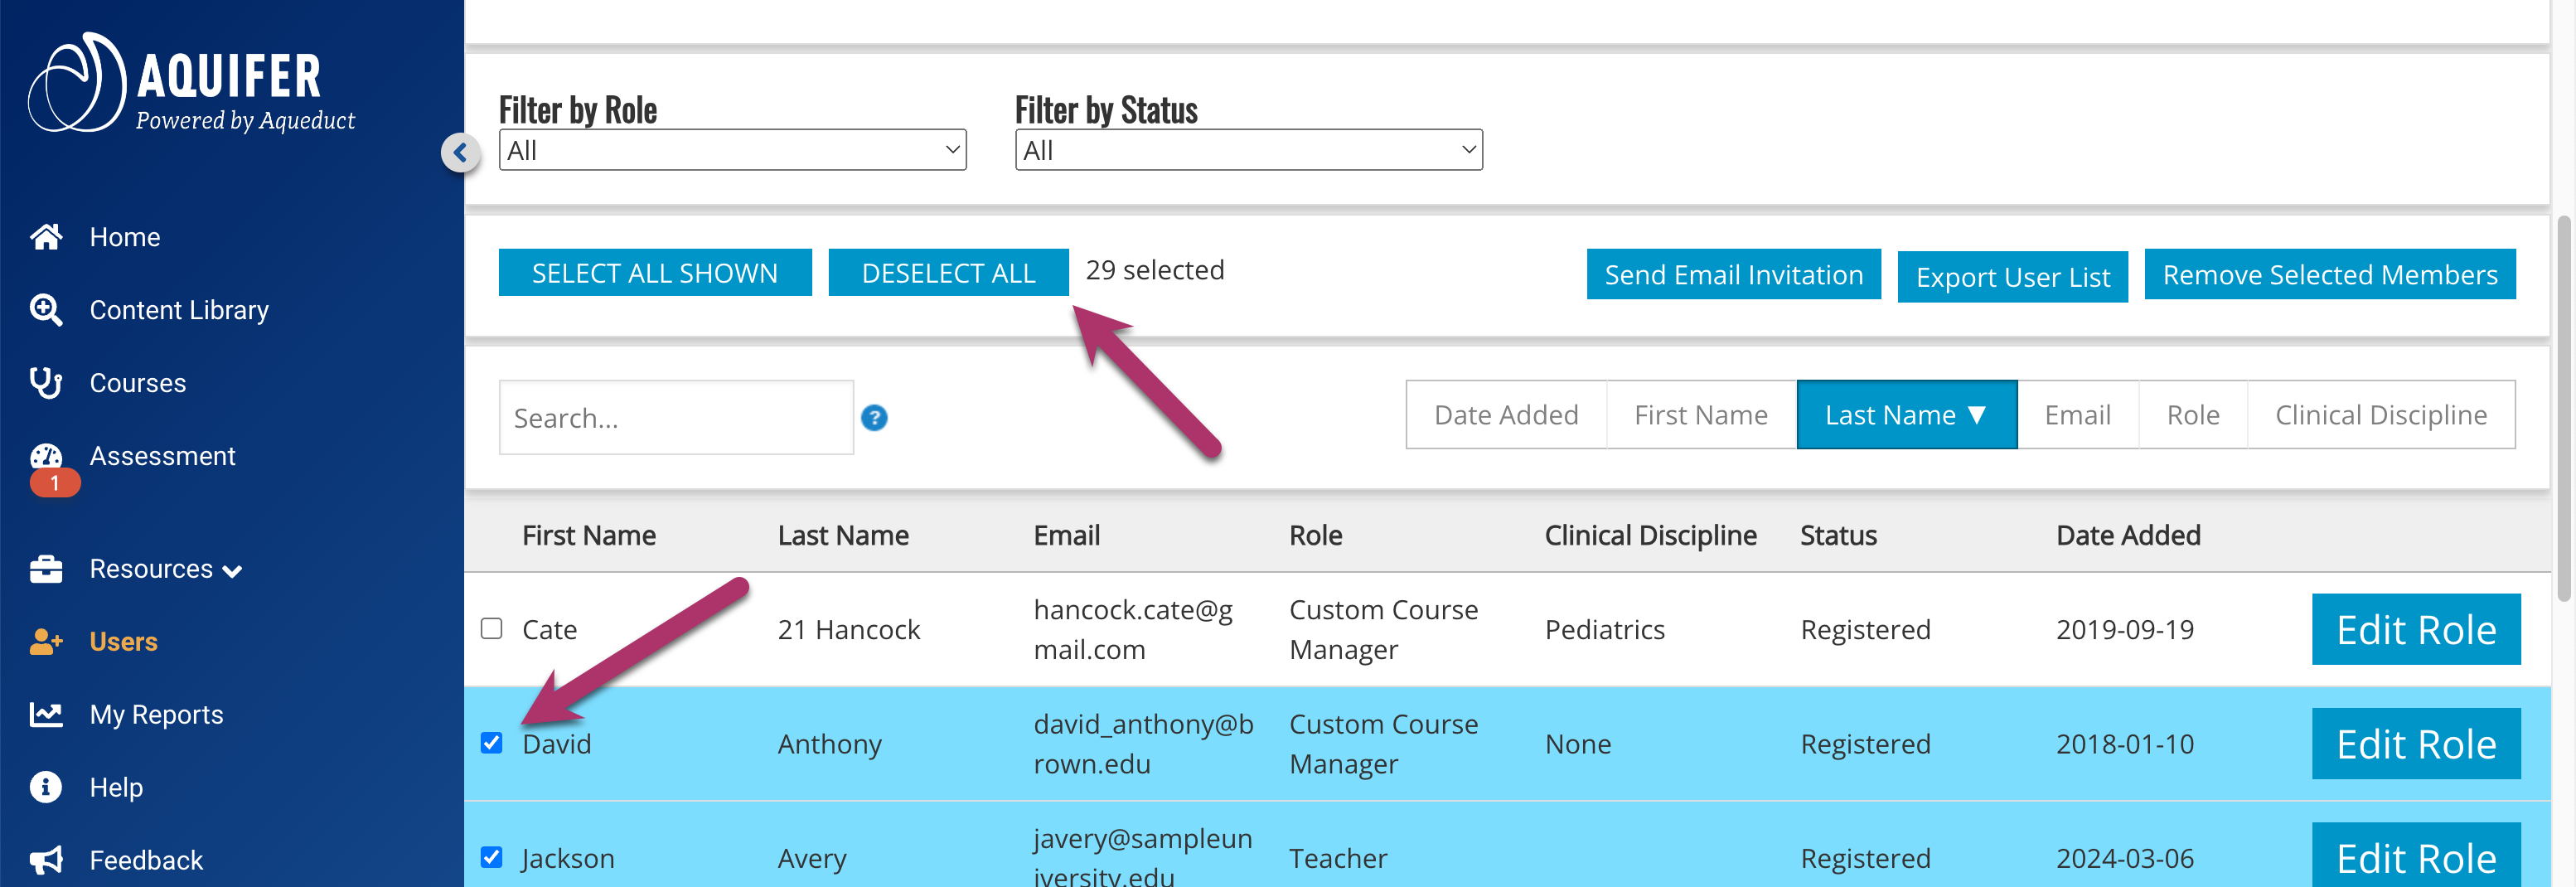
In order to use the administrative user management tools, you will need to select a user, or group of users, you wish to manage. After using the filter and sort options to display the list of users as you’d like, there are two methods to select and deselect students.

  1. Use the Select All Shown or Deselect All buttons above the list.
  2. Check the box next to each administrator you wish to select. Check the box again to deselect.

Selected admin users are highlighted and show a checkmark in the box next to their name.

Selecting and deselecting administrative users

Administrative User Management Tools

Our user management tools make it quick and easy to edit and export users, or send email reminders to your unregistered users.

Changing the role assigned to an administrative user is easy.

Next to the user you want to edit, select the Edit Role button.

Edit admin user roles

This will open a page entitled Edit Role for [user’s name]. Choose the appropriate role from the drop-down menu by clicking on the up and down arrows. Click Update.

Select new admin Role

You will be directed back to the Users page for your program. A message will be open at the top of the page indicating whether or not you have successfully added users, “Group role was successfully updated.”


Note: If your program already has the maximum number of users for a role (viewed form the main user panel), you will not be able to add additional users in that role. Please contact Aquifer support for assistance.

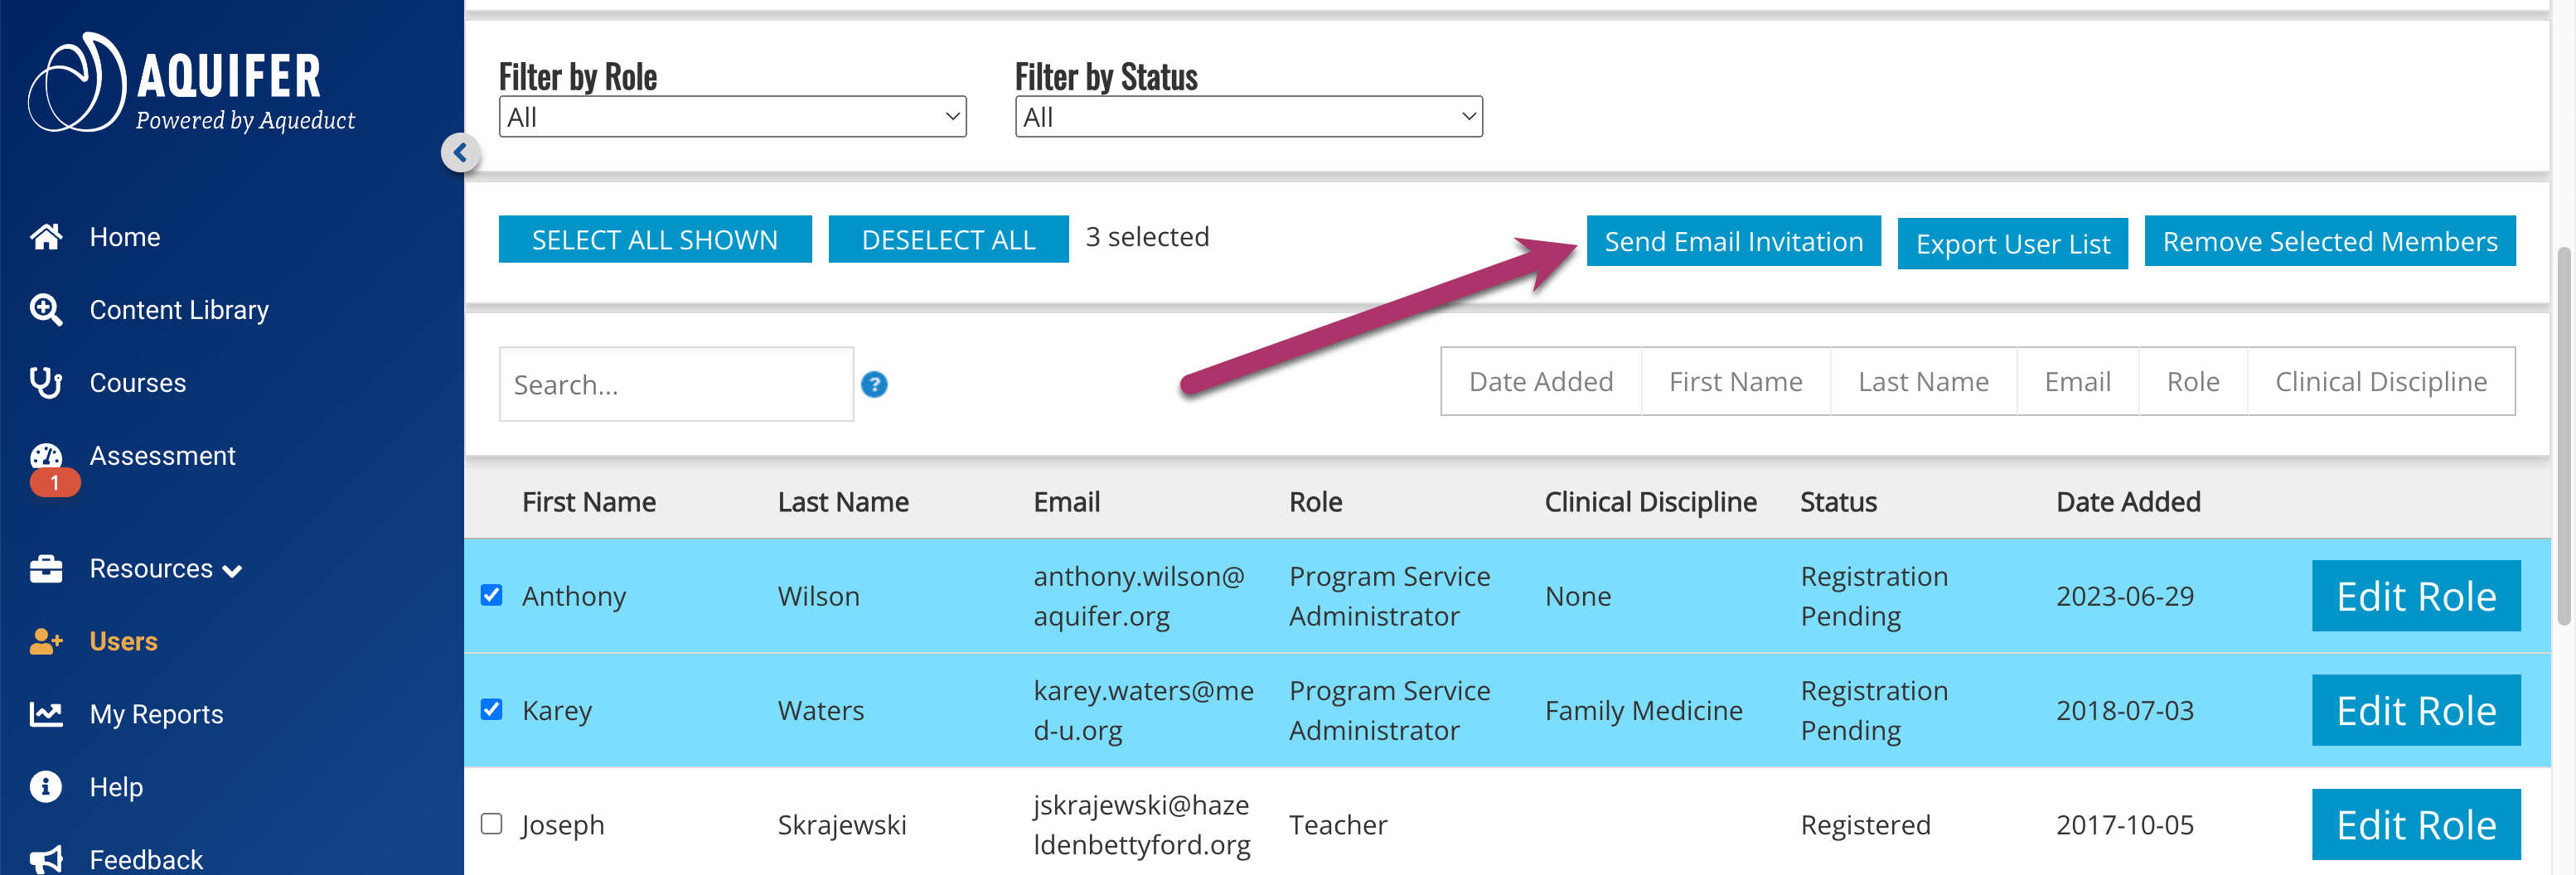
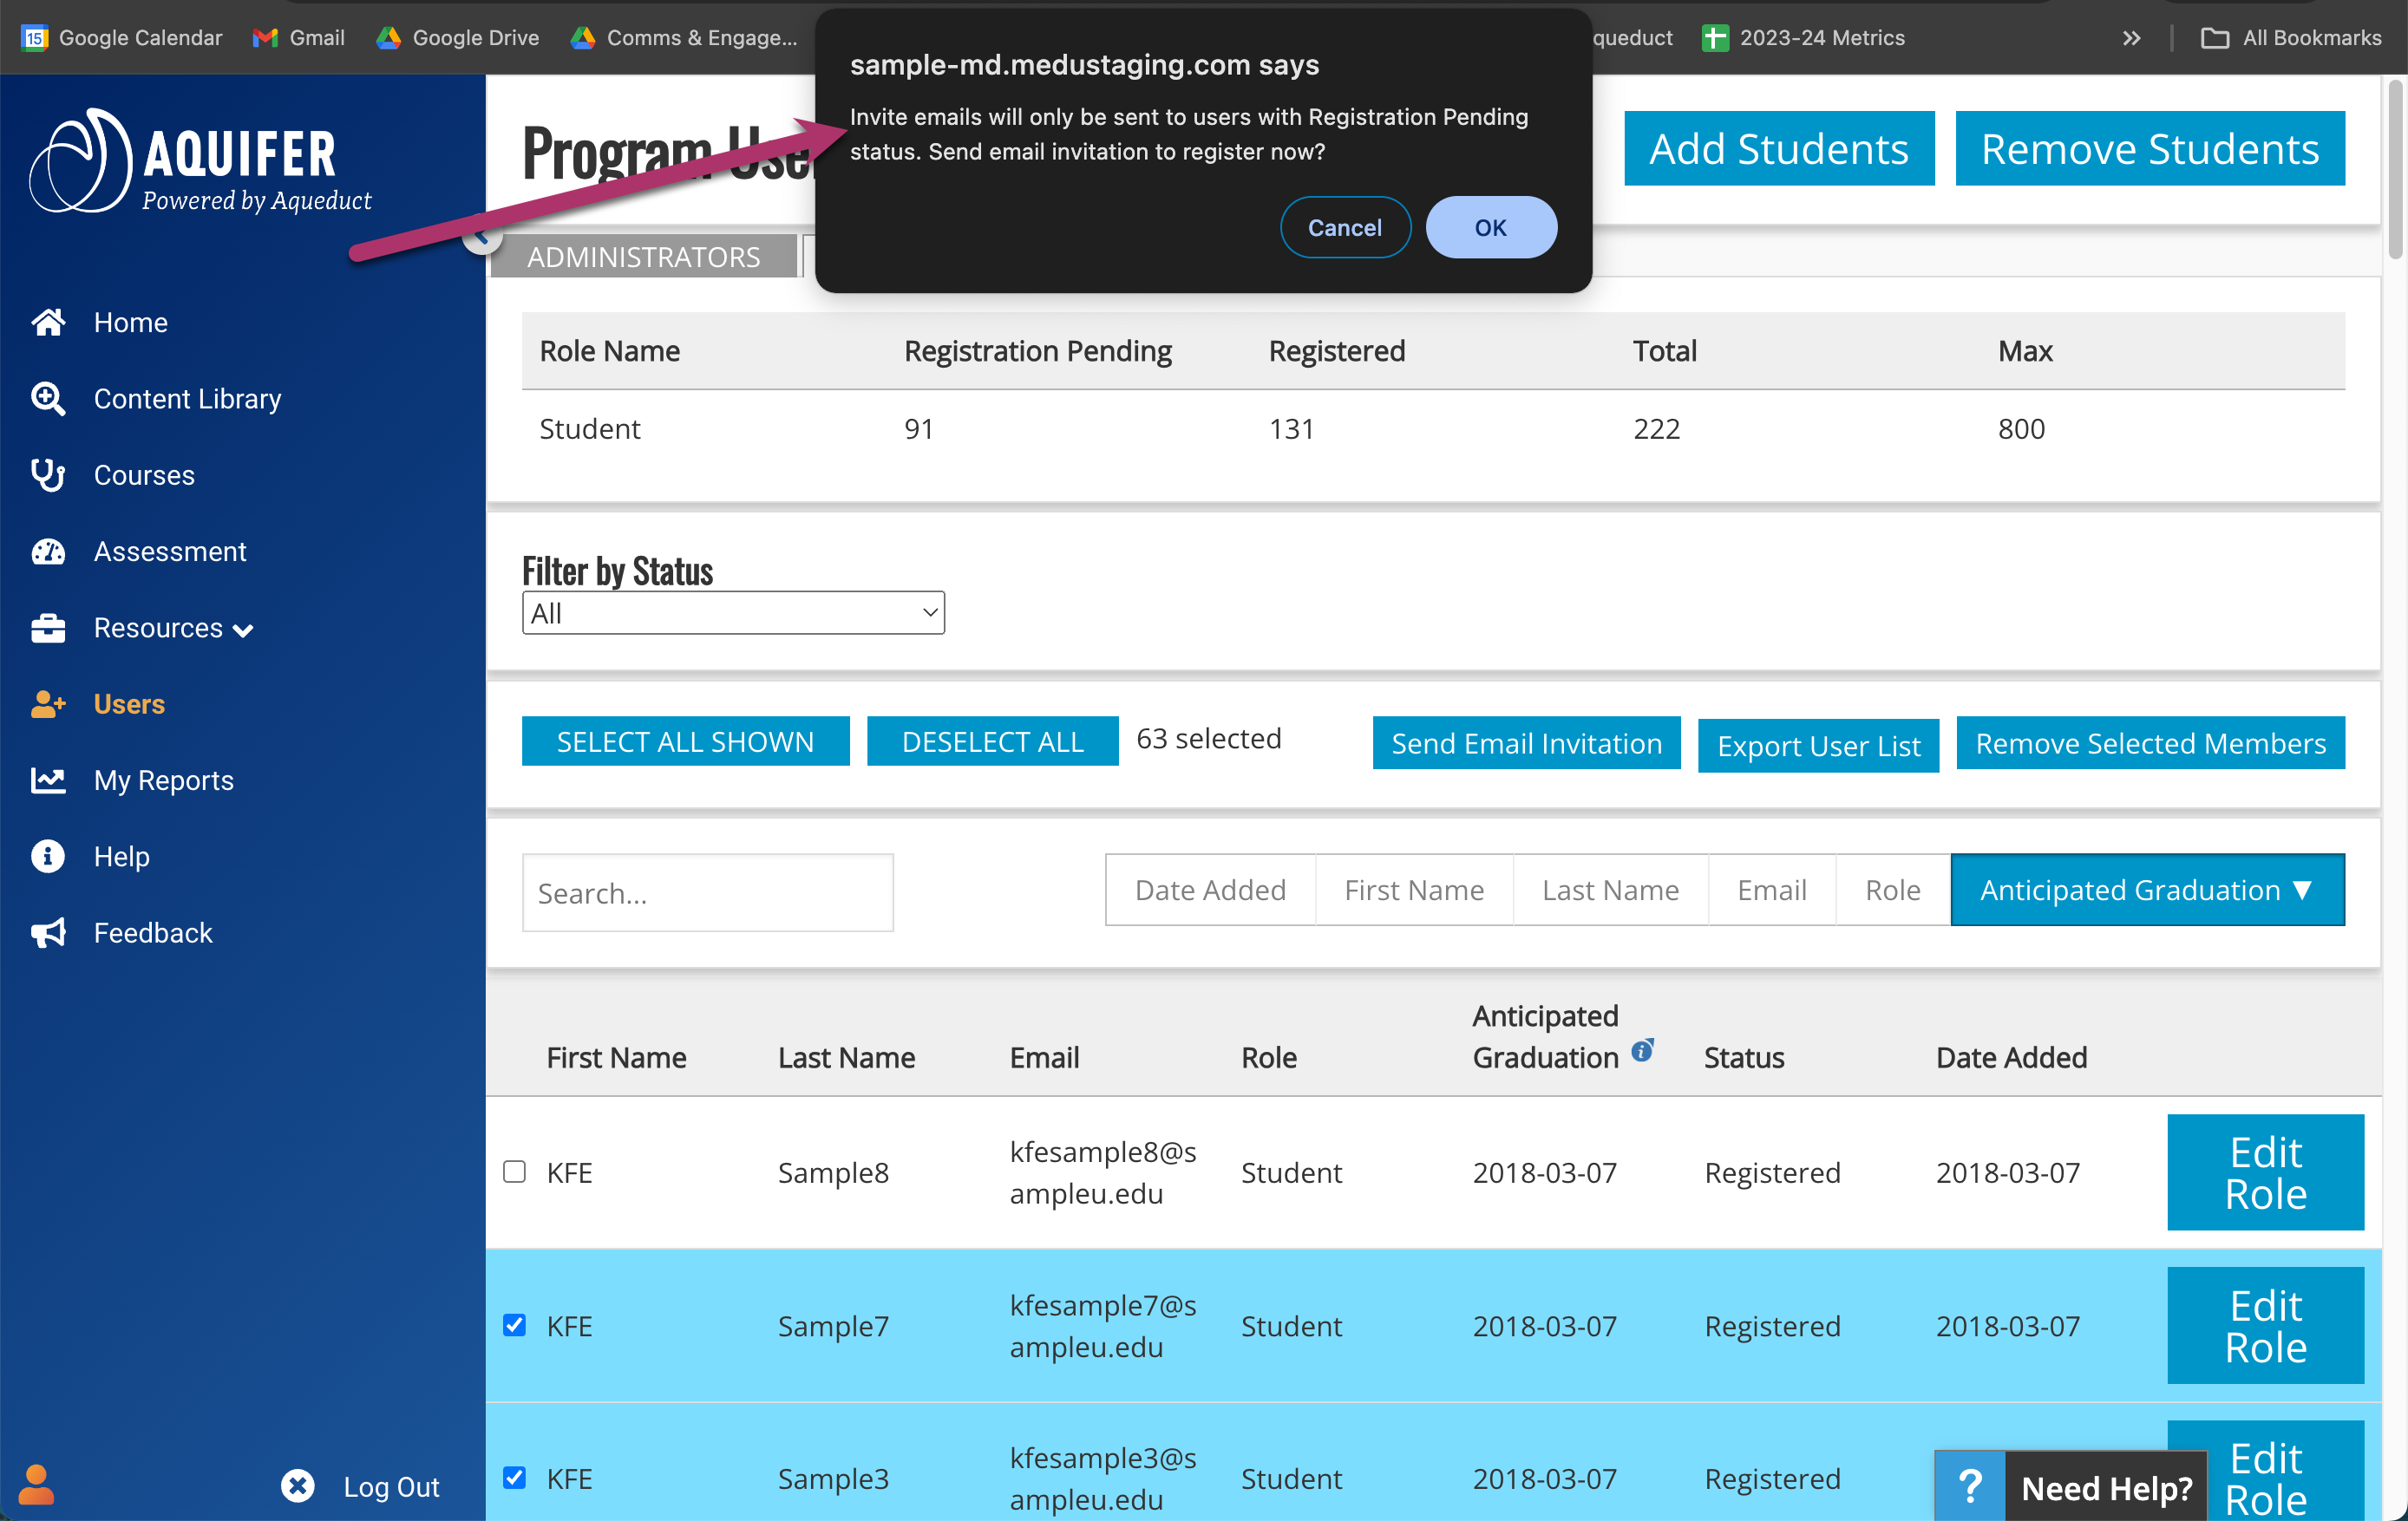
Email invitations can be sent to administrative users with a Registration Pending status at any time. Please note that all admin users automatically receive an email invitation when they are initially added to the program. You may wish to send reminders to administrators who have not signed in to access your course after a few months, or a period of time that fits with your program’s schedule.

Email invitations will ONLY be sent to users with a Registration Pending status.

To send an additional email invitation, select the users you wish to email, and click the Send Email Invitation button.

Select and Send Admin Email Invitation

You will receive a pop-up prompting you to confirm that you wish to send an email to the selected users. Click OK to continue sending the email invitation.

Registration pending pop up

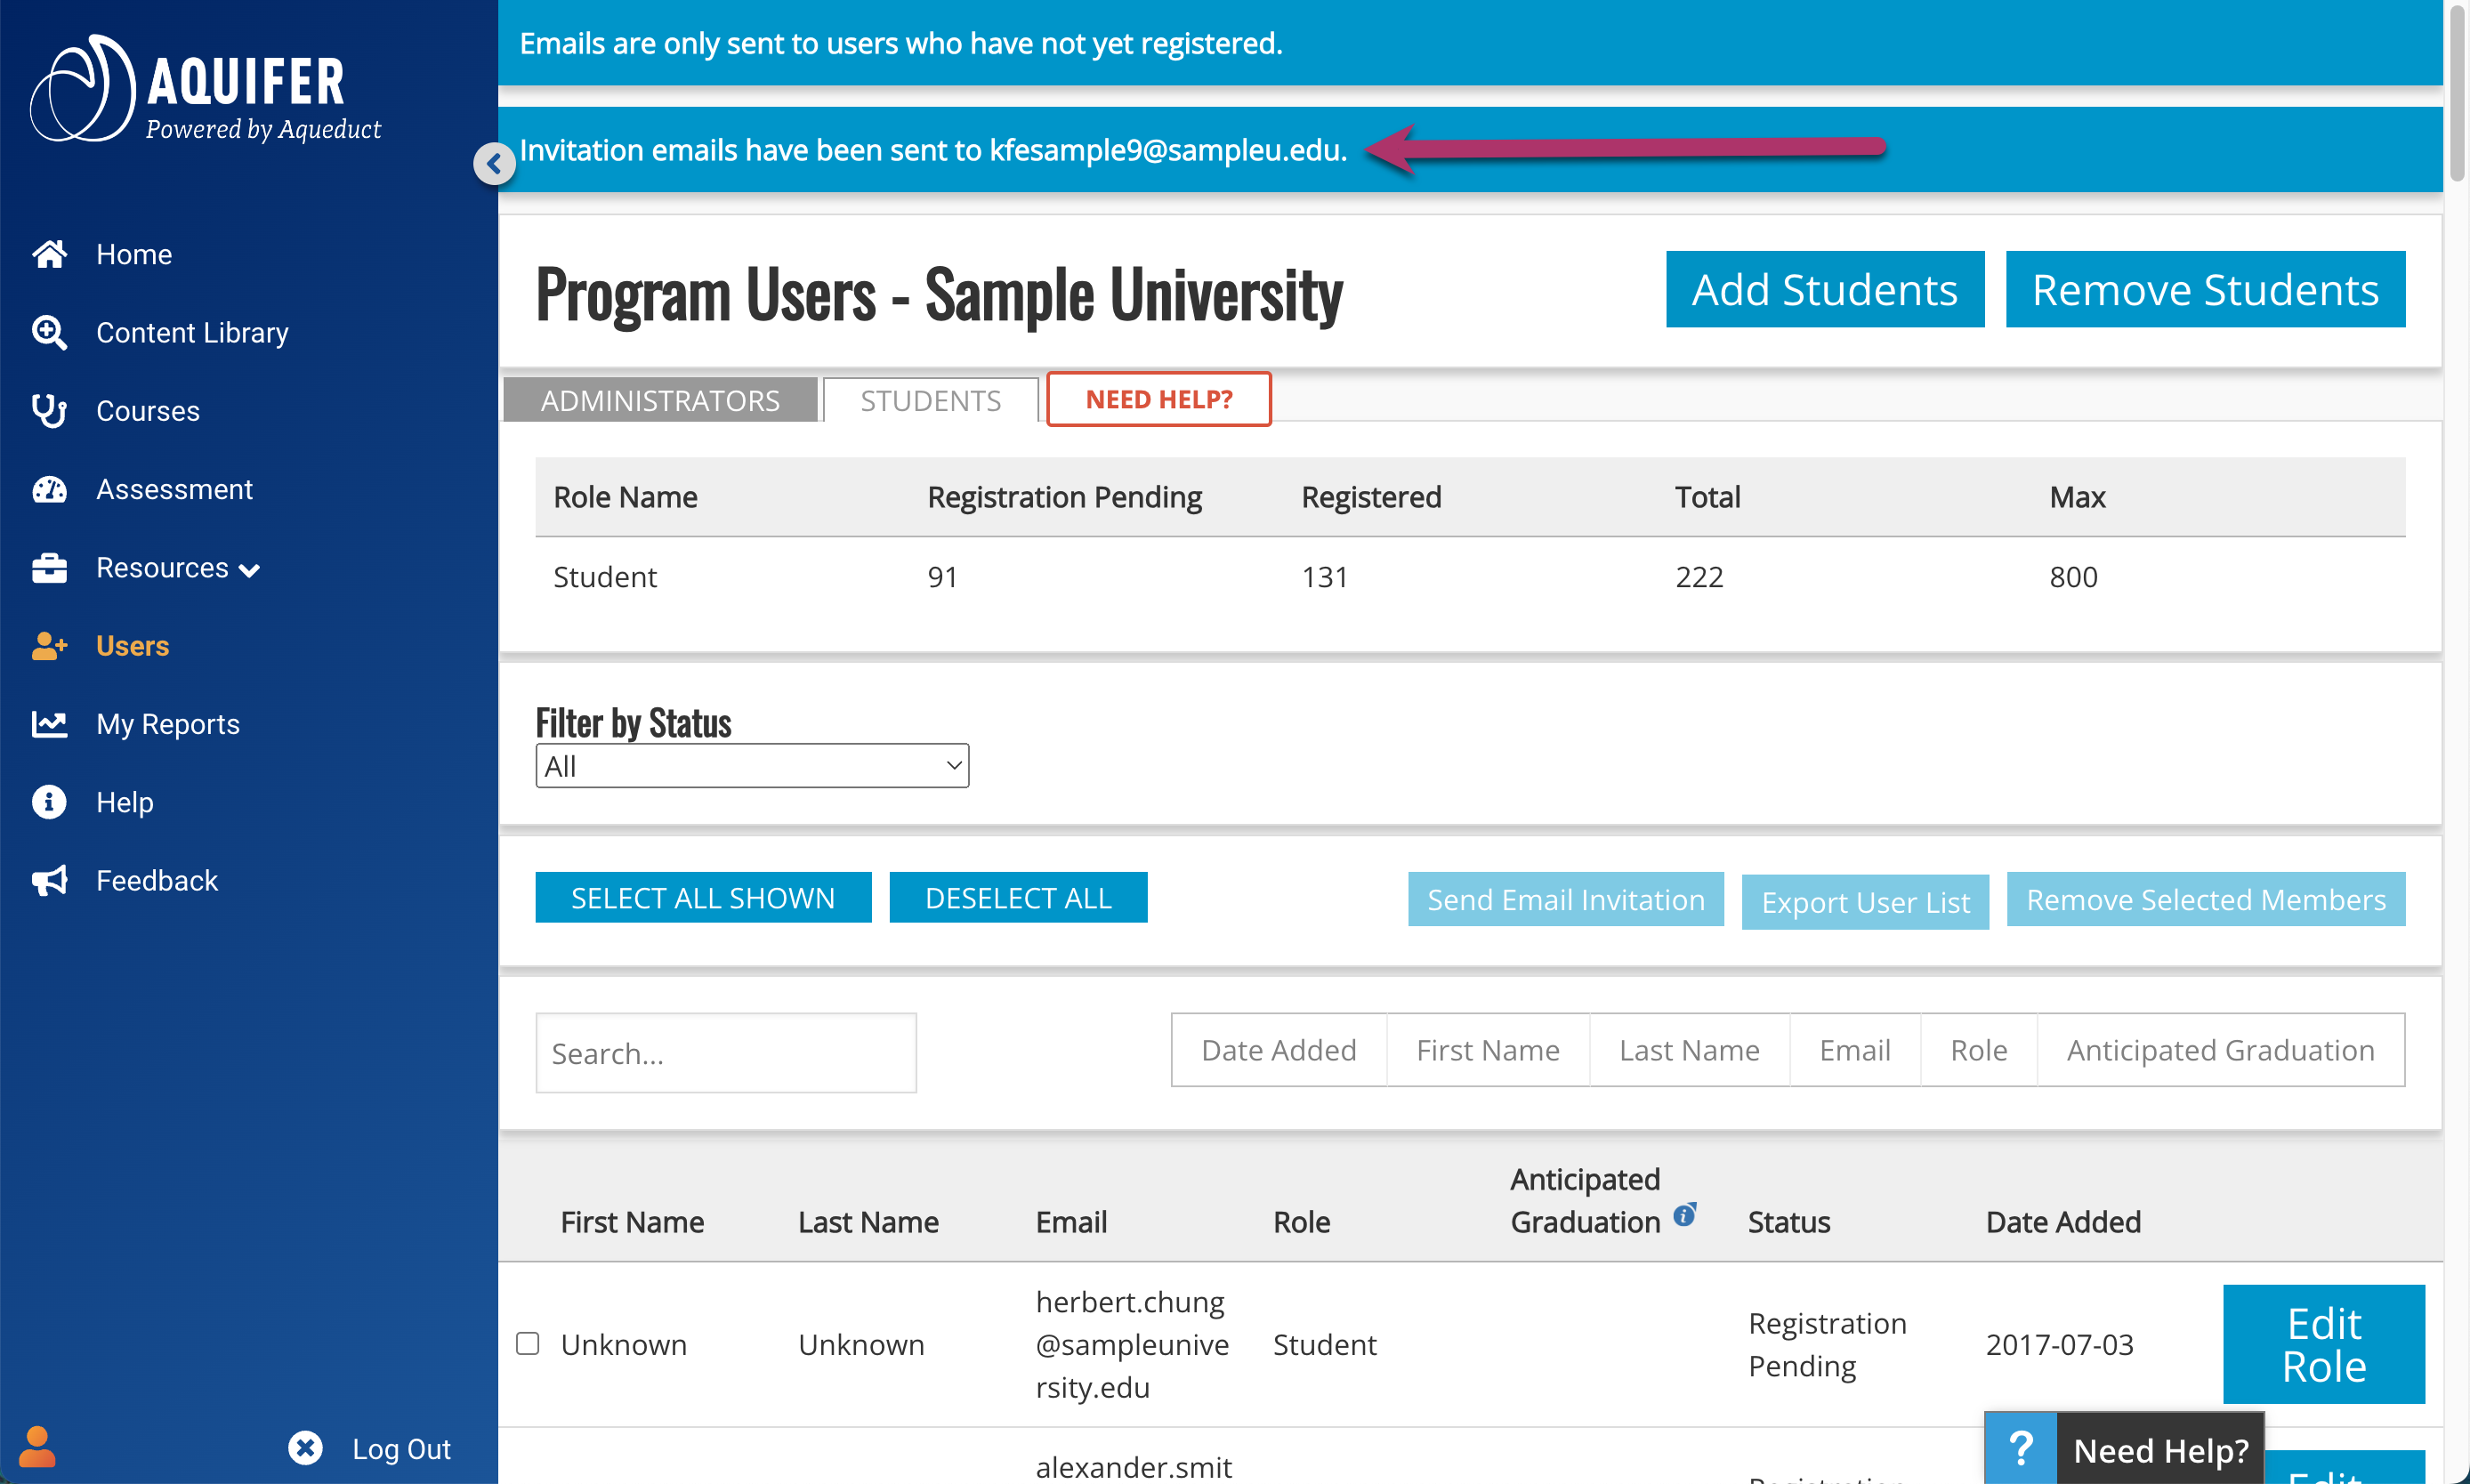
After emails are successfully sent, you will see a confirmation note in the light blue box at the top of the page.

Invitation emails sent

Please note: Emails will not be sent to users with an Active status. If you select users with a mix of statuses, emails will be sent to only those who have not yet registered. After clearing the pop-up, the message at the top of your screen will show which emails were sent to users.

To export a list of users to a csv file, select the admin users you wish to export and click the Export User List button. Your browser will direct you to download and save the csv file for your use.

Export User List

Removing Administrative Users from Your Program

Removing admin users from your program will discontinue their access to your Aquifer courses and reporting. There are two ways to remove admin users from your program.

To batch remove admins using a list of email addresses, click the Remove Admins button at the top of the page.

Remove Admins Button

On the Batch Remove Administrators from Program page, add emails (comma separated) for the users that you wish to remove from your program and click Remove Administrators.

Batch Remove Admins Add Email

You will receive a pop-up message asking to confirm the removal of the listed administrators. Click OK to confirm that you wish to proceed.

Confirm Remove Admin

After the process completes, you will see a confirmation in the light blue notification bar at the top of the page.

Admin users removed confirmation

You can also remove administrators by selecting them from the user list, and clicking on the Remove Selected Members button. The options for sorting and filtering your user list allows for efficient use of this method for removal.

Remove Selected Members

You will see a pop-up notification asking you to confirm deleting the selected users. Click OK to continue.

Confirm Remove Admins Pop-Up

After the process completes, you will see a pop-up confirmation.

Users Removed Confirmation

Once administrators are removed from a program, they are no longer able to access Aquifer courses or reports.

Engaging Your Faculty with Aquifer

With Aquifer you can tell your busy teachers to relax–you’ve got the core content covered! Now they can do what they love best: teach about patients, observe students’ skills, provide useful feedback, and mentor students’ professional development.

Realizing the full value of Aquifer occurs when students blend their learning from our cases effectively into their foundational knowledge and clinical experiences. Your clinical faculty, community-based preceptors, didactic faculty, and teaching residents provide invaluable opportunities for this cognitive integration to occur.

Eight Great Tips for Teaching with Aquifer

We offer a variety of password-protected access options:

  • Student-level access: Includes card-by-card case navigation with a case summary provided upon case completion. All faculty, community preceptors, and residents who share your institutional email address may self-register for all of the courses to which your institution subscribes.
  • Teacher access: Includes open case navigation, access to the case summaries, and to the case search feature of the Aquifer website. Contact your institution’s Aquifer Program Service Administrator or Curriculum Administrator to authorize access.

Our case summaries provide an in-depth review of each case––the learning objectives, the differential and final diagnosis, and key teaching points. All of the summaries are available to registered instructors in the relevant Aquifer course. Encourage your faculty and residents to:

  • Familiarize themselves with the Aquifer cases that are common to their practice setting.
  • Incorporate relevant Aquifer case content into their didactic session.

Our site is optimized for mobile access, making teaching on-the-fly easy. Your teachers may quickly find relevant cases or case content through our powerful search feature found on the Courses page.

  • Website search (open to the public): Searches the Aquifer site for relevant content, including the virtual patient presenting problems. Preceptors and residents can encourage students to complete Aquifer cases just prior to or following clinical patient encounters.
  • Case search (available to registered instructors only): Searches the virtual patient cases themselves, identifying all relevant content and multimedia within the cases and case summaries. Preceptors and residents can dive into the cases at a moment’s notice, drawing immediately from the rich resources that the cases provide.

Encourage your clinical teachers to visit our Educators page and use our integration resources to:

  • Compare and contrast the presentation of Aquifer cases to students’ patients.
  • Draw from the wide array of available multimedia resources and Web links for use in their own teaching.
  • Employ the Aquifer clinical reasoning structure to frame and expand patient work-up and management discussions.
  • Use the case analysis tool to work through an Aquifer case together––or apply the tool to a challenging patient presentation.
  • Apply the Aquifer summary statement rubric to students’ real-time case presentations.

Residents can be unsure in their new teaching role. Remember––they probably completed the cases as students themselves! Now they have access to the instructor resources. Urge them to draw from the cases they found most useful, and to use Aquifer’s Educator Resources as a way to get started.

Clinics get busy. Admissions mount. Faculty and residents struggle to balance it all. Students worry about finishing this week’s cases. Problem solved! Increase your teacher and student satisfaction by letting them know it’s OK to give students some time to work on the cases when the day gets out of hand. How often is it that easy?!

Decrease lecture time and increase active learning in your course or clerkship when you integrate Aquifer content into faculty or resident teaching sessions.

  • Align required case completion with your course didactic sessions––and cut down the need for your faculty to lecture. Ask them to do a chalk talk instead: We guarantee the students will enjoy it a lot more.
  • Expand on Aquifer content about the competencies that are more effectively taught in face-to-face discussions, including communication skills, professionalism, cultural competency, and systems-based practice.
  • Create active learning sessions––such as team-based learning or flipped classroom sessions––that require students to problem-solve and apply lessons they have learned from working through the virtual cases.

Educators have reported a number of innovative methods for expanding on Aquifer content––taking student satisfaction and clinical learning to a higher level:

  • Clinical reasoning assignments: Create and solve new “what if” scenarios built off of our virtual patients.
  • Patient safety and quality improvement exercises: How would you measure the quality of the care received by an Aquifer patient?
  • High fidelity simulation exercises: Create scenarios that make our virtual patients take a turn for the worse.
  • Standardized patient sessions: What would happen if this Aquifer patient could talk?

Aquifer Pediatrics Active Learning Modules

Aquifer Pediatrics Active Learning Modules are application exercises designed for educators to use with their students in small or large group settings. These modules have been thoughtfully prepared with the aim of minimizing teacher preparation time and maximizing learner achievement.

What is an Active Learning Module?

An active learning module is a type of facilitated student-centered learning session that promotes students’ ability to apply core concepts and information learned from pre-session assignments to new and more complex scenarios. Active learning modules typically consist of between one and three case vignettes, or “application exercises,” each followed by one to four questions that stimulate the student to combine and apply the learned concepts in new ways. Each question requires the students to do one or more of the following:

  • React to a clinical scenario
  • Interpret laboratory or other diagnostic data, or
  • Respond to other previously unseen information

Students should then have to make a specific choice or create a specific answer to the question.

Answers to these questions should not be found in the pre-assigned Aquifer Pediatrics cases (or in any other resource assigned in the pre-lesson homework), and can only be answered by synthesizing and applying the information learned to reach a single best answer.

Students should be expected to make decisions and use their judgment.

Application exercises simulate authentic clinical scenarios—with appropriate ambiguity and uncertainty—and allow each student or student team to reasonably select a different “best answer” provided they are able to support their answer with reasonable arguments based on the concepts provided in the cases and other advance preparation assignments.

Active learning modules can be used for:

  • Flipped classrooms
  • Team-based learning
  • Small group sessions

Using the Modules

There are currently active learning modules for:

  • Pediatric immunizations
  • Fever
  • Prescription writing/Patient safety
  • Child development: Identifying and classifying speech delay
Each module contains:
  • A detailed facilitator’s guide: This guide is designed to allow the course director to map the learning objectives to the course curriculum and to understand the expected learning outcomes. In addition, it is designed to provide the granular teaching points and higher order structure needed to allow an instructor novice to use the information to teach a session successfully.
  • Pre-session homework assignments: One to three Aquifer Pediatrics cases will be assigned in preparation for the session. Additional reading requiring less than 30 minutes of preparation will also be assigned.
  • Individual and group readiness assessment questions: A series of questions to administer to the students at the beginning of the learning session in order to hold the student accountable for the assigned pre-reading. If using team-based learning, the questions will then be repeated as a group.
  • Core concepts: Core concepts are the building blocks of clinical decision-making. They are the concepts that allow students to tackle novel clinical scenarios. These are the concepts that we want students to take away from the session.
  • Specific learning objectives: The learning objectives are the measurable outcomes for how a student demonstrates mastery of the core concepts.
  • Application exercises (in both PowerpointTM and pdf formats): The application exercises are complex clinical scenarios that stimulate students to apply the core concepts that they have learned through their pre-reading. They should require students to work together to come to a solution.

Where to Find the Active Learning Modules

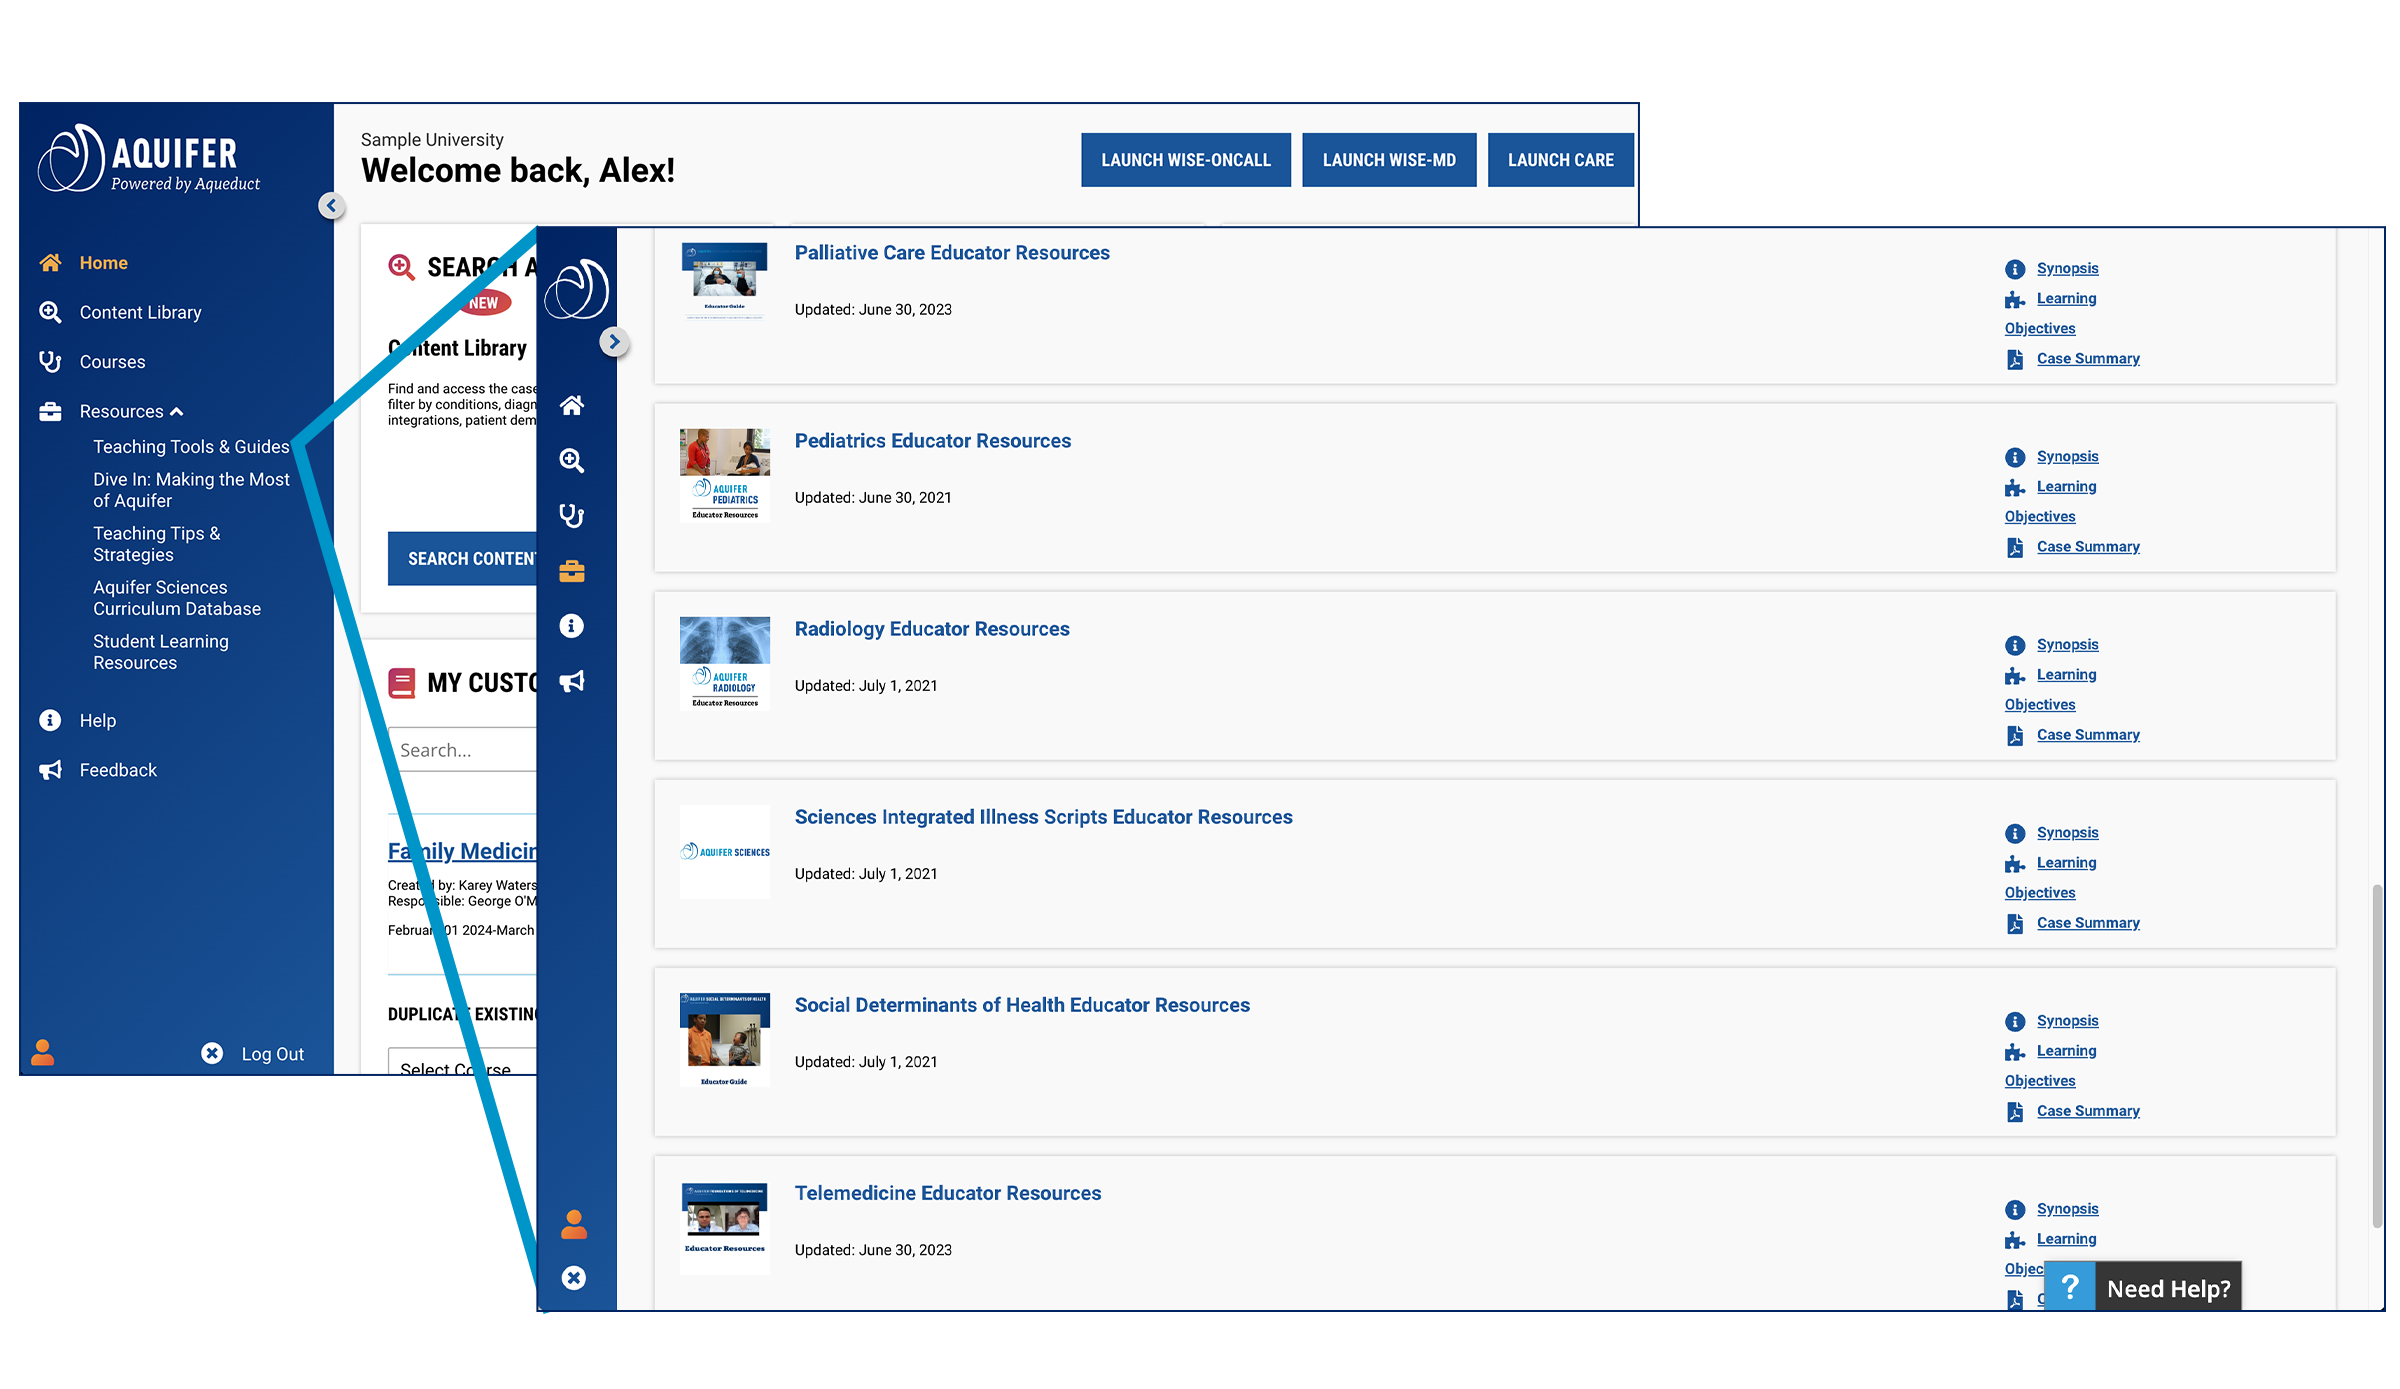
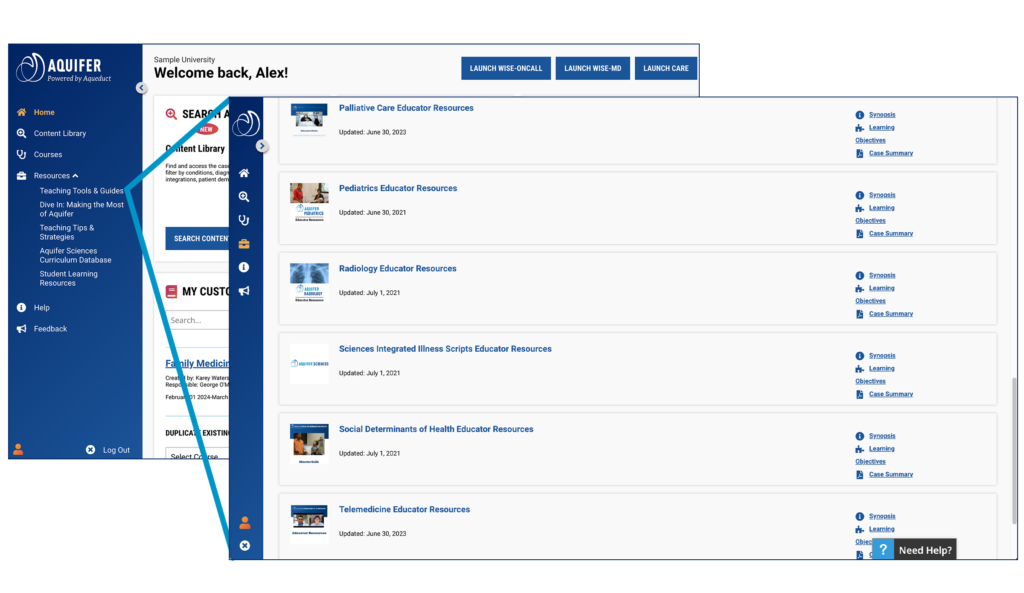
The Pediatrics Active Learning Modules are available to educators and administrators with current subscriptions to Aquifer Pediatrics or Aquifer Family Medicine. To access this resource, sign in to Aqueduct and open the resources tab on the left-hand side of the screen. Click on “Teaching Tools and Guides.” The Active Learning Modules are available for download in the Pediatrics Educator Resources section.

Aquifer Radiology Flipped Classroom Workshops

Enhance your students’ knowledge about radiology through Aquifer’s interactive Radiology Flipped Classroom Workshops. These modules were developed by a group of nationally recognized radiology educators and shown to influence student learning.


Included with your Aquifer Radiology subscription:

Flipped Classrooms are meant to be interactive learning sessions with the students (in a non-threatening setting for student participation) to reinforce materials covered in the case. Students like the Flipped Classrooms as an alternative to didactic lectures. It also gives them the opportunity to ask facilitators about any problems they had with the case.

There are 18 Flipped Classrooms corresponding to 18 Aquifer Radiology modules and Educator materials available on how to use Flipped Classrooms, what the concept of Flipped Classrooms entails, and how to implement them (video demonstrations, references, etc.). This is a great resource if you have never used the Flipped Classroom or are unfamiliar with the concept.

All Flipped Classroom cases have excellent radiographic examples, pertinent annotations, and are appropriated to the materials covered in the case. All modules are in PowerPoint format, with material embedded in the Notes of PowerPoint. This information is provided to the facilitator for each PowerPoint slide (what questions to ask students, the answers to the questions, what learning points to emphasize, etc.). This is not visible to the student when projected on the screen in PowerPoint. This allows any facilitator (from resident, fellow, to staff radiologist) to facilitate a great interactive session. Providing questions (and answers) to the facilitators should make them comfortable doing these sessions. Of course, the facilitator can ask own questions, etc. The notes are meant to provide a guide to the facilitator.

Educators can choose to add some of their own cases, delete examples, etc. It is essential that the student complete the Case prior to the Flipped Classroom. The Flipped Classroom reviews the pertinent learning materials using radiographic case examples. It is meant to be an interactive learning session with student participation. They are designed to last 60-90 minutes.

Documentation of teaching is important in many medical schools for faculty evaluation and promotions. Faculty who use these prepared Flipped Classrooms can document teaching time with medical students. Some medical schools will require a student evaluation of the presenter and this can be done by each institution’s policy.

Aquifer Radiology Cases and Flipped Classroom Workshop resources can be used to “Flip” your classroom, and make precious instructional time more productive and valued.

  1. Educator resources include:
    • Flipped Classroom pedagogy concepts
    • 18 Aquifer Radiology Flipped Classroom Workshop files
    • Video demonstration of Radiology Flipped Classroom
    • Pointers to implement your own Flipped Classroom teaching
    • References (links, including to the Aquifer grant supported work by O’Connor EE, Fried J, McNulty N, Shah P, Hogg JP, Lewis P, Zeffiro T, Agarwal V, Reddy S. Flipping Radiology Education Right Side Up. Academic Radiology, published online April 7, 2016. doi:10.1016/j.acra.2016.02.011. PMID: 27066755. This effort won the 2017 AUR Herbert M Stauffer Award for Best Educational Paper published in Academic Radiology in the year 2016

Aquifer Radiology Flipped Classroom Workshops:

    • Can be completed in a 60-90 minute session
    • contain excellent case images and annotations, chosen to emphasize learning outcomes in the corresponding Aquifer Radiology online case
    • are in PowerPoint format
    • flexible for educators’ adjustment to needs specific to their setting
    • include facilitator guidance for what to ask (with correct answers), what to emphasize, and active learning tasks to use for interactive classroom engagement in each workshop
    • lower the barrier for recruiting medical student educators, including radiology residents, who need teaching to fulfill program ACGME requirements
    • Promote far transfer of learning by providing opportunity for learners to APPLY what they learned from the online Aquifer Radiology cases to new examples

Outcomes with Aquifer Radiology Flipped Classroom Workshops:

  • Depend on prior student completion of the Aquifer Radiology online case
  • Ease documentation of faculty & resident teaching activity
  • Students love the Flipped Classroom as an alternative to traditional lecture-based didactic instruction
  • Interactive aspect of instruction cultivates better teaching-learning partnerships, as students are empowered/required to interact with instructors, unlike in lectures

Where to Find the Flipped Classroom Workshops

The Radiology Flipped Classroom Workshops are available to educators and administrators with current subscriptions to Aquifer Radiology. To access this resource, sign in to Aqueduct and open the resources tab on the left-hand side of the screen. Click on “Teaching Tools and Guides.” The Flipped Classroom Workshops are available for download in the Radiology Educator Resources section.

Case Analysis Tool

The Aquifer Case Analysis Tool is a structured worksheet to be completed by the student as they work through an Aquifer case, designed to enhance the development of clinical reasoning skills. Although built for Aquifer Pediatrics, the Case Analysis Tool can also be used with Aquifer Family Medicine, Internal Medicine, and Geriatrics cases.

The Case Analysis Tool also includes:

  • A complete Clerkship/Course Director’s Guide to using the tool
  • A suggested grading rubric
  • Answer keys for many Aquifer Pediatrics cases

The case analysis tool is a simple and elegant way to assist in the teaching of the clinical reasoning process as well as measure students’ learning from Aquifer virtual patient cases. Students’ performance using the structured tool clearly shows not only their understanding of the case material but also their developing knowledge of how diagnostic and management plans are derived. Furthermore, use of the tool enhances students’ learning experience by facilitating direct communication and individualized feedback.


How it Works

A staged process parallels the structure of the cases themselves, as well as the process by which clinicians assess patients. Using the validated case analysis form, the student captures specific requested information in sequence as she/he works through the case:

  • Epidemiology/patient profile,
  • Prioritized problem cues from the patient’s history and physical exam,
  • A problem statement,
  • A differential diagnosis, with each diagnosis supported by specific history and physical exam findings, and
  • A diagnostic and treatment plan, with a rationale given for each step.

The case analysis tool perfectly complements the clinical reasoning features of the cases, taking students’ ability to problem-solve to the next level. Students appreciate producing tangible results of their developing skills to use in discussion and feedback sessions. A few educators have even found it useful for helping students organize their thoughts about their non-virtual patients!

The case analysis tool was developed to accompany Aquifer Pediatrics, but may also be used in conjunction with Aquifer Family Medicine and Aquifer Internal Medicine cases. Answer keys are currently available for most of the Aquifer Pediatrics cases.

The case analysis tool was developed for the pediatric clerkship at Rush Medical College and validated through a joint project between Aquifer and Rush Medical College. Keith Boyd, MD, and Sharon Sholiton, MD, of Rush created a case analysis tool for use with Aquifer Pediatrics cases that provides an assessment tool to evaluate student learning from Aquifer Pediatrics cases. The validation project, funded and managed by Aquifer and led by then Aquifer Pediatrics Editor-in-Chief Sherilyn Smith, MD, further developed the tool to ensure that it accurately discriminates between those who understand the case content and can apply that knowledge in a structured assessment from those who cannot.

As the student works through each case, use of the tool facilitates the development of clinical reasoning skills by clearly delineating the steps involved in the patient evaluation and clinical care through the following steps:

  • The student identifies and documents pertinent data obtained via history and physical exam, and then succinctly summarizes the key information into a problem statement.
  • This focused patient assessment then drives the development of a prioritized differential diagnosis.
  • Finally, the student generates an initial diagnostic and treatment plan.
  • This staged process parallels the structure of the cases themselves, as well as the process through which clinicians assess patients. Using the tool requires the student to develop independent learning skills and allows the clerkship director to assess his/her clinical reasoning process and provide individualized feedback.

Where to Find the Case Analysis Tool

The Case Analysis Tool is available to educators and administrators with current subscriptions to Aquifer Pediatrics or Aquifer Family Medicine. To access this resource, sign in to Aqueduct and open the resources tab on the left-hand side of the screen. Click on “Teaching Tools and Guides.” The Case Analysis Tool is available for download in the Pediatrics Educator Resources section.

Learn More

Read our blog post on how to effectively use the Case Analysis Tool in your course or clerkship.

Using Aquifer Content in Team-Based Learning

Team-based learning (TBL) is an instructional method that fosters a more thorough understanding of concepts versus memorization of facts. Utilizing group work to promote active learning, TBL encourages learners to apply core content knowledge to work through exercises as a team.

Learners actively engage with the TBL format as each team member is held accountable not only to an understanding of the core material but also to contributing to the overall team and in-class discussions.

In the TBL method, learning occurs primarily from team members justifying their answers to each other through the use of application exercises and/or quiz type questions, while faculty serves as content experts. TBL takes advantage of the fact that the collective wisdom of a group exceeds that of each individual in the group.

Aquifer cases, from a variety of courses, can be used for Team-Based Learning.

For example, Aquifer Pediatrics has Active Learning Modules and Questions for Further Consideration that can be used as application exercises. The Basic Science questions, within Aquifer Pediatrics, provide useful prompts for integration of core principles into clinical care in the context of each the Aquifer Pediatric cases. These are basic science “tools” that provide one to two-page refreshers of the scientific principles for teaching clinicians.

Similarly, Aquifer Geriatrics cases can be used for TBL, by having students open a case and work through the case questions as a team.

Resource

Team-Based Learning Collaborative

References

Michaelsen LK, Knight AB, Fink LD, eds. Team-based learning: A transformative use of small groups. Westport, CT: Praeger; 2002

Michaelsen LK, Parmelee DX, McMahon KK, Levine RE, editors. Team-Based Learning for Health Professions Education: A Guide to Using Small Groups for Improving Learning. Sterling [VA]: Stylus Publishing, LLC; 2007